We had a two day event this weekend. The bad part was that there was rain both days. Not much good for testing. However, both days I got one or two runs with substantially dry sections where I could get a feel for the high lat-G behavior.
In Grid Sunday
The runs were encouraging. Immediately before these events I installed the Tarett 5-hole front anti-roll bar and a new set of bumpstops one full-step up in durometer from the last event.
New Rear Bumpstop Stack- (Yes, I cut this pair a little short)
The car was definitely stiffer in roll and a little more bouncy than last time. The stock struts are really not up to the job with these high spring rates, but the car is still controllable, to my great surprise. I calculate the present natural frequencies at 2.10Hz front and 2.45Hz rear. I made a wild guess and set the front bar to the middle hole, planning to adjust it in between events if necessary.
I’m carrying a front spring rate of 505lb/in, which is 155 from the metal spring and 350 from the bumpstop. The rear is 745lb/in, 228 from the metal spring and 517 from the bumpstop. However, there is some uncertainty in these numbers. (For comparison, KW Clubsport coil-over springs are 400F/685R. They also have bumpstops that look pretty tall, but I have no idea what their rate is.) Note: when people normally talk about Porsche spring rates they rarely add the stock auxiliary springs (bumpstops) into the mix. When an aftermarket setup eliminates the bumpstop contribution and compares their new spring to the stock spring the result may be a misleading comparison.
I had also maxed out the rear camber and reset the rear toe to zero. I’m sure the thrust angle is wonky, but I’ll get that taken care of at an alignment shop soon.
How it Drove The car was well-balanced in both wet and dry conditions with big grip as before. It’s very encouraging that the balance didn’t change noticeably from a wet corner to a (sort of) dry corner. In spite of the difficult wet/dry/wet conditions as rain showers came through I never spun and never hit a cone. I went off-course once when the car hydroplaned straight through a deep puddle when I needed to be turning. External observers stated that the car seemed to have only very minimal roll in the corners. I think I may have been approaching the speed of the Miatas in the slaloms as I learned to trust the car and ask more of it. I hope to get some Miata data to compare to. Transient response seems very good, but not sure if it’s at Miata level.
Results Day 1 was mostly very wet, so I didn’t expect to make much of dent in the swarm of Miatas. I managed 4th of 13 in C-Street and 8th overall of 110. I was closer to the fast guys in CS in the wet than I expected. My previous experience is that a big weight difference is next to impossible to overcome in the wet, even if the amount of tire is proportional. 600lb is a big weight difference.
Day 2 we got drying conditions for our final 4 runs. I had been in the lead of CS all day, both for Day 2 and the two days combined, partly because of others’ cone trouble. In his last run of seven one of the drivers ahead of me on day one got close enough to take first for the 2-day total by 0.007s.
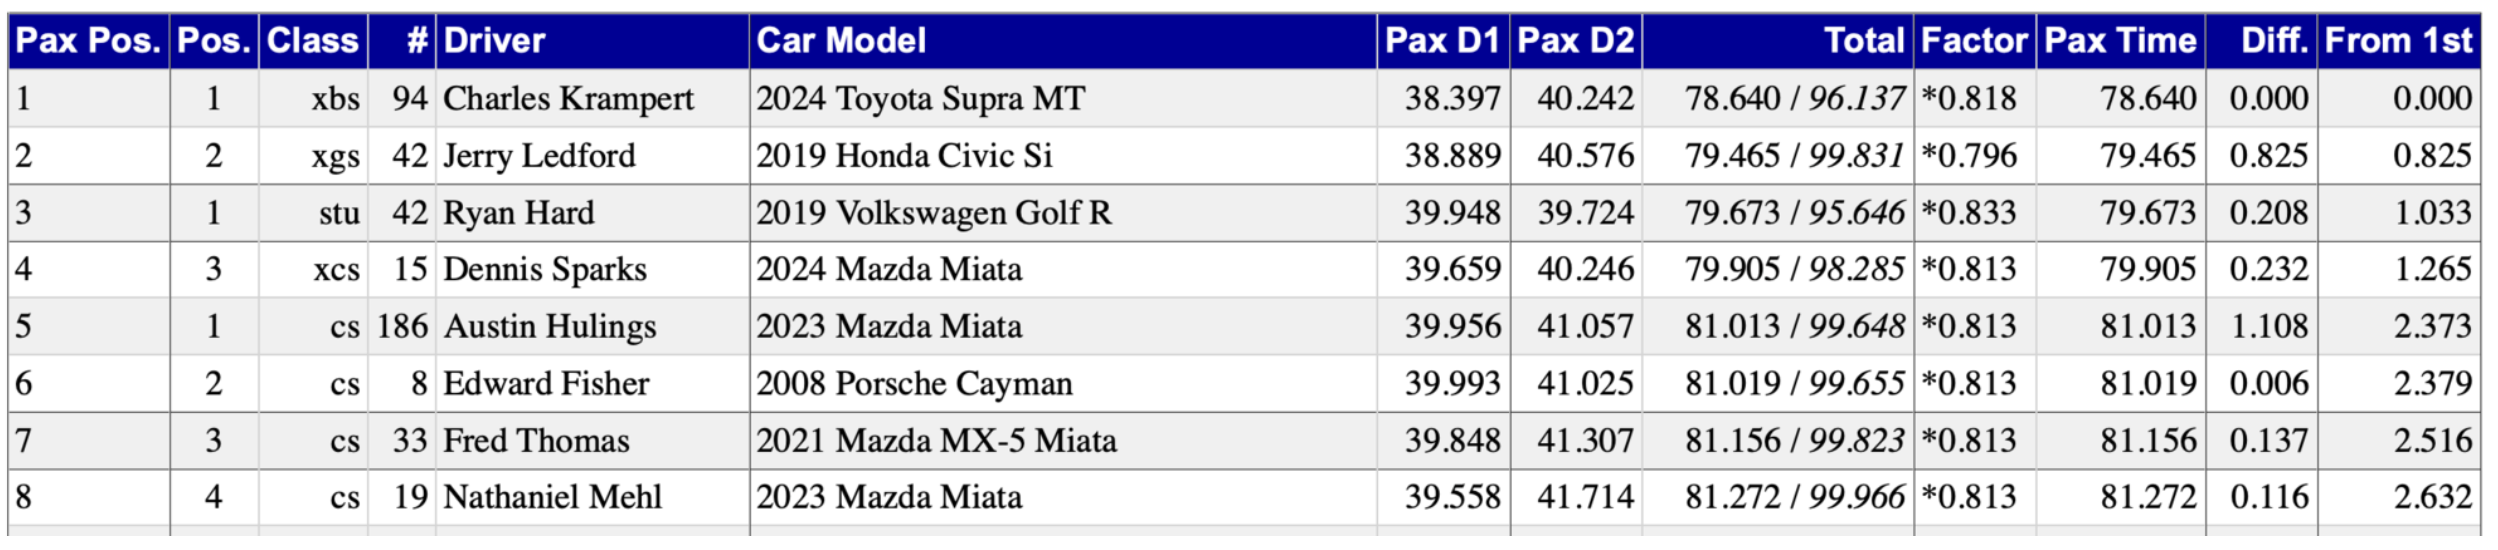
So, I ended with the fastest time in C-Street on day 2 and taking 2nd for the two days combined. Over the two days I was 6th overall. Six of the top 10 overall were C-Street drivers, with 2016 D-Street national champion Dennis Sparks leading the way in Pro class in his 2024 Miata in 4th. I’d been pretty close with him both days until he threw down on his last run and jumped ahead by a second. Dennis trophied in CS at 2022 Nats. He told me he thought it was great that I had developed an alternative to the Miata for CS. The top 8 overall positions for the two days combined are shown below. Each of the drivers in positions five through eight have now placed first in C-Street in an event this year. Note that those four were within 0.269s over two days of driving, fastest times for each day added.
2-Day Event Overall Results
Plans Except for the alignment I have no plans to change the car before the upcoming Bristol Pro-Solo and Tour events, other than some maintenance items. Instead, I’ll be working on the driver in two local events before Bristol. In the meantime I’ll be trying to figure out how to proceed with the too-long Bilstein B6’s. As mentioned in the previous post on this topic, the front struts are too long when fully extended as compared to the stock struts. I have a friend that can turn down the standard bumpstops I’ve been using so that they will fit inside the B6 lower housings. That means buying some examples and testing them after machining to determine the real spring rates. But the big thing is to either find a substitute shorter shock shaft, get the shafts shortened and re-threaded or have a spacer installed interior to the front struts to make them legal.
In between the first and second autocross I made the first suspension change: stiffer bump stops.
The difference was amazing. Ten seconds into the first run I knew that, if I continued to develop the car (and the driver) it could be competitive in C-Street against the ND2 Miatas. So. Much. Grip!
The new bump stops made a huge difference. Less roll, faster response, balance that moved toward oversteer and the biggest thing: more grip. The extra grip comes from not losing as much camber because the car rolls less. A major weakness of this car is insufficient static negative camber in the front. Well, if you don’t lose as much then you don’t need as much and peak grip is increased.
The car was easy to handle. It’s somewhat bouncy now, especially on this bumpy site, since the stock damping is now a bit insufficient for the new spring rate. I was 2nd of 11 in C-Street against the same crowd where I was 5th of 10 last time. And I was 7th pax overall of 109, a huge move up from 22nd in the first event.
I think I was a little conservative on the bumpstops. The plan is to go up one durometer step and add an adjustable front bar. The Tarett hollow 5-hole front bar has already arrived.
I’ll show you what I did.
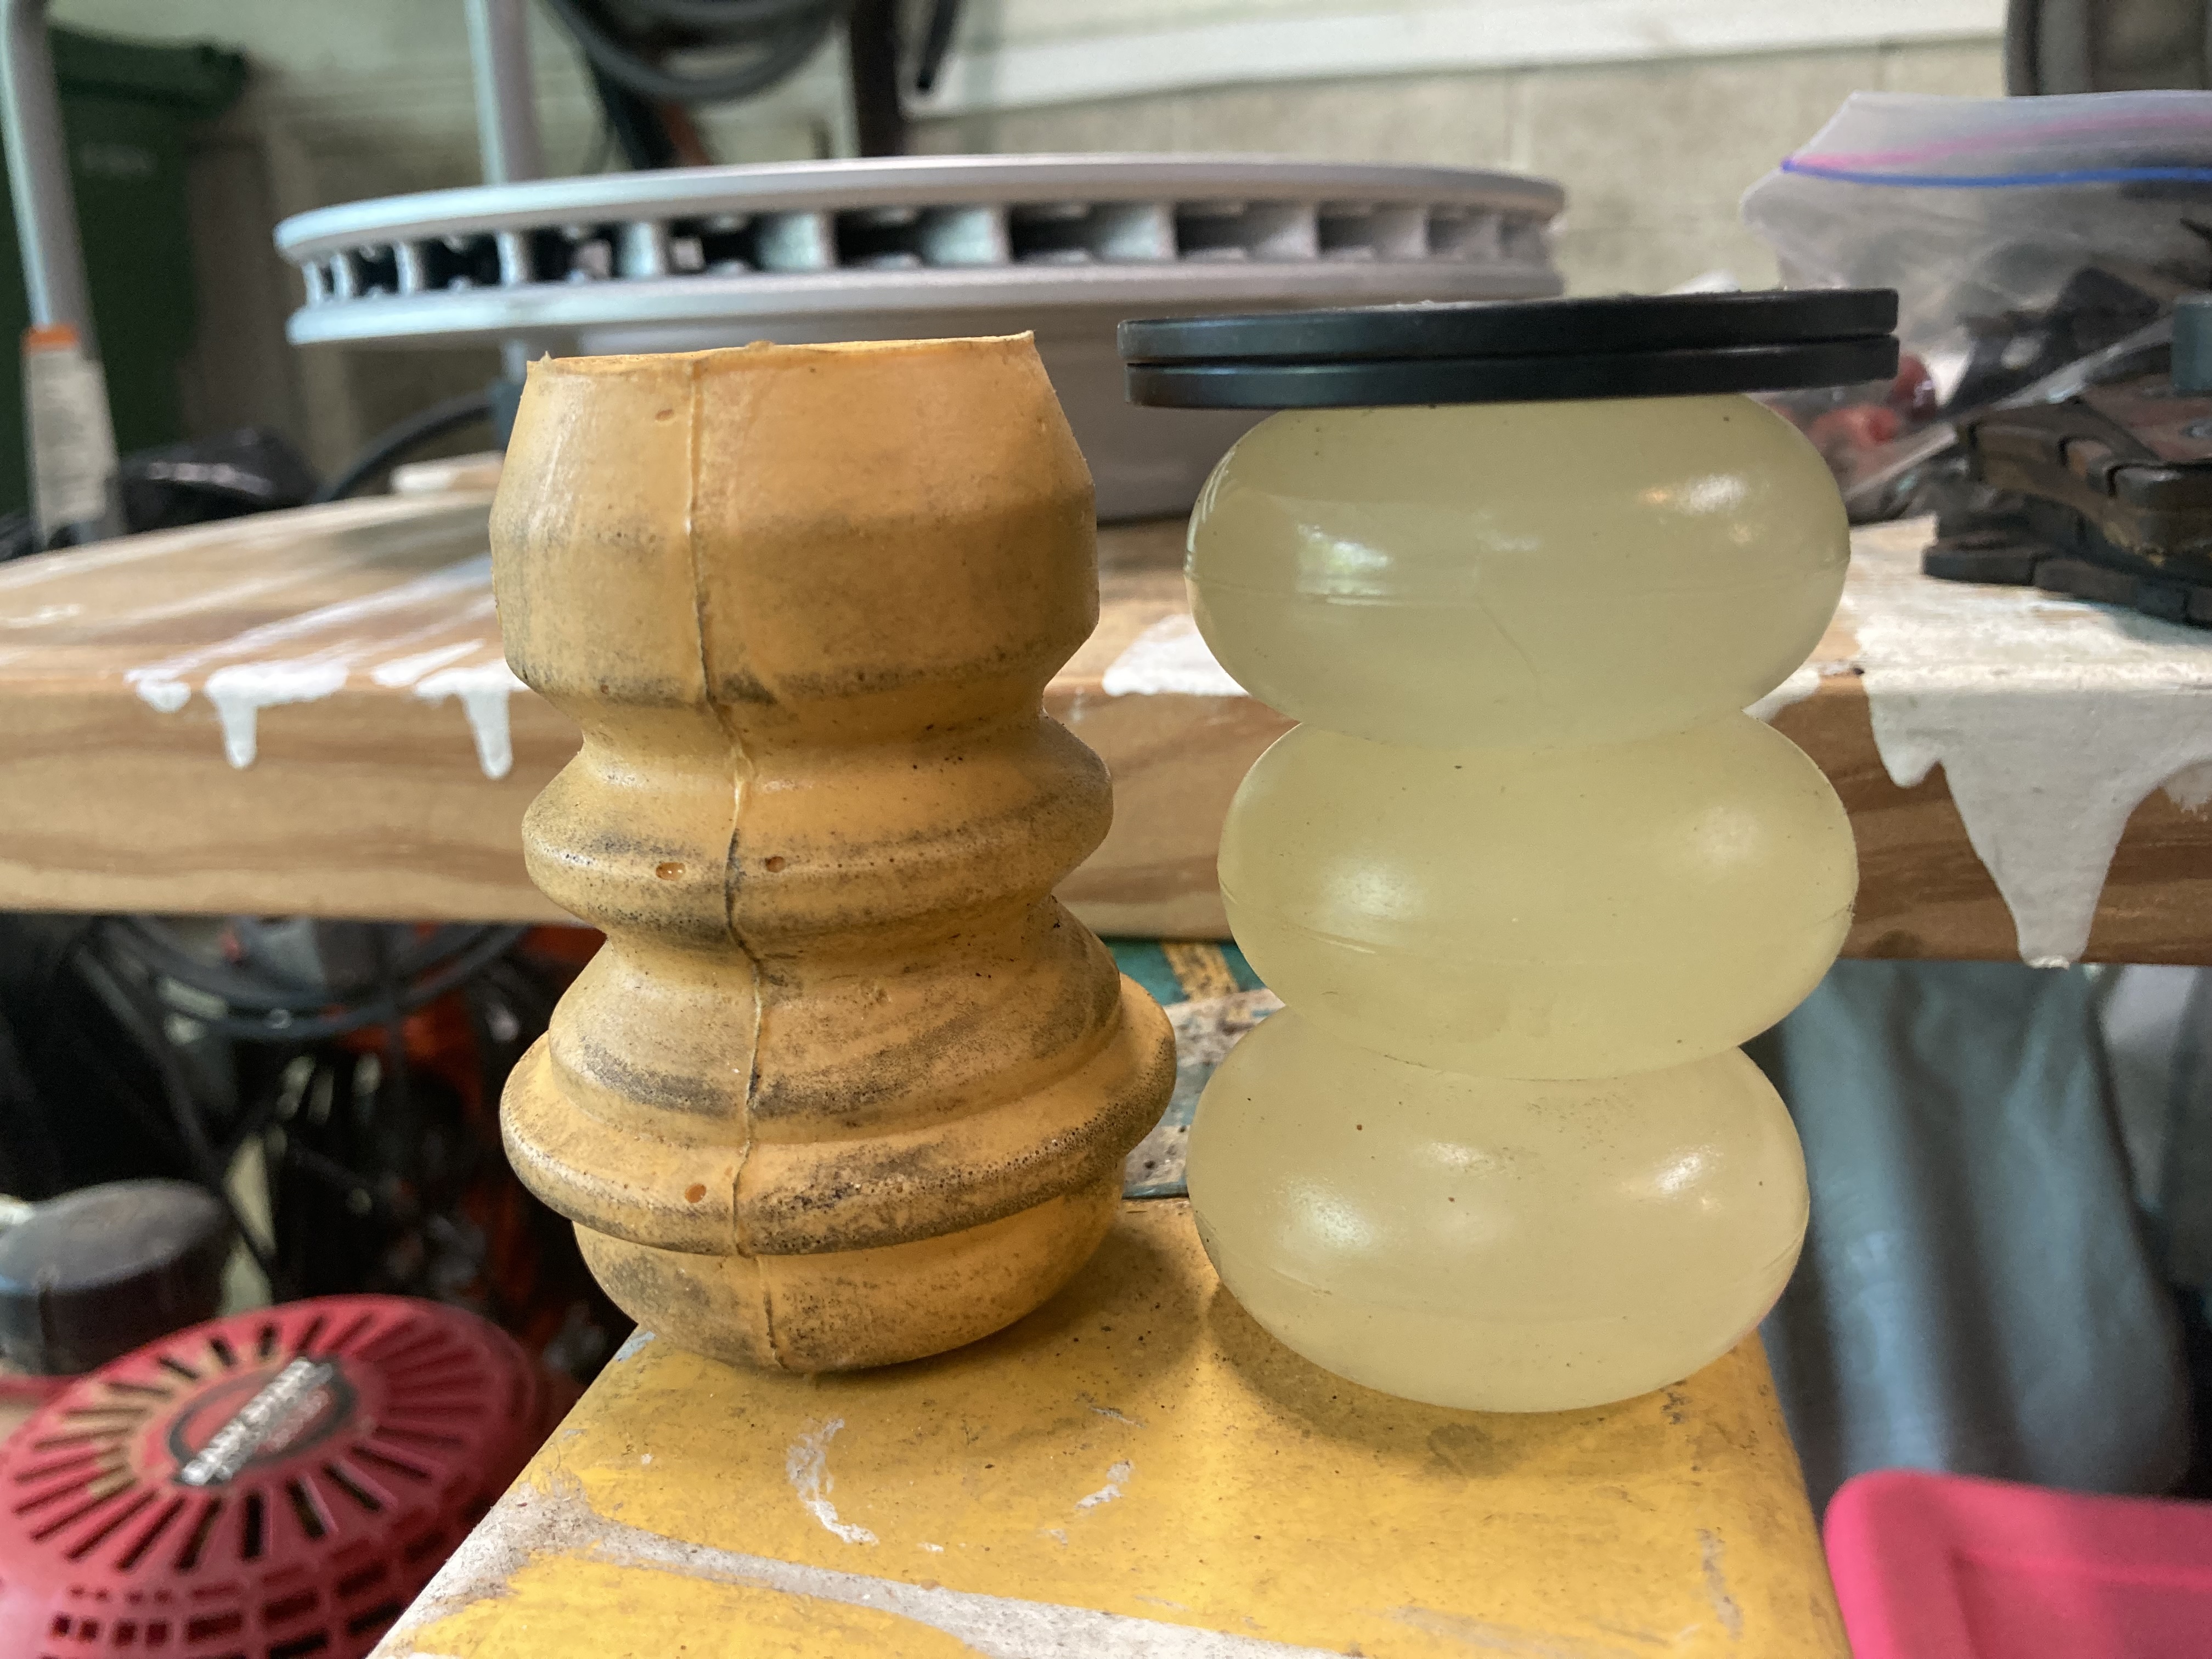
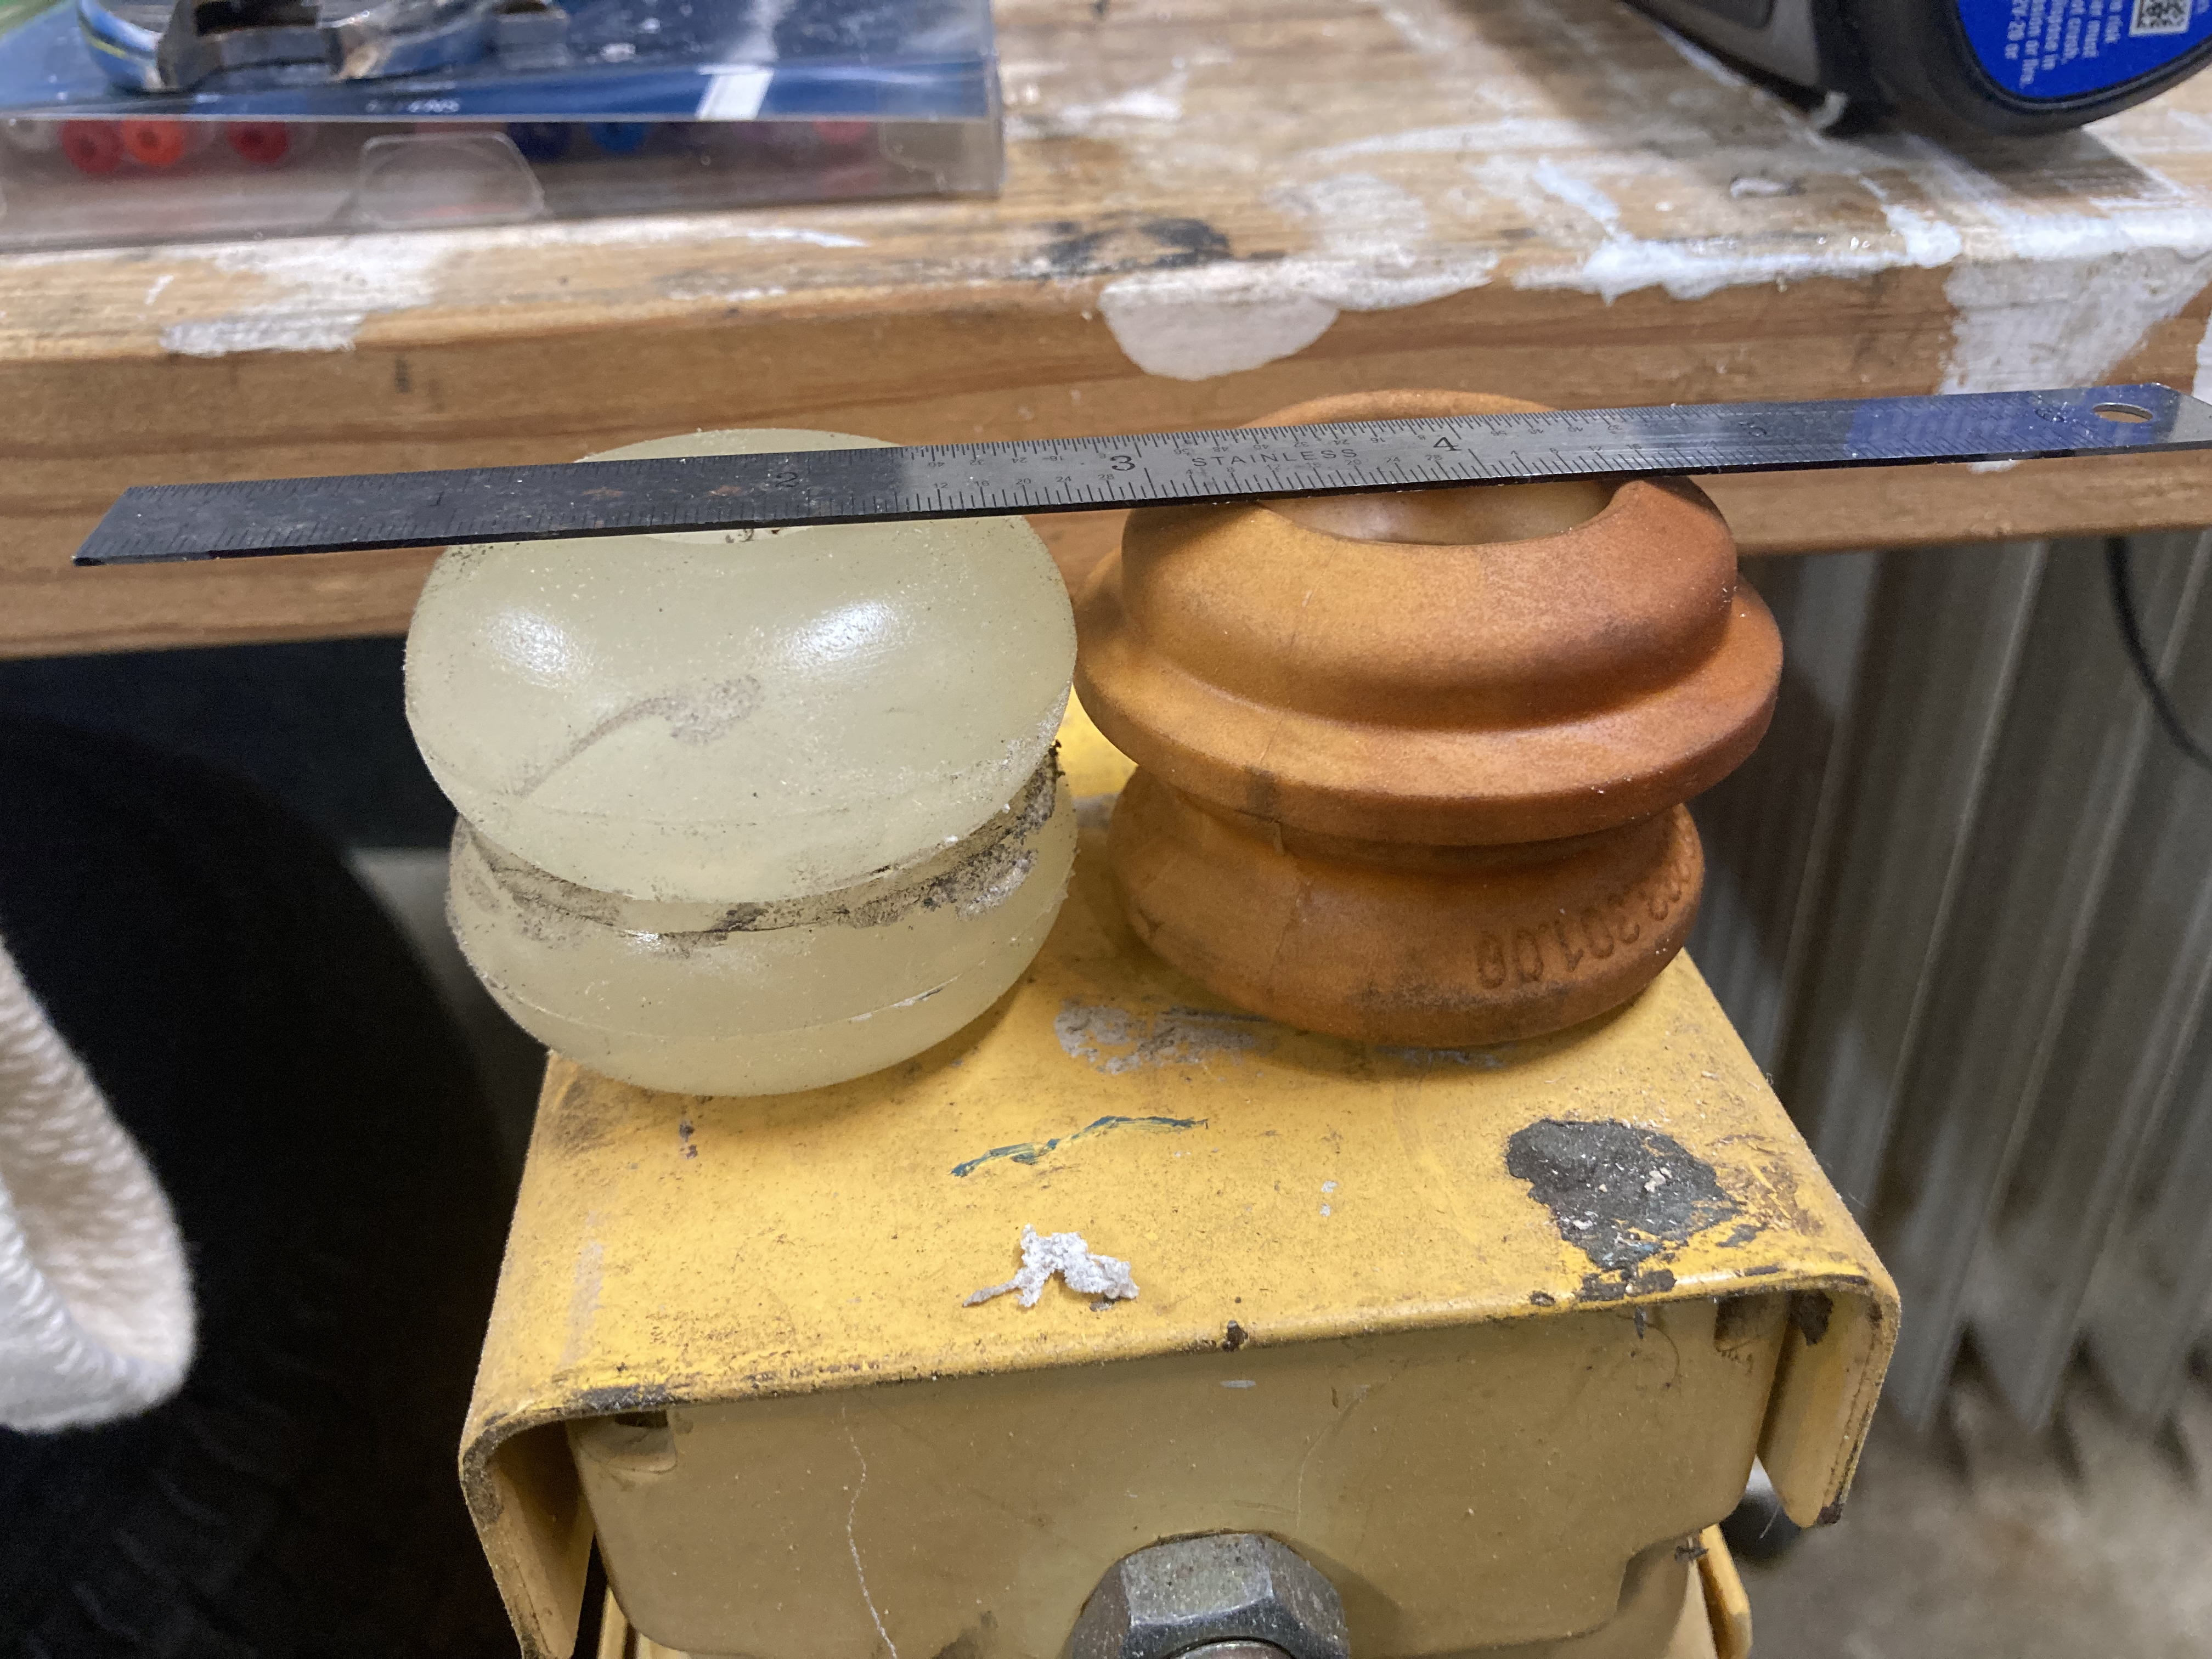
Height Comparison: Stock Porsche vs. new stack of 3 donuts plus 2 spacers run in event 2
In the picture above you see the stock front bump stop on the left. The rules states that any alternate design cannot increase the length of the strut at the point of contact. Since I’m still using the stock strut that means that the height of the new bump stops cannot be more than the height of the old.* They can be shorter, however.
These donut-type bump stops were bought from ReSuspension. They sell a wide variety of types and stiffnesses. I like these and used this type on my 944 back in the day because the shape creates an initial soft-ramp of the spring rate as they flatten out. Since then I’ve used others that are pure cylinders, but a different material, and they seem to work equally well.
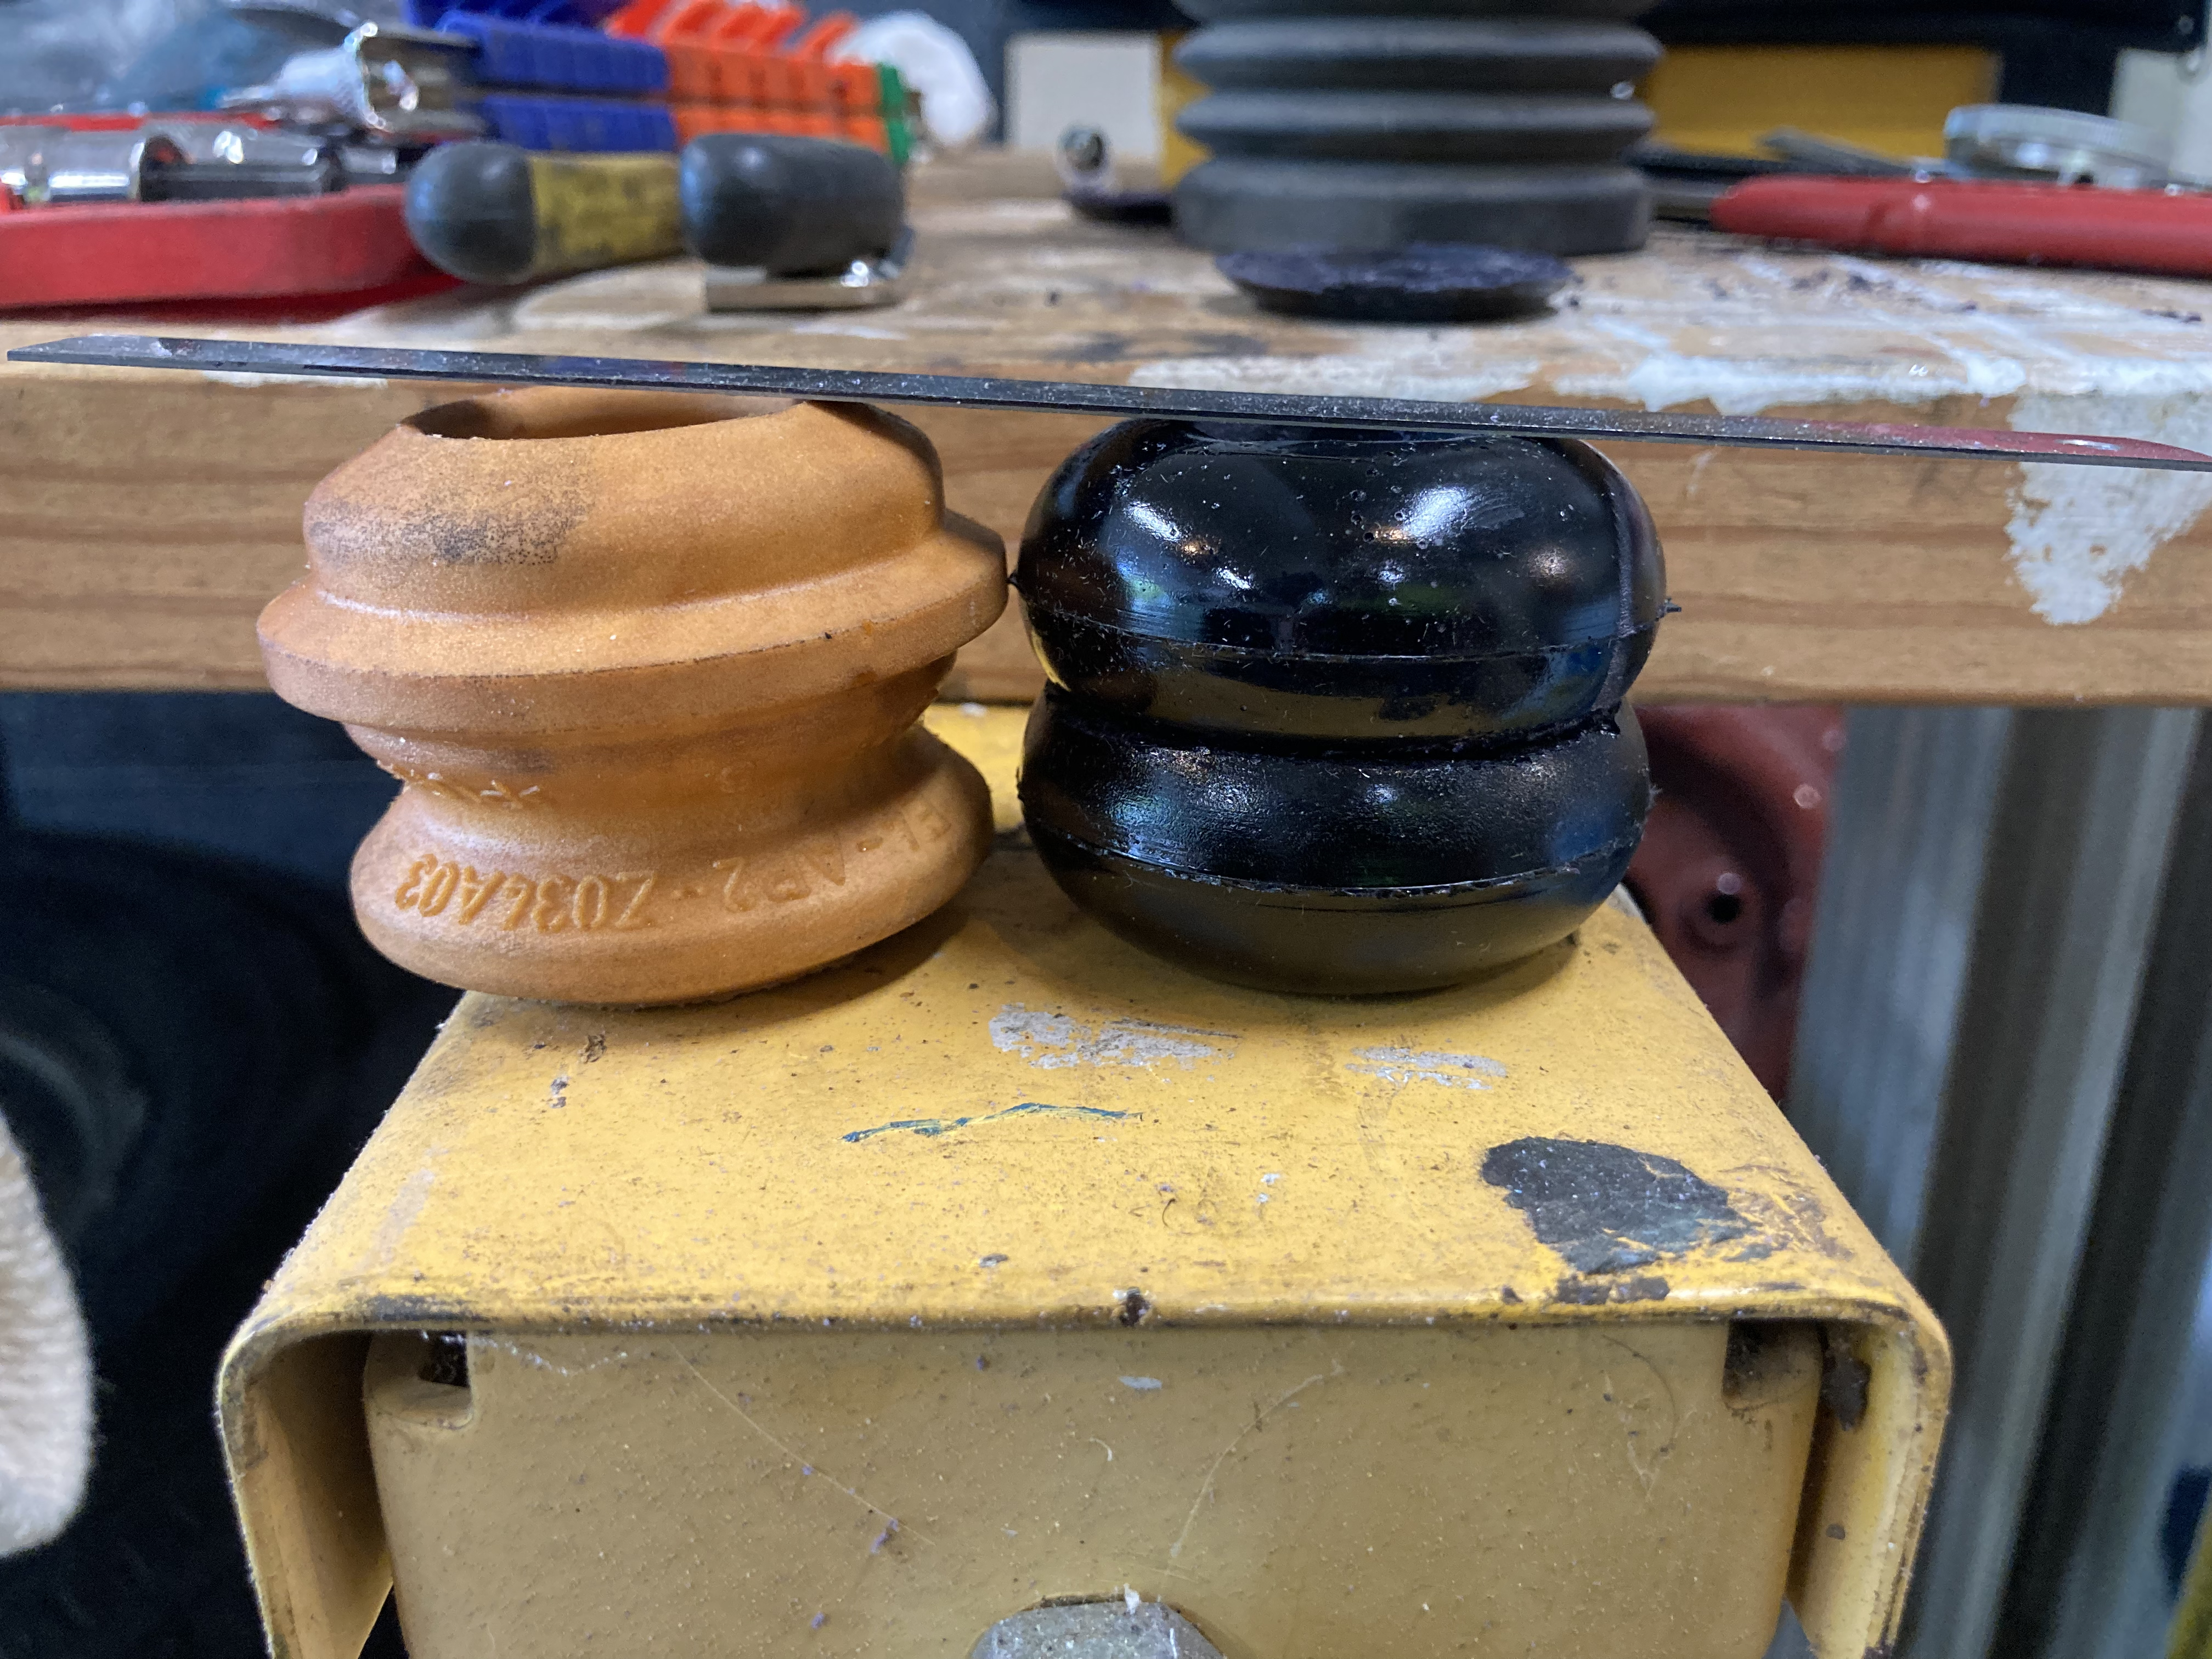
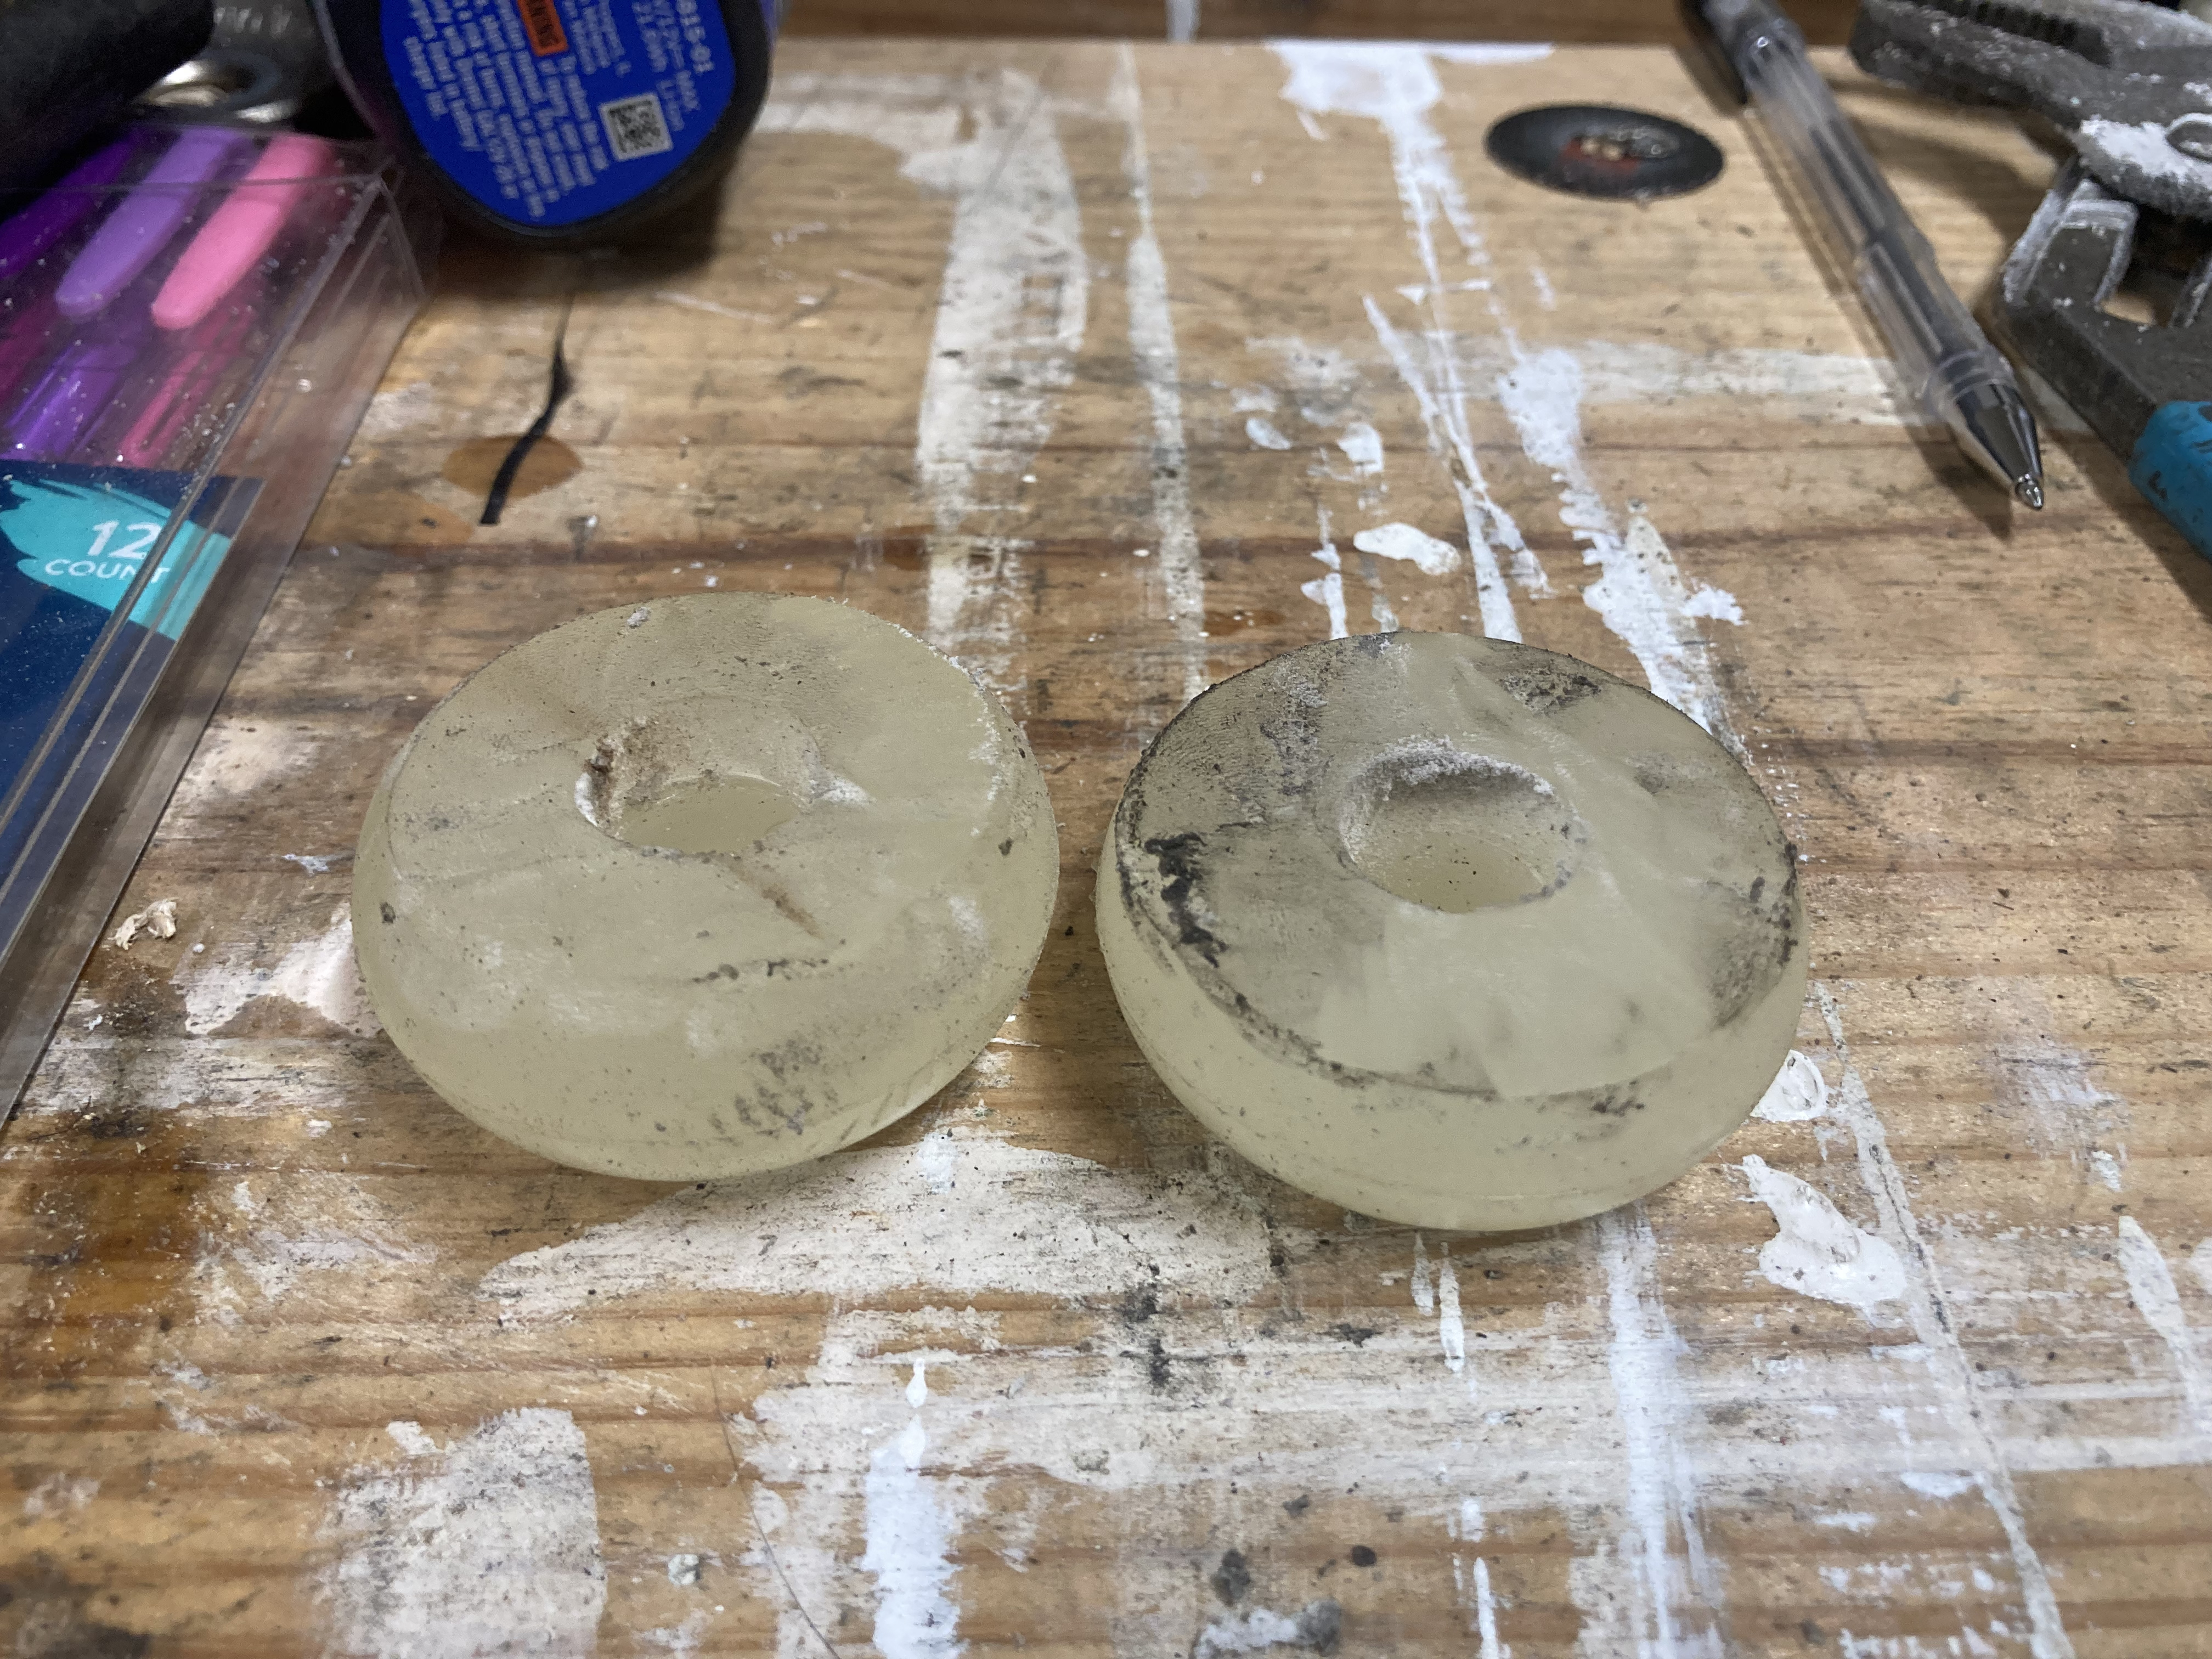
Rear Bump Stop Comparison
In the above picture the new bump stop vs the stock Porsche for the rear is shown. Two of the donuts as-molded were too tall, so I had to trim them.
Rather crude trimming of donuts for the rear
The holes in all of these is 0.625″ which is smaller than both the front and rear shaft diameters, and the diameters are not equal front and rear. So, I had to open the center holes to get them to slide onto the shafts.
ReSuspension provides technical data on these donuts for a single and double and triple stacks. I use this information to calculate the resultant total spring rates front and rear. It’s possible to mix and match various durometers to get a range of spring rates. However, the trimming affects the spring rate that these stacks actually produce. Determining how much will require direct measurement. For instance, shortening the rears should have made them exhibit a stiffer spring rate, based on how much I cut off something like 15%. As I go further I plan to figure out a way to measure the rates. All that’s really needed is a press, calipers, and a load sensor of some type. (Bathroom scales?)
Next event I’ll have a similar arrangement except with donuts one full durometer-step stiffer. The calculations indicate that this will push the balance even further into oversteer. I hope to counter this with the new front bar, which I also hope will tend to keep the inside rear tire down better. In this event I had issues with spinning the inside rear due to the lack of an LSD.
*For any aftermarket strut the allowable height of the bump stop could be more or less, depending upon the design. The supplied bump stop might not be legal. In fact, the allowable bump stop height for an aftermarket strut almost certainly will not be the same as stock or what is supplied. You must understand the geometry, measure precisely and determine what’s what. No supplier has any obligation to meet SCCA rules. I’ve already run into an issue with Bilstin B6 struts that I’ve purchased. By my measurements the as-delivered fronts are not legal in SCCA Street-class.
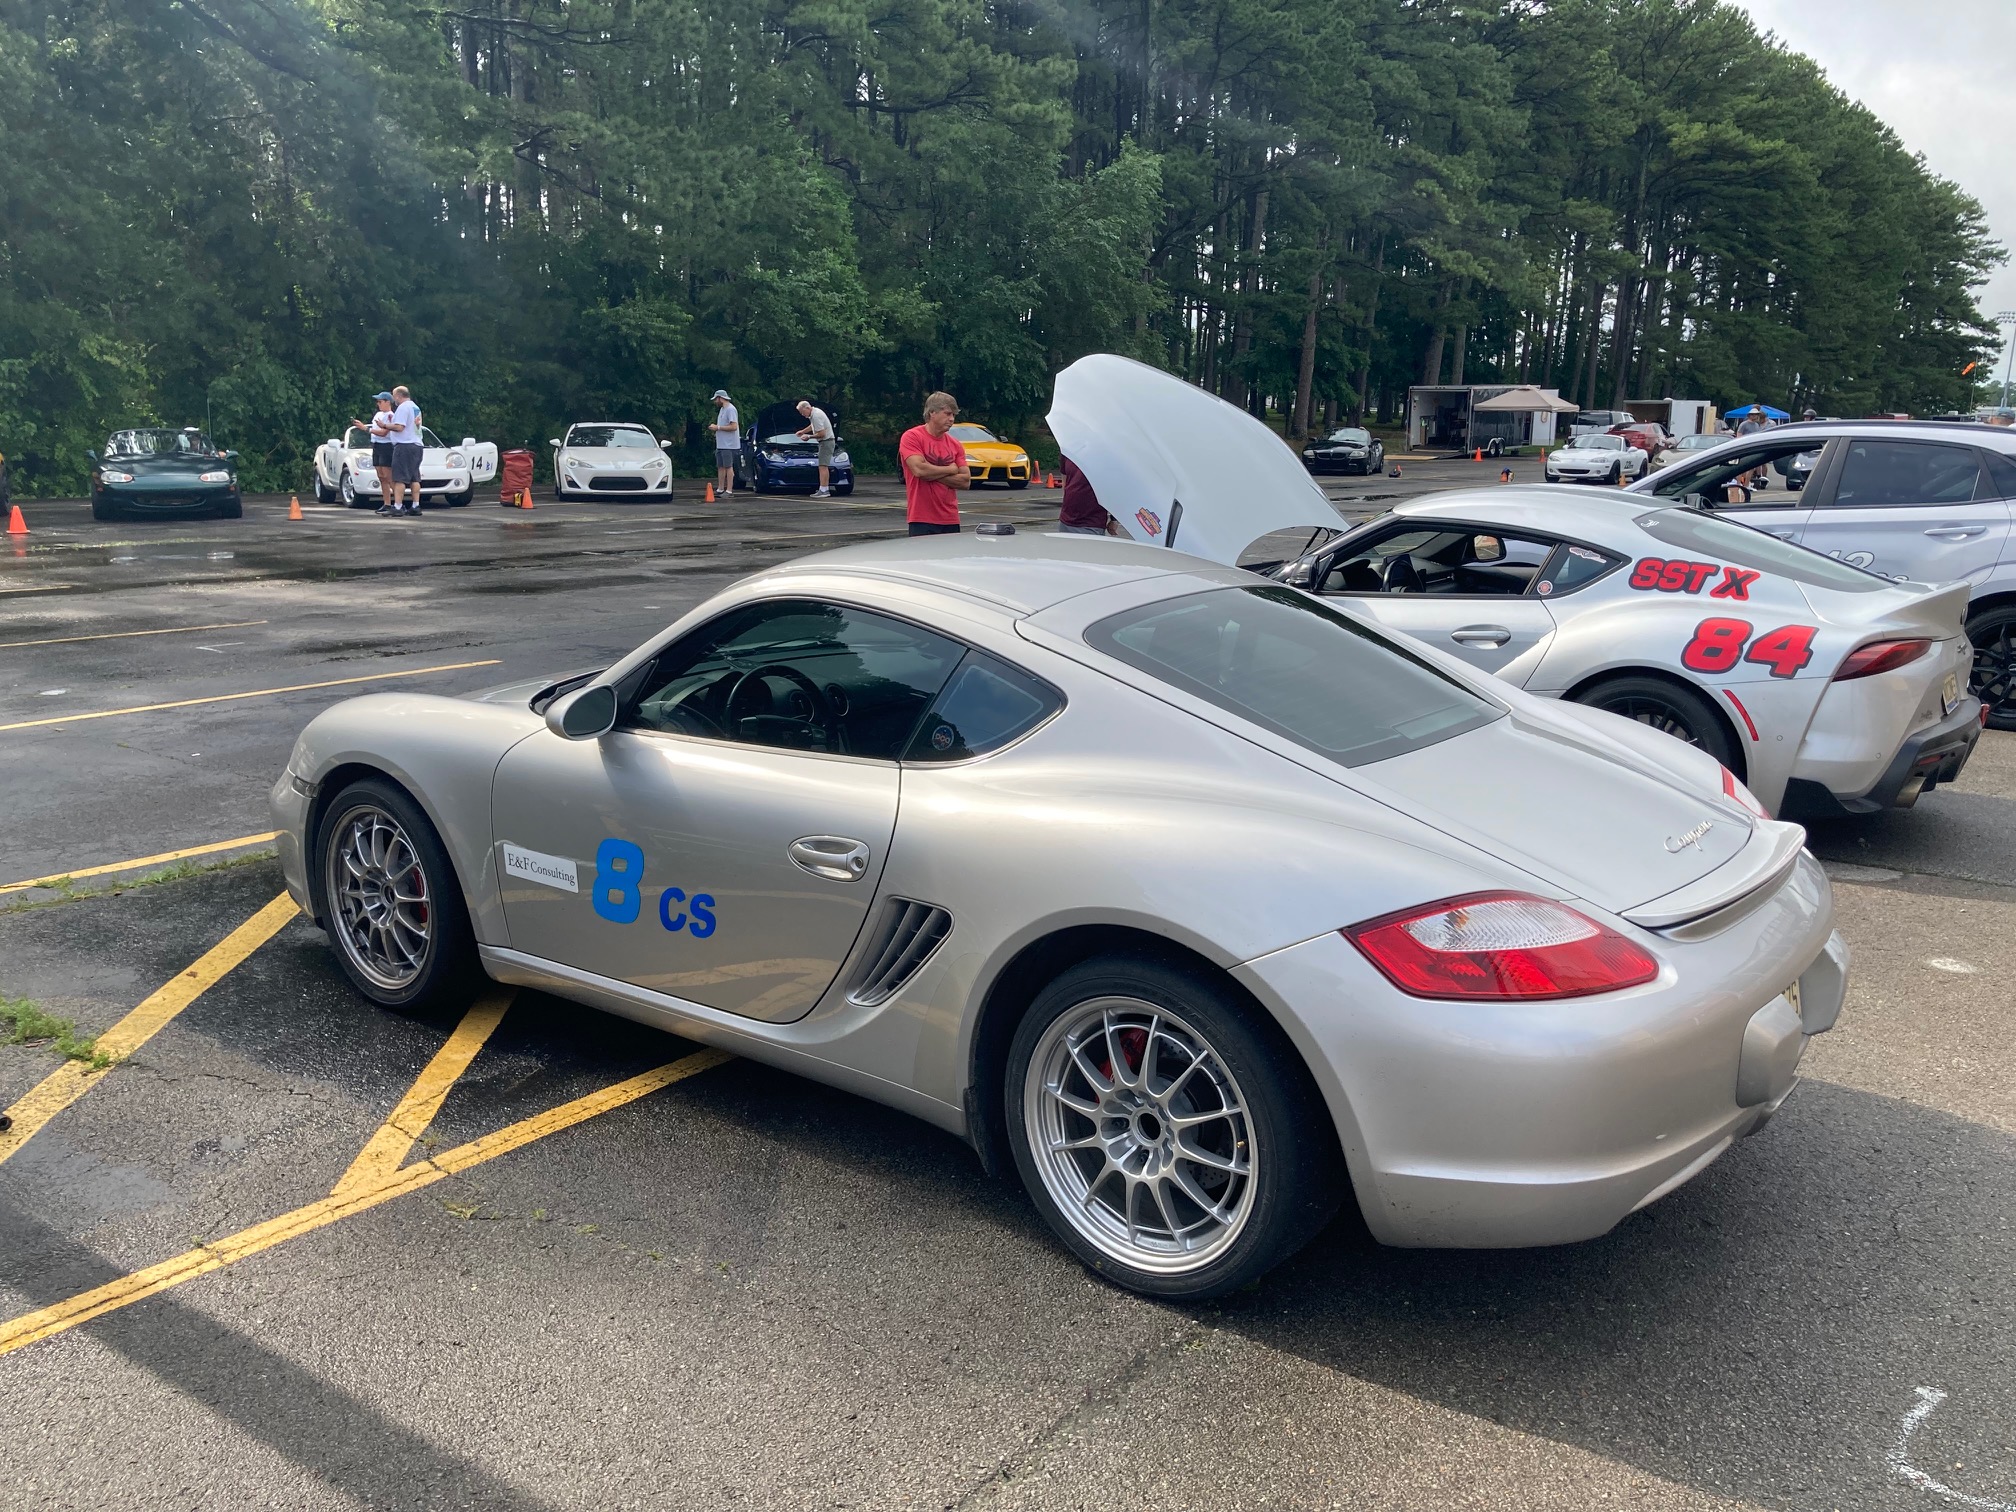
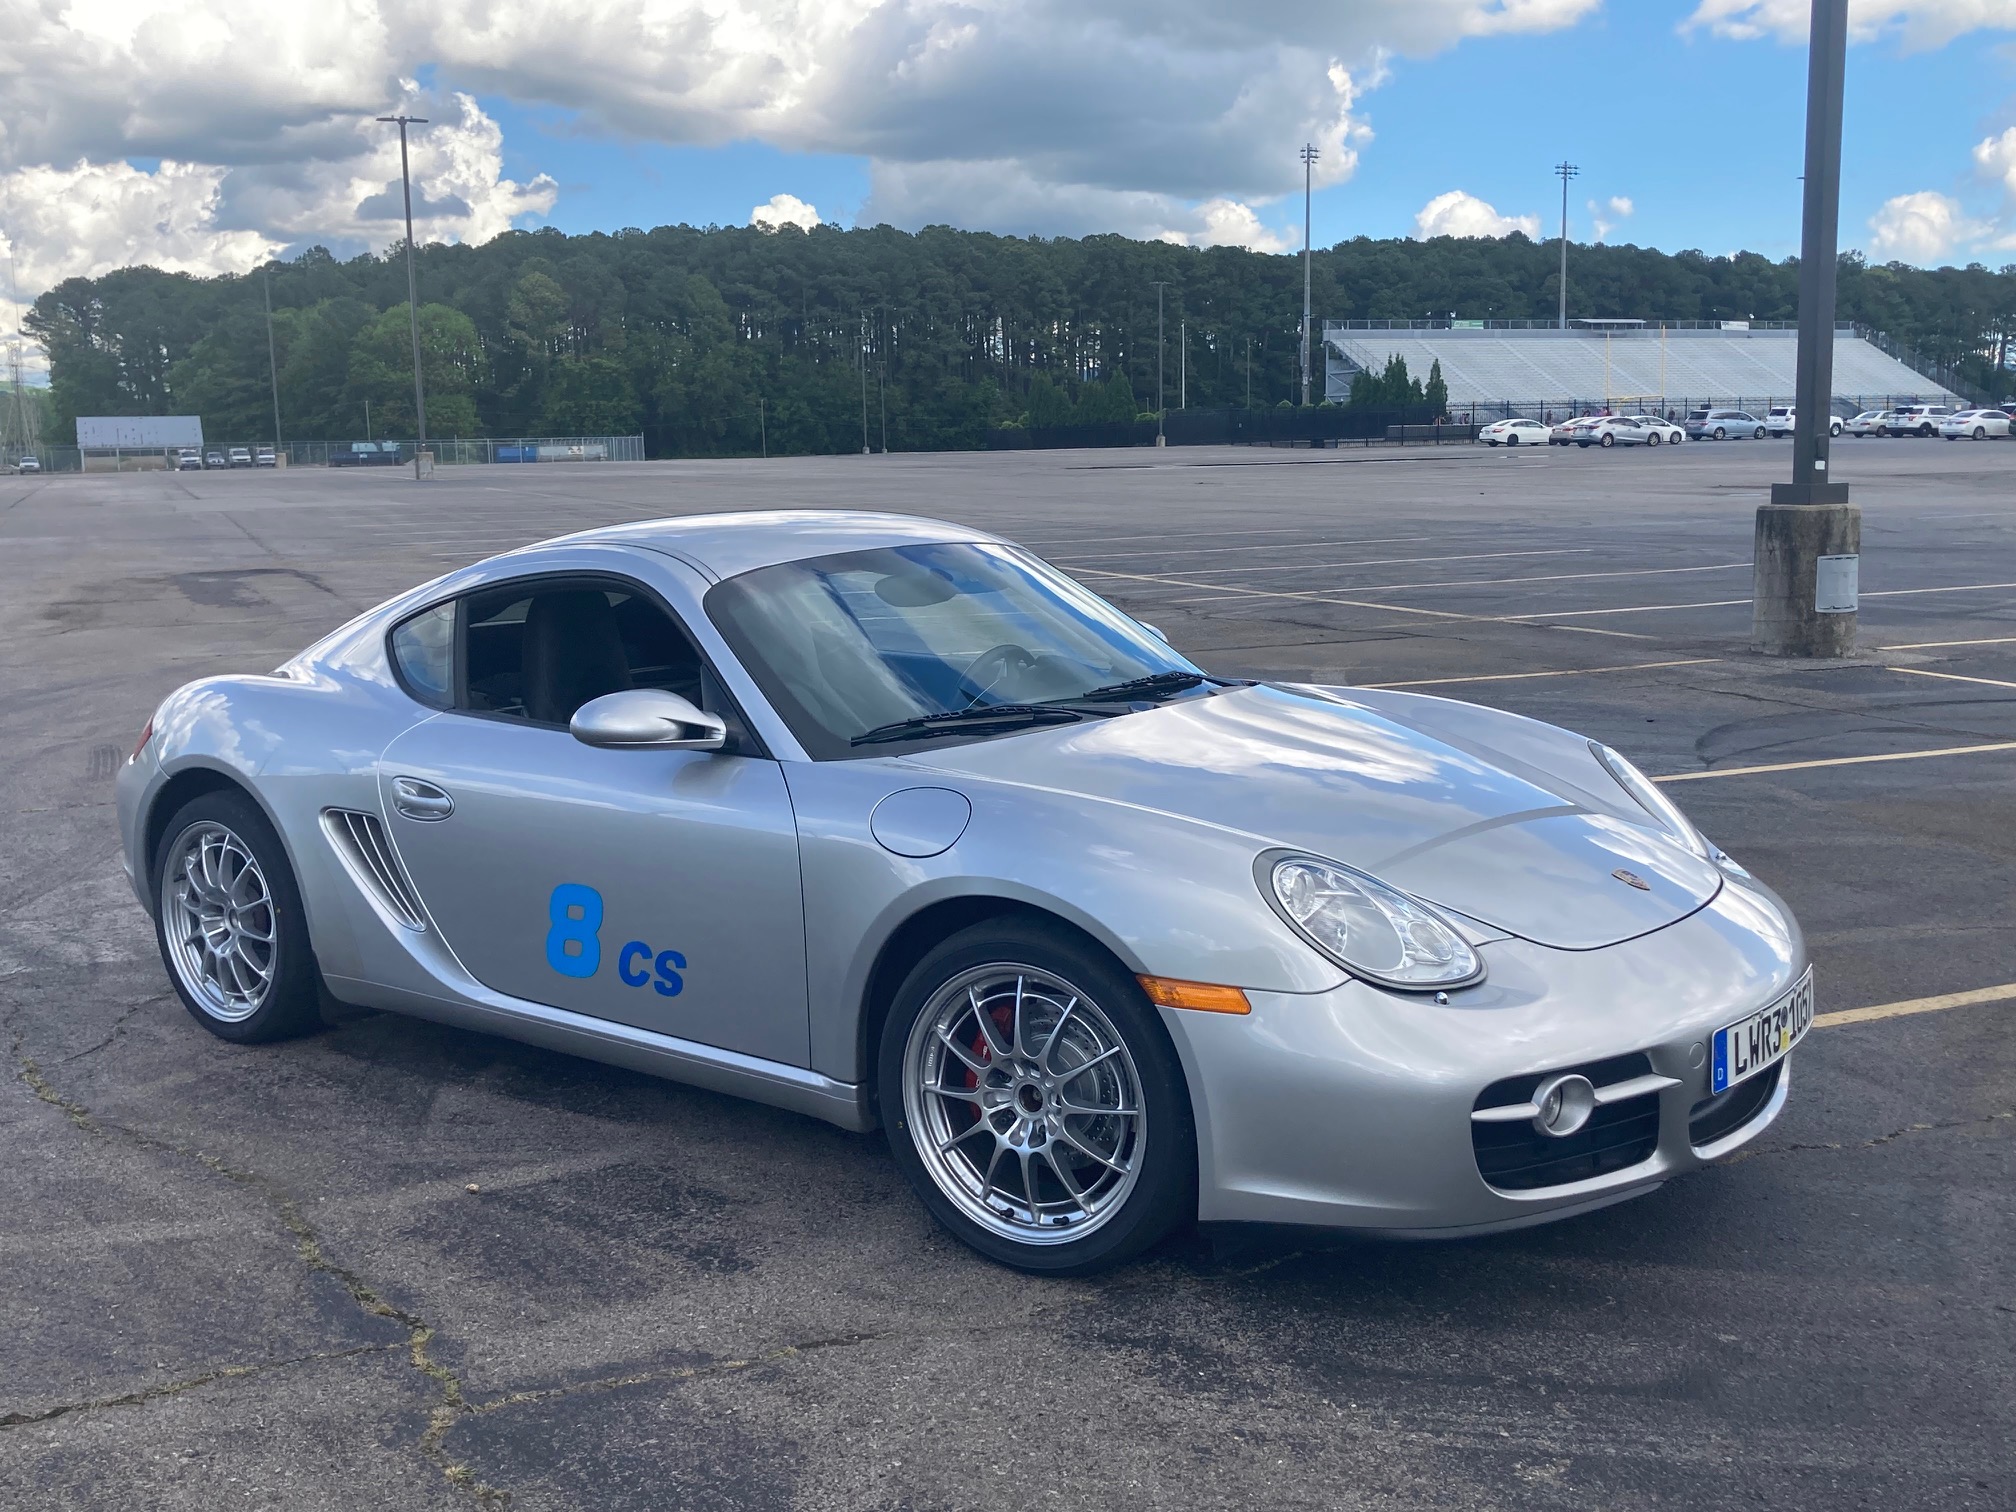
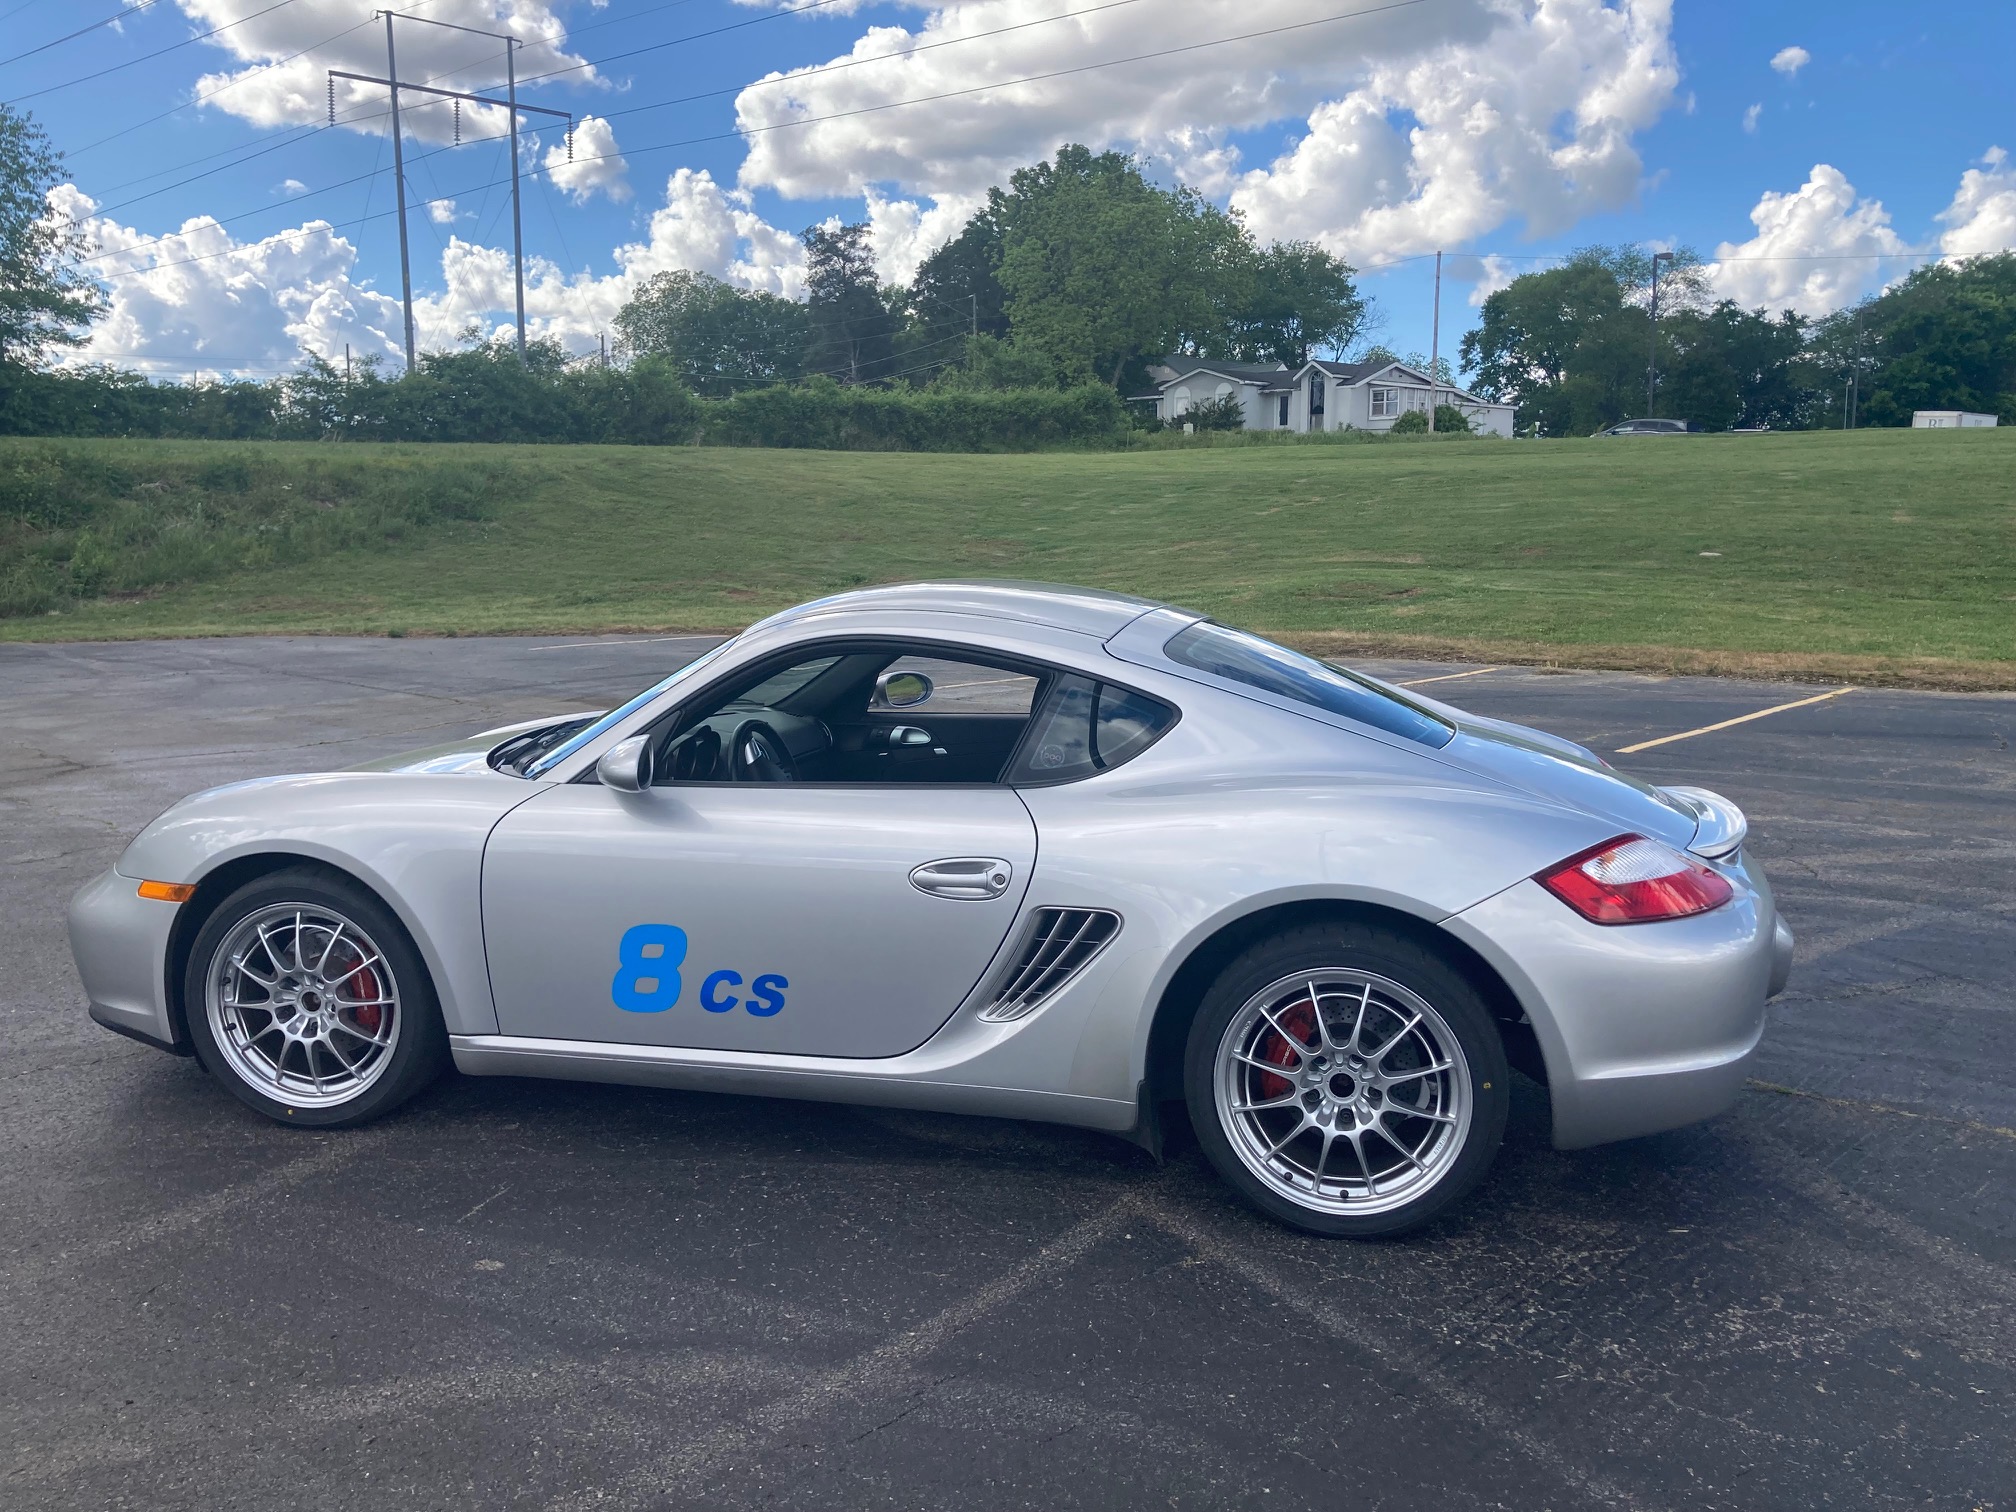
The replacement autocross car is a 2008 Cayman, 2.7 liter model, to be prepped for and run in C-Street. I appear to be in a significant minority of autocross racers who think this a competitively-viable plan! C-Street is presently spec-ND2 Miata. I’ve driven that car in a couple of events. It’s definitely a very fast autocross car, often raw-timing B-Street, but it’s not perfect.
The non-S Cayman is one of a group of cars moved down from B-Street this year. Those are the turbo 4-cylinder Supra, the 2006-08 BMW Z4M, the 4th-generation Corvette and the Cayman. I believe that the only one of these four that’s shown up so far this year at a national event was a Corvette at the Red Hills Tour. It didn’t do well, but I have no idea of the skill level of the driver. I hope to take the Cayman to the Bristol Pro-Solo and Tour July 4th week.
The general consensus is that the only one of the four that might be competitive is the Supra. This may very well be correct, but I have no interest in owning that car. I’ve always wanted to own a mid-engined Porsche and my performance-predicting spreadsheet indicates that the Cayman is the one that can be the most competitive with the ND2. On paper. Not counting certain intangibles.
I ran the car in its first event on fresh tires this past weekend. In summary, I believe the car shows promise but driver and car must both evolve to be threat to the ND2 in C-Street.
The car was run stock except for 255/285 Stones on 8.5” and 10” rims. I’d maxed the front camber to about 1 degree in front with healthy toe-out. I left the rear as I received it at 1.5 degrees with very slight toe-in. There seems to be a little more camber to be had when I look at the eccentric.
Handling was very balanced. At times I was 4-wheel drifting in decreasing radius corners. Elsewhere I was power-sliding out from an apex. Not necessarily fast, but these antics happened naturally while hustling my chosen line. Great fun, very controllable, no understeer. I very much like the mid-engined, short wheelbase dynamics and how fast the car rotates. Steering precision and feedback is fantastic. As expected it is not as stable under braking as a Corvette or ND2 due to rear toe instability over bumpy surfaces inherent in the strut geometry. Like the ND2 it’s easier to drive than the Corvette thanks to not having to manage big torque. On the other hand, it sometimes seems to take a long time to get from one corner to the next. I was looking for some reading material or contemplating the meaning of life and autocross which are, of course, the same thing.
I started tire pressures at 30F/34R. Grip was not great… it felt like too much pressure. So, I dropped one psi each run and it felt better and better. I ended up at 26/29 and the grip was fantastic, probably also because the tires were coming into their own. AT LEAST a match for the ND2 when it comes to grip.
Lack of an LSD was only a problem when launching at the start and then turning hard at the light with full power in 1st gear. I had to drive smoother to stop that and optimize speed at the light but I was able to do it. This issue may go away when the front roll stiffness gets increased as planned. I never had inside wheelspin in 2nd gear… just not enough torque from the little 2.7 liter engine!
First run I had a problem with stability management kicking on (though nominally turned off) when one tire would begin to enter ABS activation. (This is the way non-Sport Chrono cars work.) This went away by the 2nd run as I lowered pressure and got more grip, plus I was driving better.
The car was slow in the long slalom when compared to the ND2s I’ve driven lately. To be expected with stock springs, bars and shocks, I guess, and it’s wider. Also, I’d replaced a disintegrated front bumpstop the day before the event with the one I’d bought for reference. Just weaving down a city street I can feel that the side with the new bumpstop is stiffer than the other, even though the old bumpstop on the other side is intact. The roll is snubbed earlier and the car turns faster. This shows how much these Porsches depend upon good bumpstops for proper handling. And, I hope, also how much things will be improved with stiffer ones.
So, how did I place? We had a CS class of 10. Five are what I’d call fast. I was 5th. The four above me all paxed in the top 10 out of 125 drivers. Also in that top 10 (and not in CS) were two multi-time national champs, 2 more Nats trophy winners and at least one other that could win a Tour if he ever went to one. I paxed a slightly disappointing 22nd with a significant error on my fastest run.
I’ve done the calculations and ordered aftermarket bumpstops last night. I’ll play with those first on the stock shocks and then maybe with Bilsteins once I get them. I’ve ordered a manual-hydraulic spring compressor to make things easier and safer to do all this strut assy/disassy. Sway bar decision to follow. If all is good except for some lack of damping then shock valving will be the final step. At least that’s the plan.
Stuart R. submitted a comment that he claps his hands together before each run to increase his tactile sensitivity. I replied that this was great and that I also have a routine I do before each run. It just takes a few seconds once you learn it. Feel free to throw in some hand clapping!
This may seem a little silly. That’s OK. It’s just what I do based upon what I’ve learned in the various athletic-type competitions, namely wrestling and internal and external martial arts throughout my life, as applied to autocross driving competition. I suggest you try it and then modify to suit.
Of course, this kind of thing (not this procedure in particular) applies equally to any important human performance. An example might be a business or technical presentation. I gave literally hundreds of those during my career. I’m off-the-charts introverted by nature, so this was initially a very difficult endeavor which required years of study and practice to achieve competence. The point is that all people who reach a high-level in any type of performance make sure their body and mind are in the correct state before they begin.
Here’s my routine. I usually do this just before being released from grid to head to the start:
Hold your two hands up to either side of the wheel but don’t grip it yet. Now, without hardly making any movement, push your arm joints open. First the shoulder joint, then the elbow, then the wrist, then the palm, then extend through all the finger joints. Think of a wave of expansion traveling down your arms. Now relax and allow all the skeletal muscle to hang from the bones. Do this three times. Push the joints open, release the skeletal muscles. One more time: push the joints open, then totally release the skeletal muscles.
Now grip the wheel lightly and release the shoulders and elbows, sinking down until the entire weight of the arms is hanging from your hand grip. Focus on feeling the weight of your arms pulling down on your neck and upper back and your hands. The weight of the arms is producing a light stretch in your shoulder, elbow and wrist joints. (This is pulling the joints open where step 1 was pushing the joints open.)
With your foot, tap the gas pedal, then the brake, then gas, then brake, then gas then brake. If you left foot brake you should also move the left foot around and tap the brake and the rest point a few times.
Now gaze out the windshield into the distance, seeing everything out in front of the car, both what’s straight ahead and what’s in the periphery, and say to yourself, “Now, now, now, there is only the now.”
Explanation
Some people (like me) are naturally untrusting and need an explanation before they can attempt anything. This is for those people.
Steps 1 and 2 are a standard procedure in some internal arts like T’ai Chi Ch’uan and Chi Gung. The idea is to activate and stretch the fascia while relaxing/releasing the skeletal muscles. This promotes blood flow to the hands. This immediately increases the tactile sensitivity in the hands and activates the neural pathways that control movement in the arms.
Step 3 activates the neural pathways down to the feet, priming everything for action.
Step 4 is to “get you out of your head” and into the moment. This is to set your mind up to drive what you see and feel. We want to make sure you’re not trying to “remember” the course and drive too much from memory. It takes huge processing power for a beginner to “remember” the course, taking away from the ability to actually drive.
I think there are several basic driving skills that the novice should begin developing during the first year of autocross. As mentioned in Part 1, the idea is to focus on what’s most important at the beginning.
Develop a steering method that maximizes feel and control while limiting hand repositioning
Learn to put weight on the front tires prior to turning
Learn to add throttle in coordination with opening the steering wheel
Learn to trail-brake
Learn basic line theory
Develop a steering method
We wish to develop a method that maximizes feel and control and limits hand repositioning to a minimum. In the end (and also in the middle, as well as in the beginning) being able to drive a car fast and stay within the autocross course is highly dependent upon your sensitivity to what the car is doing.
Most of the information as to what the car is doing will come to your hands through the steering wheel. We also get information through the seat and a fair amount actually comes through your feet, especially when you’re braking. The beginner should focus on the hands.
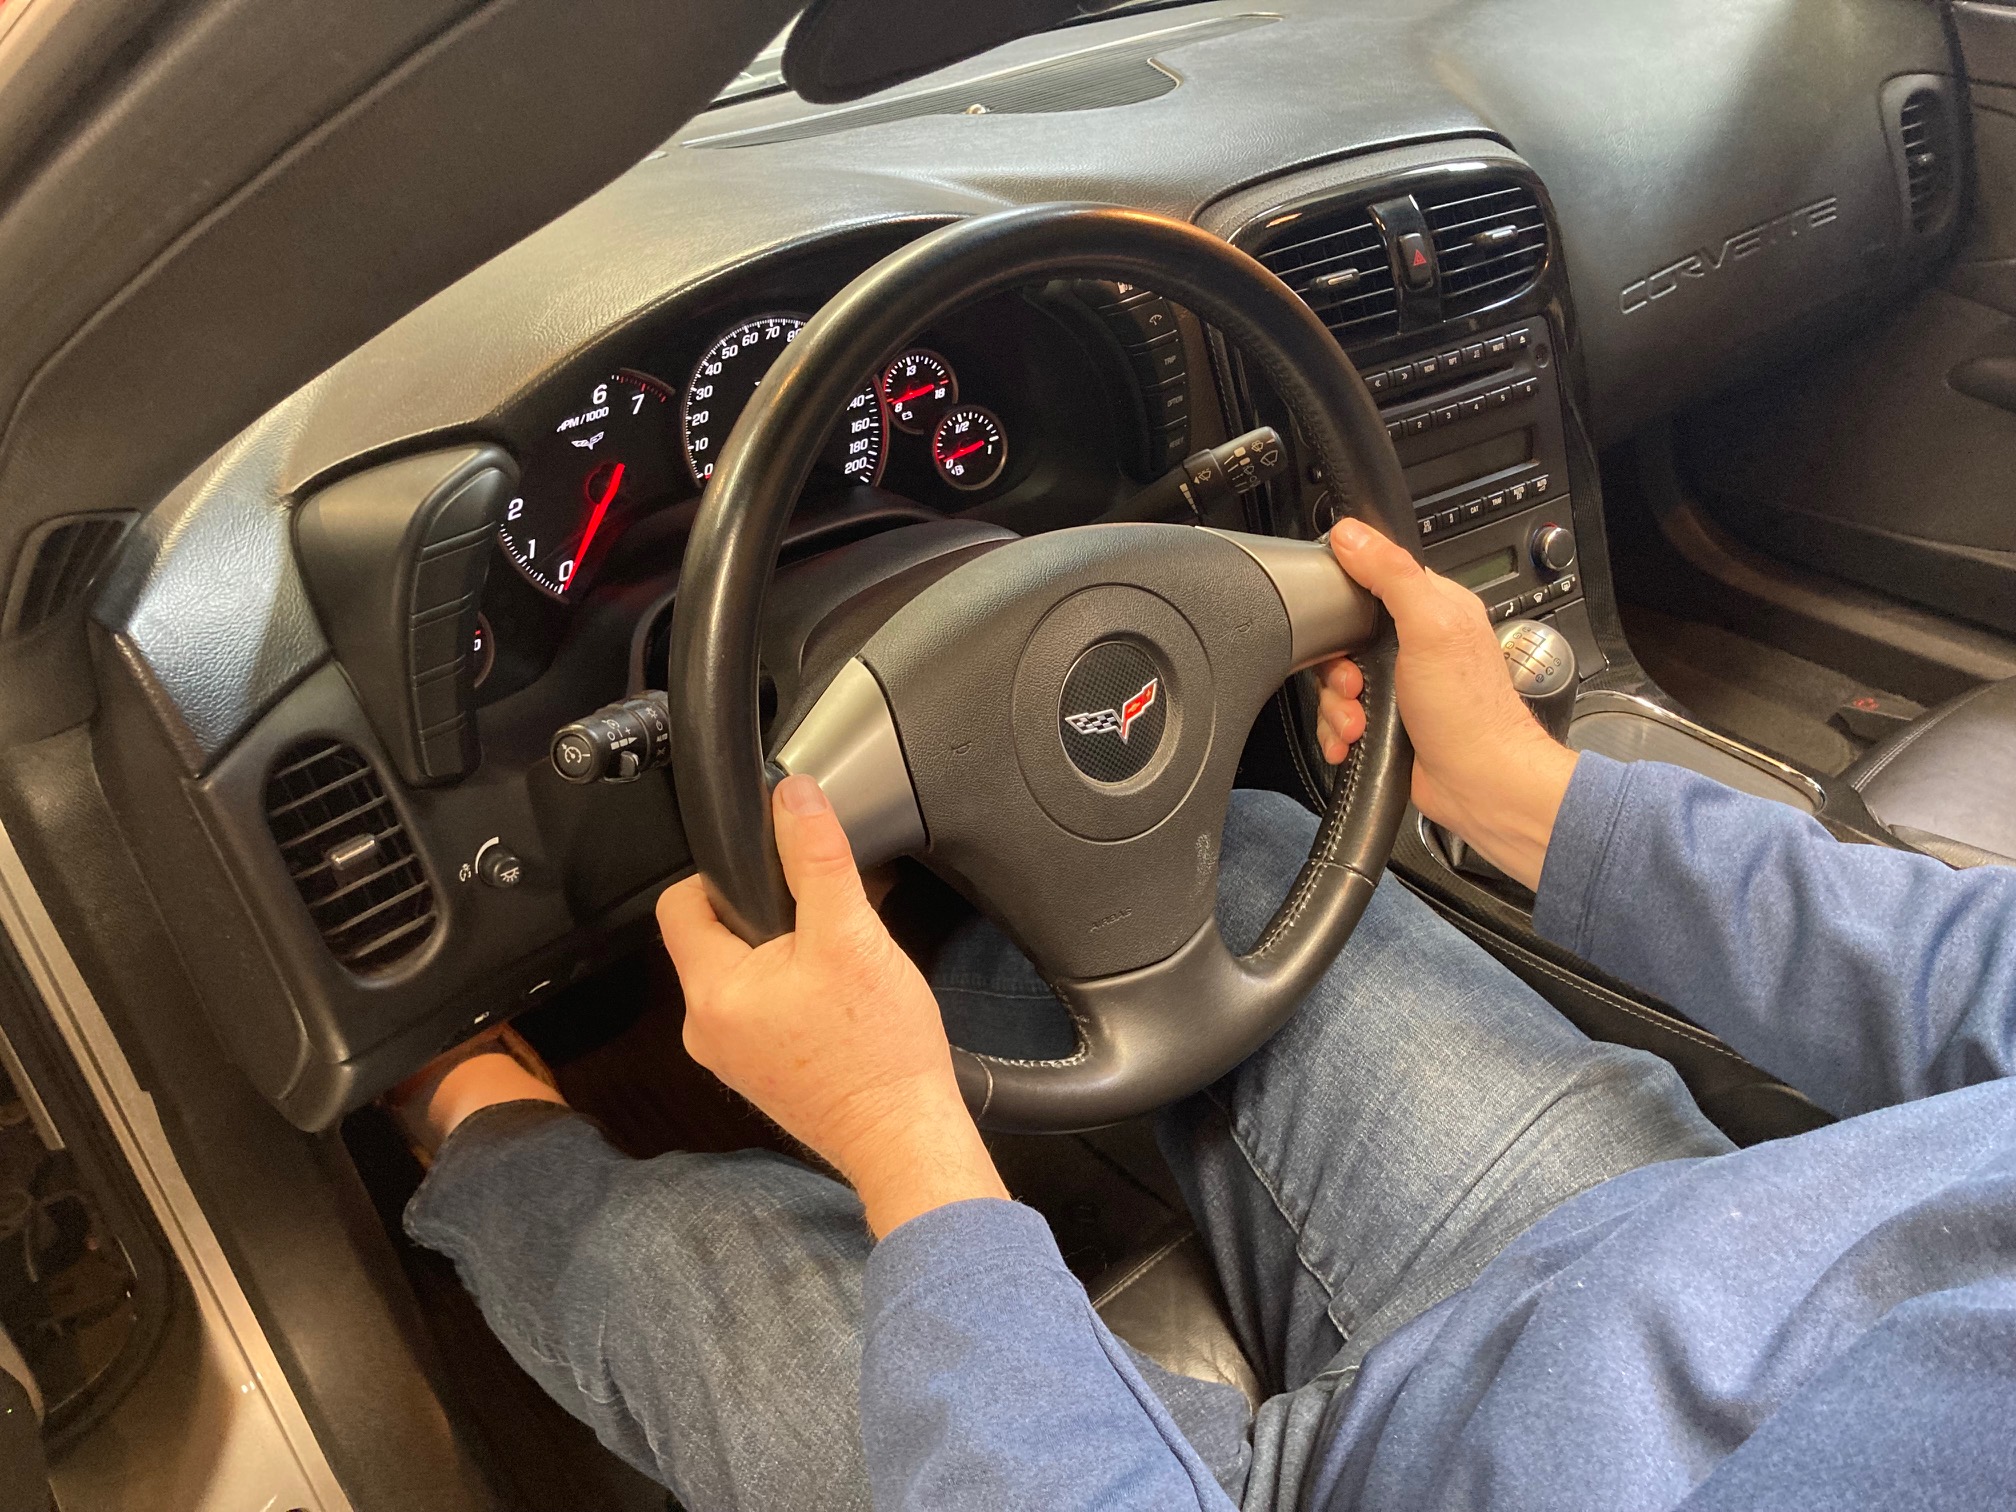
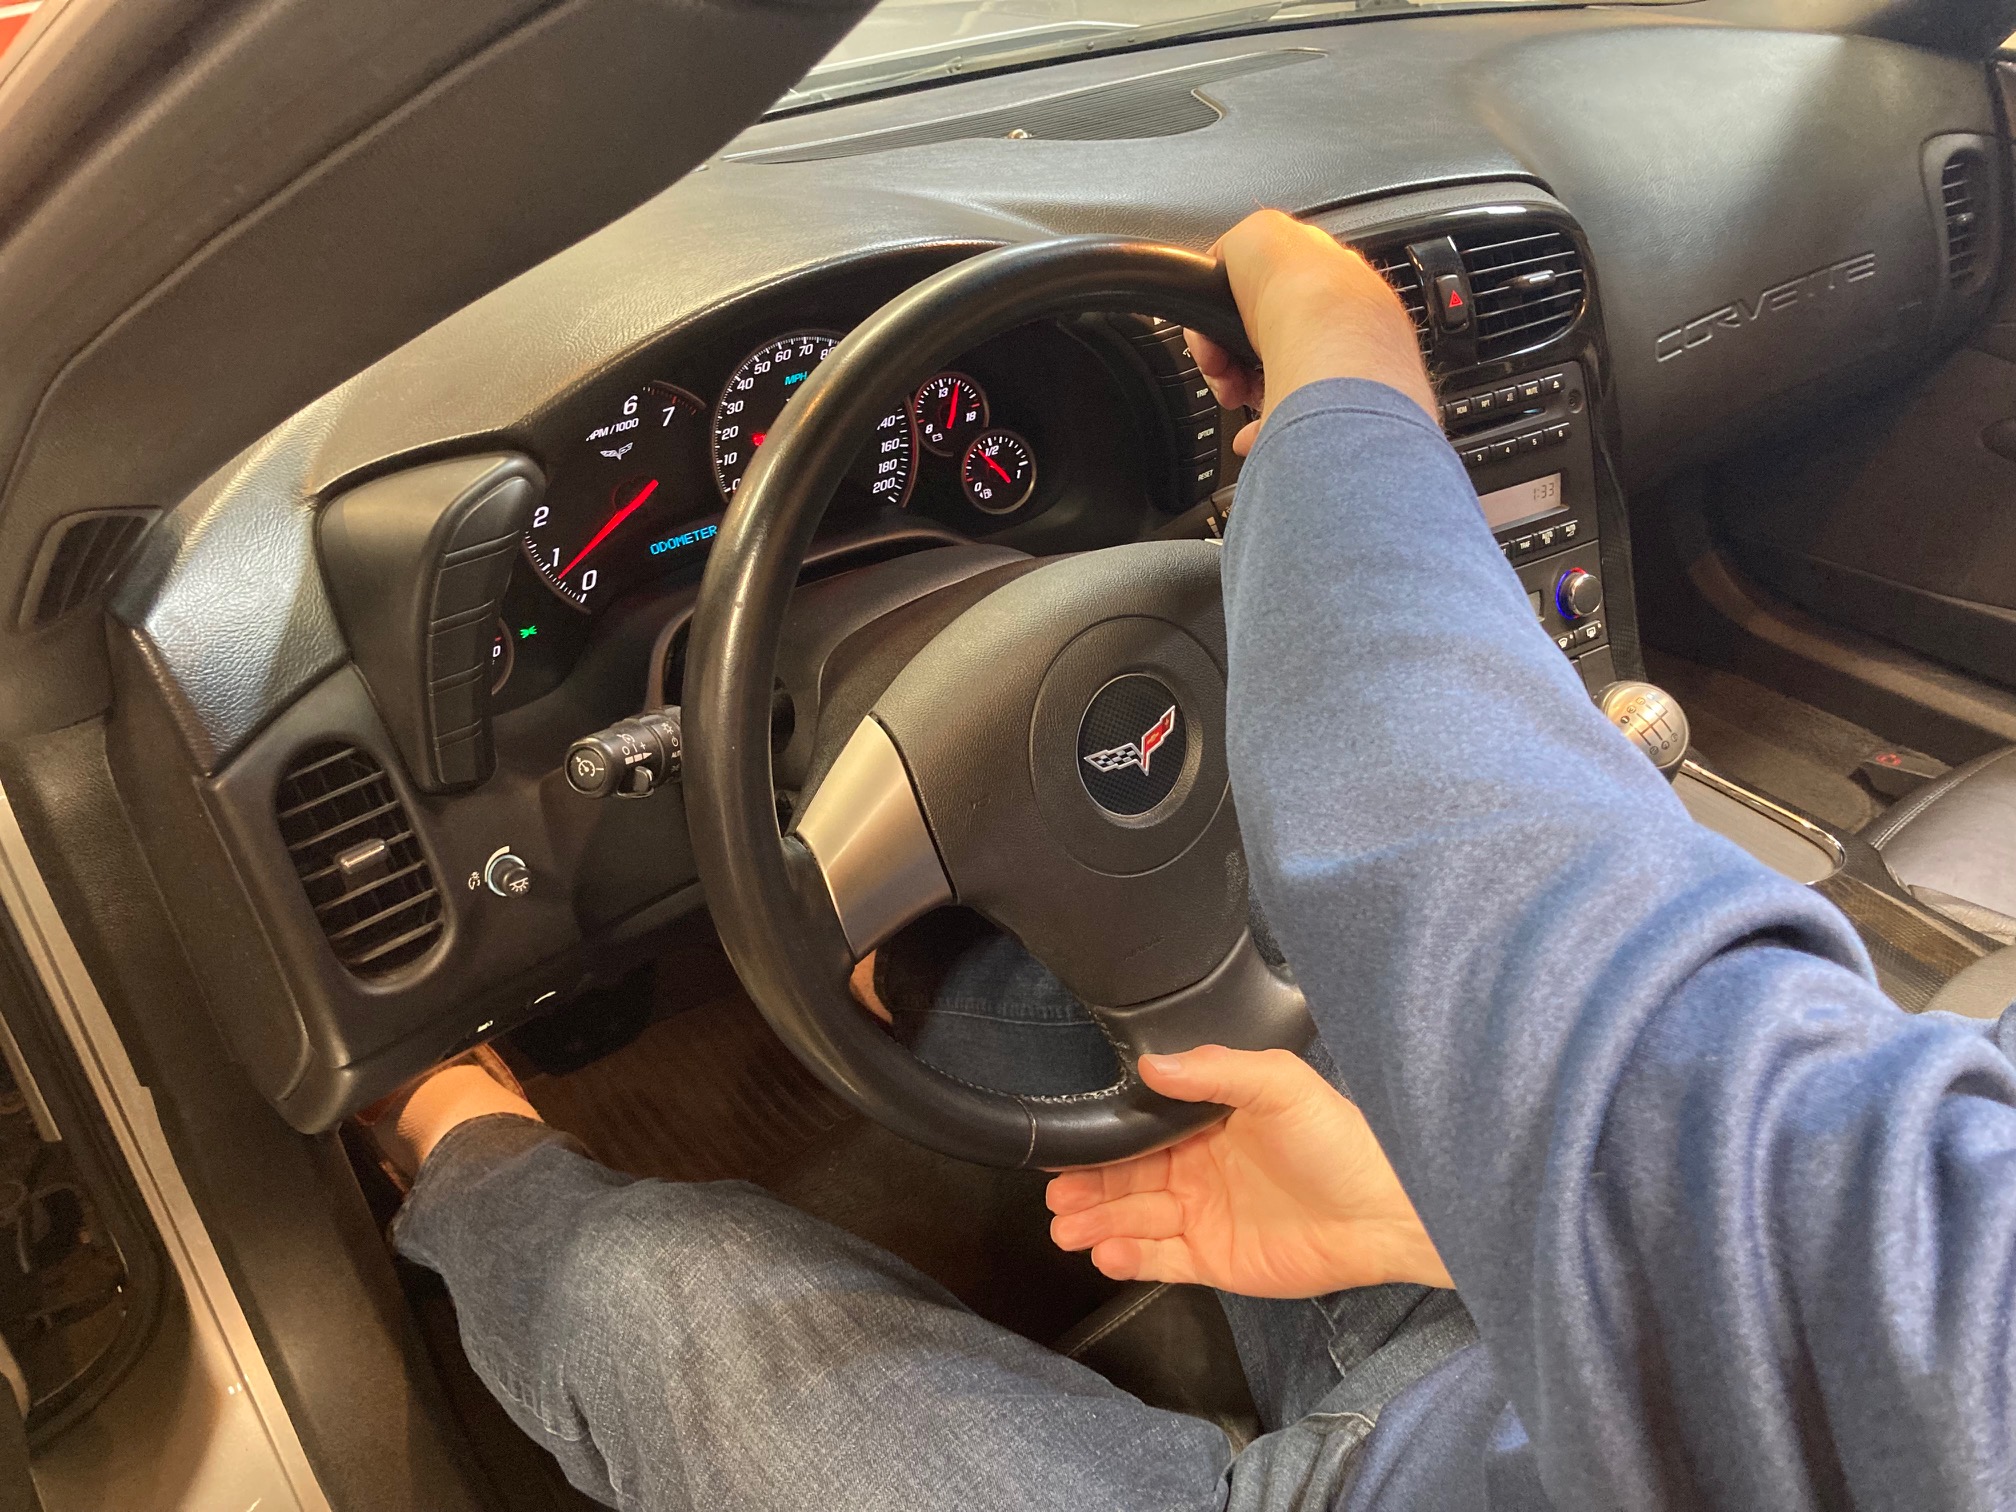
First point: Drive with two hands!
I know this seems obvious, but you might be surprised how many times I’ve seen people drive with one hand on the wheel and one that never leaves the gear shift lever. Palming the steering wheel with one hand through the entire course is a recipe for incredible slowness.
Don’t Drive In This Position! (either on the street or on the autocross course)
So, keep both hands on the wheel at all times except for the minimum time necessary to shift. Once the shift is complete, put the hand back on the wheel.
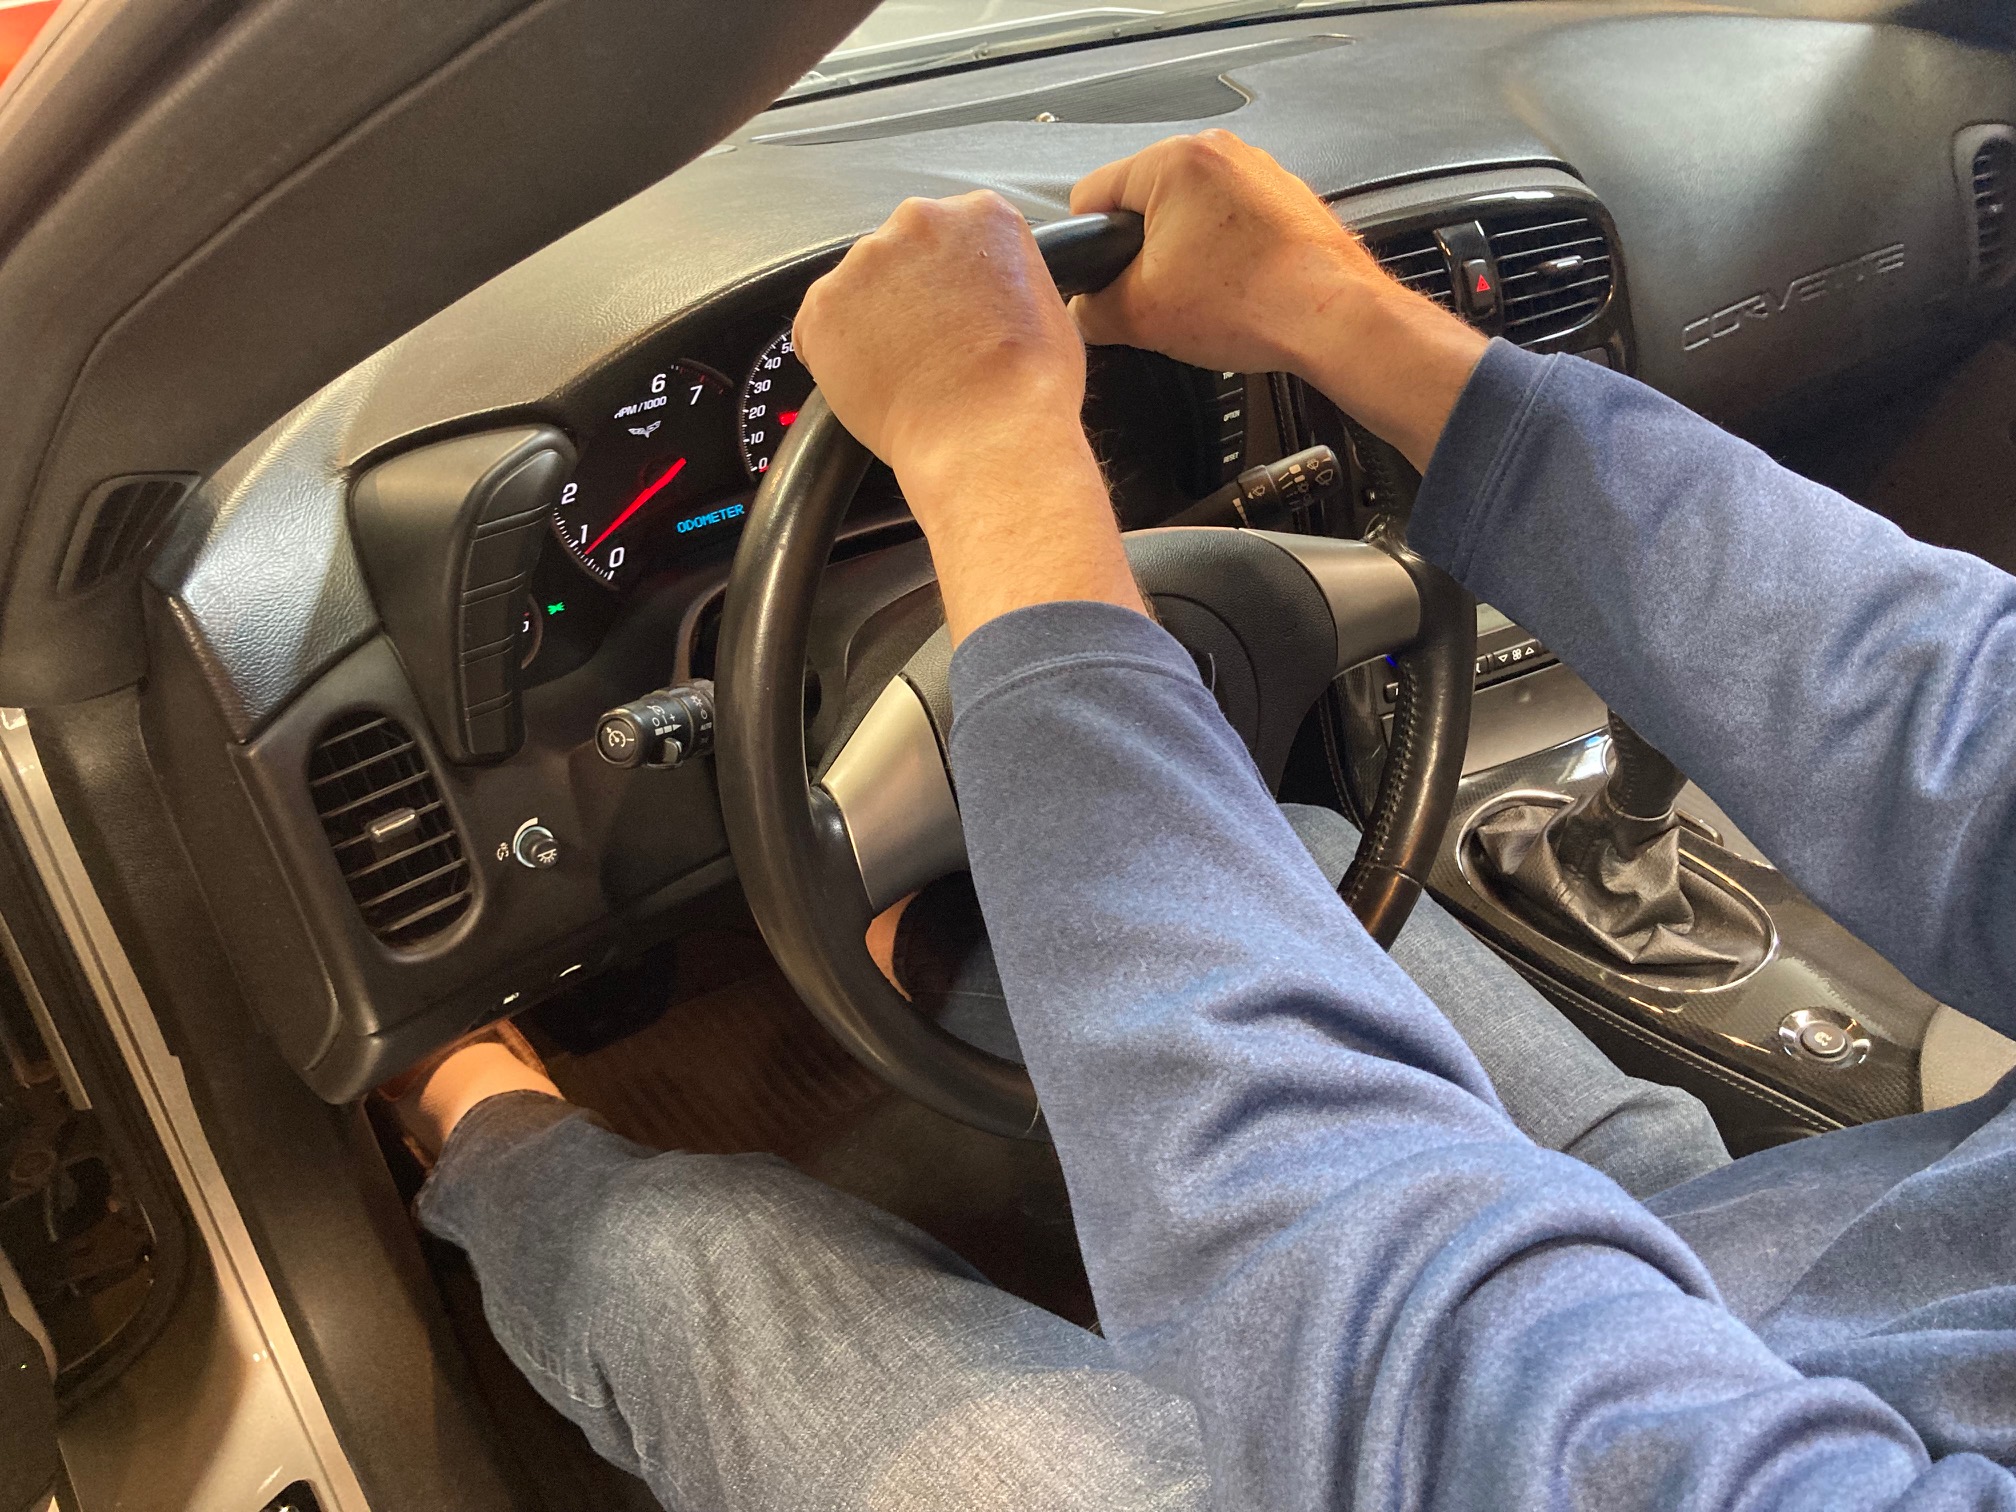
Second point: For maximum sensitivity, get the maximum amount of skin on the wheel.
Don’t drive with only the fingertips. In the picture below notice that the fingers are wrapped, all five fingers tips are touching the wheel and the palms are making good contact the wheel. Also, I like to position the hands just below 9 and 3 o’clock to get a little more rotation before having to reposition. A lower position for the hands also promotes relaxed, in-the-socket shoulders. Sinking down the neck, shoulders and elbows is key to sensitivity and control.
Proper Two-Hands-On-The-Wheel Positioning
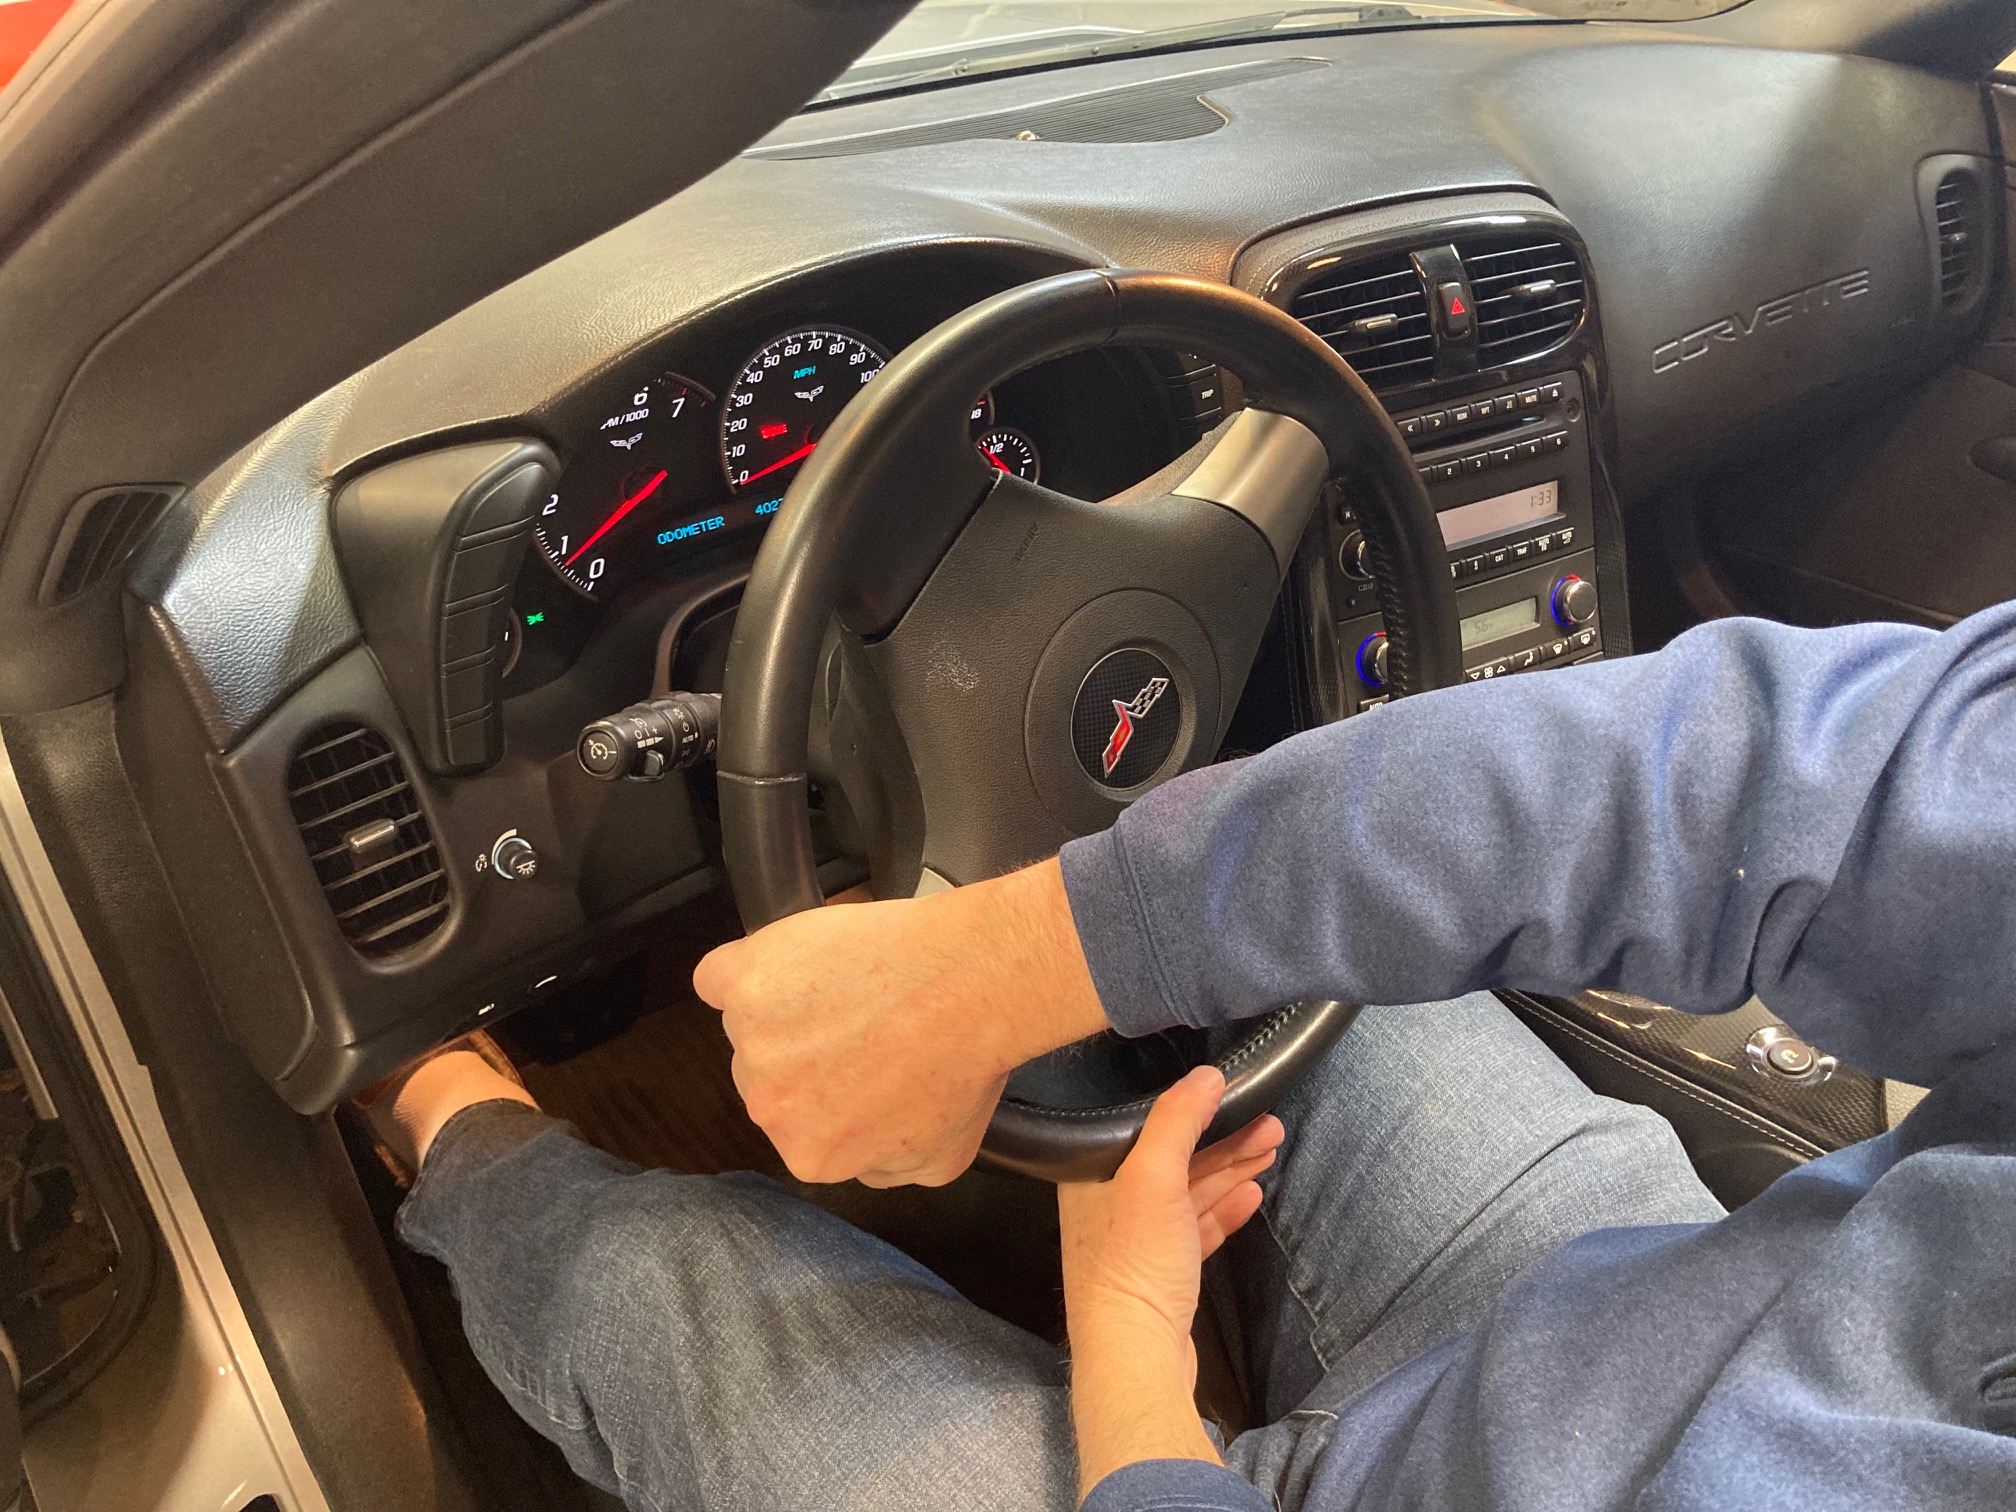
A common habit, one I sometimes still fight, is for the hands to creep up to the top of the wheel, as shown below. Don’t do it! This lifts the shoulders out of the sockets and significantly reduces control and sensitivity. Also, from here you can’t make a big turn without repositioning the hands in the middle of the turn.
Don’t Drive Like This!
Third point: Reposition the hands as little as possible.
In some cars, like the Cadillac CTS-V I started with, many repositions are required. By necessity, I got very practiced at shuffle-steering and it became a habit I had to break later. “Real” race cars generally have a steering ratio such that repositioning is never required, at least on a race track. Sports cars today are generally somewhere in between when it comes to maneuvering around an autocross course.
There are multiple steering philosophies and techniques. Read about them. Try them out. I’ll show you what I do, below.
Case 1: For a significant left turn, use both hands to turn the wheel, the right pushing up from the below 3 position and the left hand pulling down and then moving across your lap, having not totally let go but allowing the wheel to slide through the Tiger’s Mouth. Note that the logo in the center of the wheel has turned more than 180 degrees from center. Both hands are still in contact with the wheel and are providing information.
Final Position, Significant Left Turn. Wheel has been allowed to slip through the Tiger’s Mouth of the left hand
Case 2: If the turn is so tight that repositioning can’t be avoided, say in a tight left turn, I will preposition both hands as I approach the turn-in point as shown in the figure below. The left hand moves around and over the top, the right hand moves around and down. Then I’ll rotate the wheel initially with the left hand until it’s down below in the lap, while the right hand takes over and pushes the wheel over the top. The end position is the same as in the figure above, except that the wheel will have been turned 360 degrees or even a little more without shuffling the hands during the turning process. Unwind by doing these actions in reverse. A turn to the right is just the opposite, of course.
Hands Prepositioned Prior To Turning In For A Long Corner
I think this one-time, preparatory reposition of both hands is better than shuffle steering. When shuffling, each shuffle only produces about 160 degrees of wheel turn, so it takes three shuffles to get a full rotation.
Learn to shift some weight to the front tires before turning
Shifting some weight to the front allows the car to turn much harder and faster because the front tires give more traction. This means you don’t have to turn as early. By shifting weight forward you also increase the transient response capability of the car.
There’s exactly one thing that shifts weight to the front: decellerating the car. This can be done by lifting or applying the brake or both. Simple, right? It’s a matter of practicing this technique in order to get the timing correct. The timing is different from car to car and setup to setup.
Two exceptions:
First, turning while accelerating. Now you have to be a little careful. Why? Because now weight has shifted backward from the front to the rear tires, so the fronts will be down on grip.
Second, short-gap slaloms. If the cone to cone distance is not large there isn’t enough time to even lift for each cone and then accelerate in the gap between the cones, so it’s better to go though at the maximum constant speed. For long-gap slaloms and almost all autocross offsets it pays to lift for each cone and add gas within each gap. If the offset is big enough you will even have time to accelerate hard and brake hard within each gap.
How short is short? How long is long? It depends upon how responsive your car is, meaning both how fast it can change direction and how fast you can change from a lift or brake to significant acceleration. This is why transient response and instant engine torque are so highly prized in autocross. This is also why there’s so much argument as to proper slalom technique. Everyone is right and everyone is wrong, depending upon the car and the gap distance between cones.
All other times you turn the steering wheel you should have already shifted some additional weight to the front. There’s no crying in baseball there’s no coasting into a turn in autocross.
Learn to add throttle in coordination with opening the steering wheel
The slowest point in a corner is called the apex. From that point you can begin opening the steering wheel.
For every little bit that the steering wheel opens the lateral forces on the tires decrease. That means that they have molecules sitting around not working as hard as they can. So, put them to work! How? Start adding throttle. How much? As much and as fast as the tires will take. (Too much too fast and generally the car will begin to oversteer if it’s rear wheel drive and do the opposite if front wheel drive.)
Do not wait until the car is going in a straight line to add power!
Learn to trail-brake
Trail-braking into a corner is simply the opposite of adding throttle on the exit. Most autocross corners should be driven like the figure below.
Unlike on a race track, the braking point will usually be very close to, or even the same as, the turn-in point because of the lower top speeds in autocross. Initially brake hard. Then, as soon as you start turning, begin trailing off the brake pedal. As lateral force increases from the tires you must reduce braking or the tires will be overburdened. Theoretically you finish braking right at the apex when the tires are at maximum lateral force and then switch to gradually adding power as you unwind the steering wheel, as discussed earlier. It’s more important to begin adding throttle right from the apex than to perfectly release the brake right at the apex.
Learning to trail-brake on a race track is difficult and can be dangerous. Autocross is the best place to learn it. Start now! When perfected you will be significantly faster. If you then go to a track it will be automatic.
Autocross Braking Points Are Usually Very Close To, Or The Same As, The Turn In Point
Learn Basic Line Theory
Certain basics of line theory should be quickly learned.
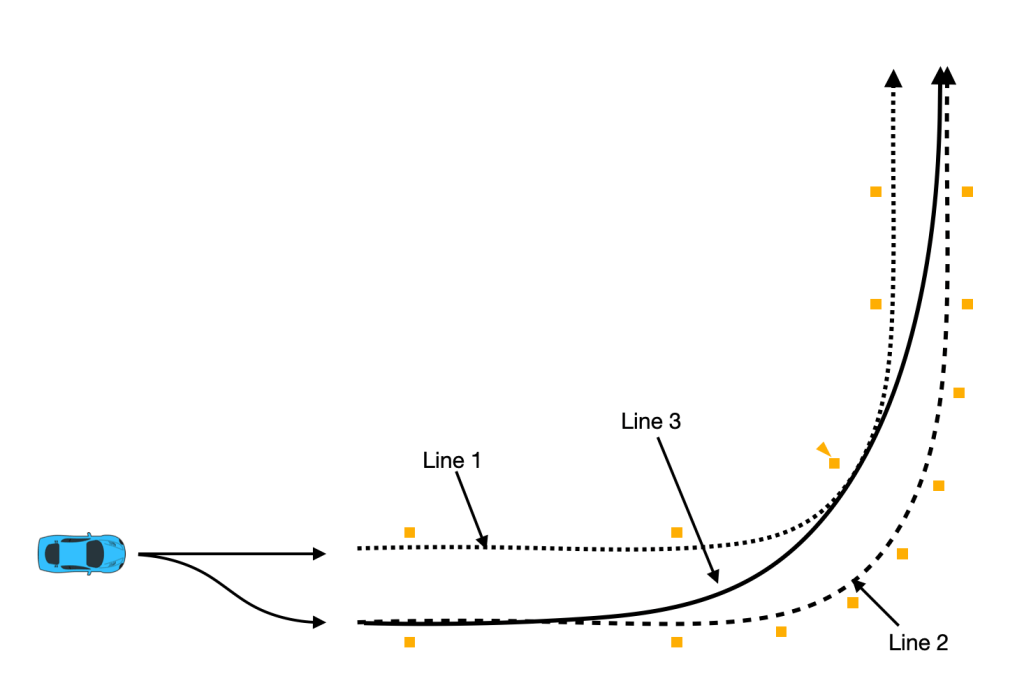
Set up left to turn right. Set up right to turn left.
This rule is not quite as simple as it may seem. Let’s take a 90 degree left turn as shown in the figure below. Very simply, don’t take Line 1 because the minimum radius is the tightest, meaning that the minimum speed will be the slowest. This assures that the time through the corner will be longer.
Don’t take Line 2 because the minimum radius, while bigger than Line 1, is still as not as large as it could be and the path is longer.
Do take Line 3 because the minimum radius is much larger than either Line 1 or Line 2. Therefore, a) the minimum speed in the corner is much higher, and b) that means you don’t have to brake so much coming in, and c) that also means you exit the corner faster and carry that higher speed as you accelerate out of the corner. These effects far outweigh the extra distance travelled compared to line 1, including the extra distance it took to get set up to the right based upon the initial location of the car as drawn, even if there is not a long straight after this corner.
Set up to the right and drive Line 3.
Turn Pinched Entries Into Chicanes
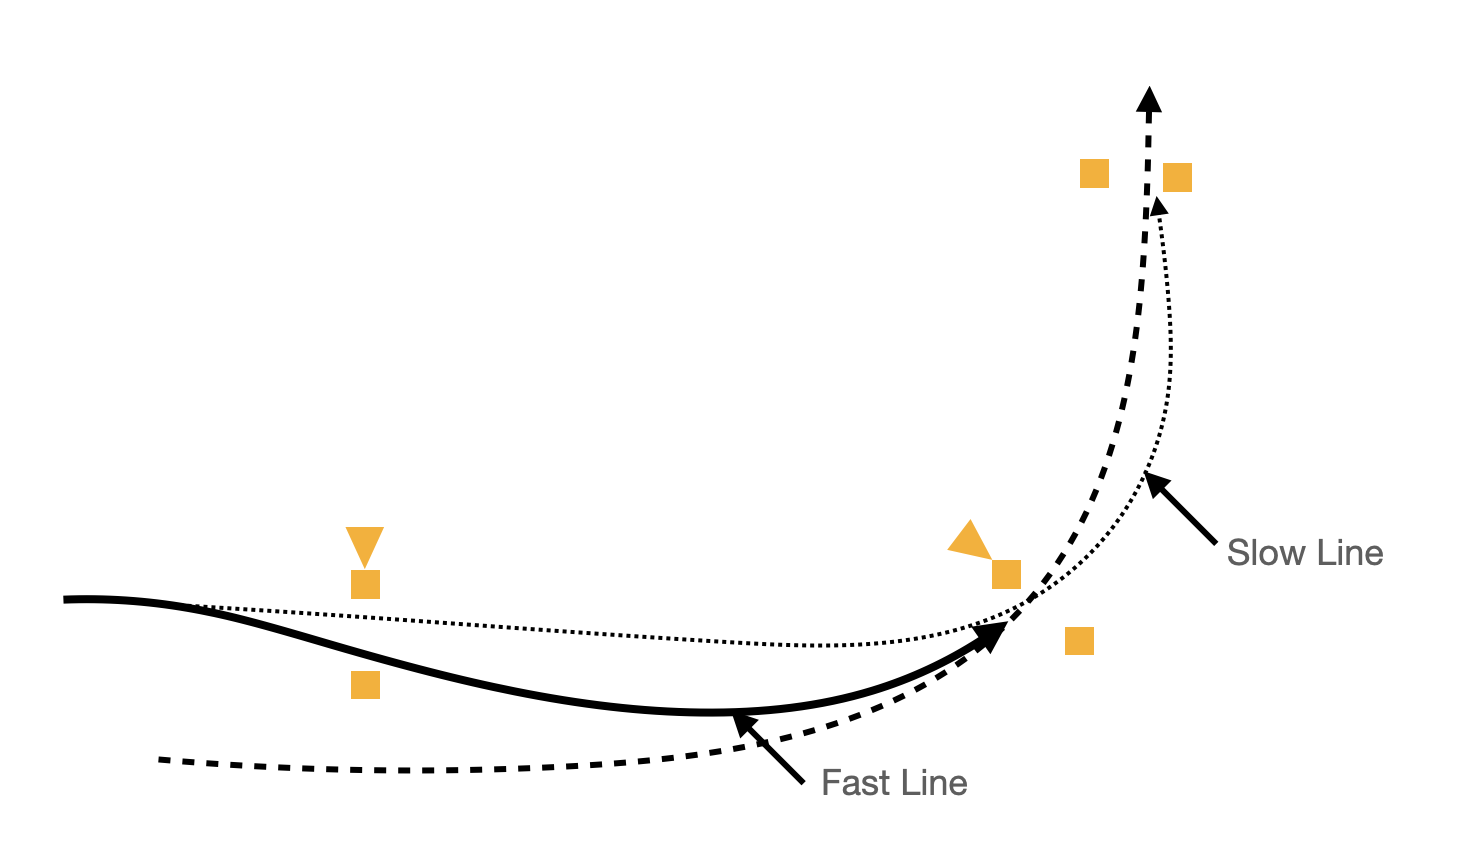
The entry to a corner is pinched when it doesn’t naturally or easily lead to the biggest possible radius through the corner. In the figure below, the best line is the dashed one, but the entry gate makes that impossible. This situation occurs often in autocross.
So, keep your speed up and turn out to get on that best line, the solid one in the figure. This maneuver is a chicane, i.e. two corners in opposite directions close together. The bold path below is the faster one even though the entry path is significantly longer.
A rookie mistake is to head almost straight for the turning cone, slam on the brakes and start a sharp turn as you go by. That’s the dotted path. Don’t do this if you don’t have to. (Sometimes you may encounter courses that give you no choice.) While the car will get to the turn cone faster you will have to slow the car considerably while approaching that point and continue slowing after that to get turned toward the exit gate. Effectively, you will have moved your actual apex (slowest point) to somewhere around the “Slow Line” arrow tip and the car will be very slow because of the tighter radius required.
To add insult to injury, the slow line means you will be starting to accelerate from a slower speed and from a later point, reducing the length of the acceleration zone. All in all the slow line will totally ruin your run time. I see lots of new autocrossers, especially those in powerful cars, do this over and over, for years. It’s very dynamic and fun, and it seems like you’re really killing it out there, and you may tell yourself that you’re making up time by using all that power, but the clock says otherwise.
Turn A Pinched Entry Into A Chicane
Don’t Go Wide On Big Corner Entry
By big I mean a corner that turns 120 degrees or more. In the figure below it doesn’t pay to take the 90 degree wide entry for the 150 degree turn, for example. Generally, for corners more than about 120 degrees going wide on entry does not increase the minimum speed in the corner, so you don’t get the same payback as with a smaller corner.
The correct radius to take the 120 degree or 150 degree turn, assuming complete freedom as shown in the figure, is a very complex subject, is dependent upon many factors and is way beyond the bounds of this post.
Don’t Use a Wide Entry For Big Corners
How To Drive Offsets
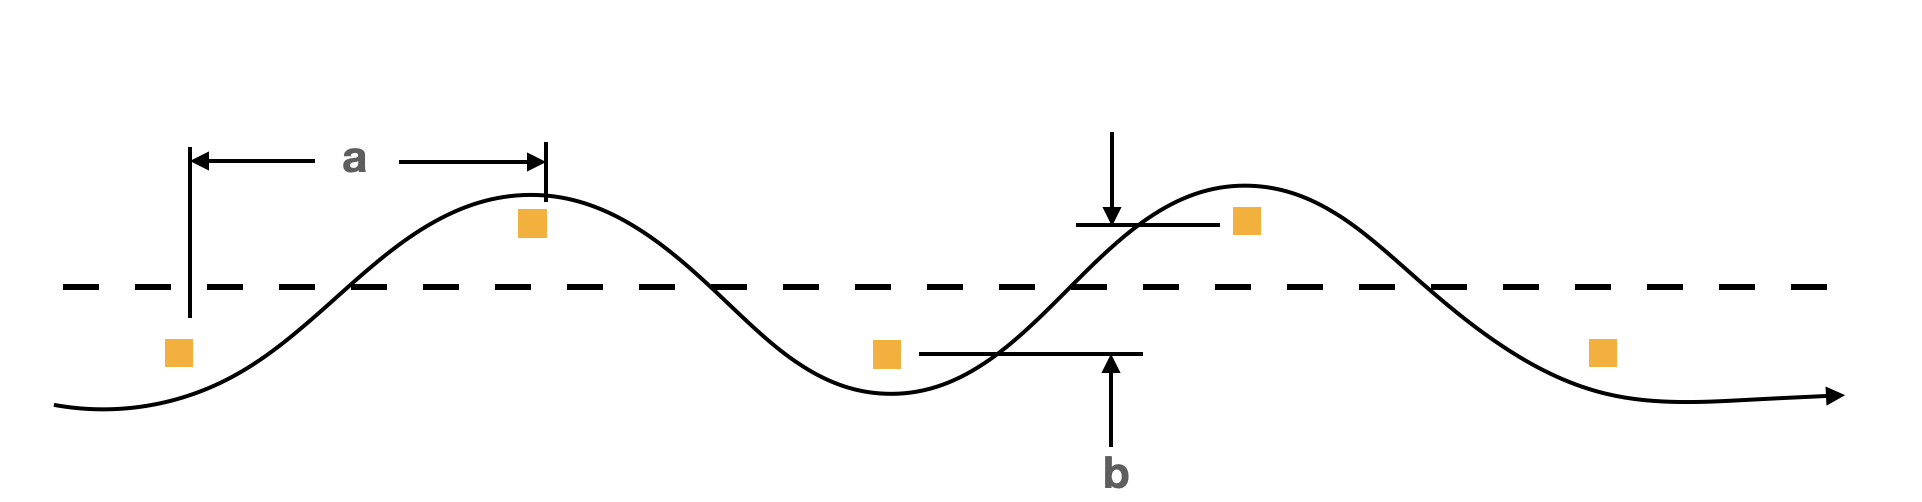
A series of offsets looks like this:
Offset Definition
On a small lot it’s unlikely that you’ll see such a long series of offsets, but you’ll probably have one or more shorter features that are actually offsets. Make your transition (change from turning one way to turning the other way) about half way in between the cones. In addition, most offsets have enough total distance between the cones that you should be at least lifting on entry to the turn around the cone and then accelerating through the gap between cones, even though the car is always turning and never going straight.
If the car travels in a straight line in the center of the gap between cones then either 1) you are probably driving too slowly and too tight around the cones, or 2) it’s not an offset because the distance is so far between cones that they are actually separate corners.
How To Drive Slaloms
Let’s start with the simplest slalom: three cones in a row. Geometrically a slalom is an offset, like in the figure above, but with the b dimension equal to zero, or almost equal to zero.
3-Cone Slalom
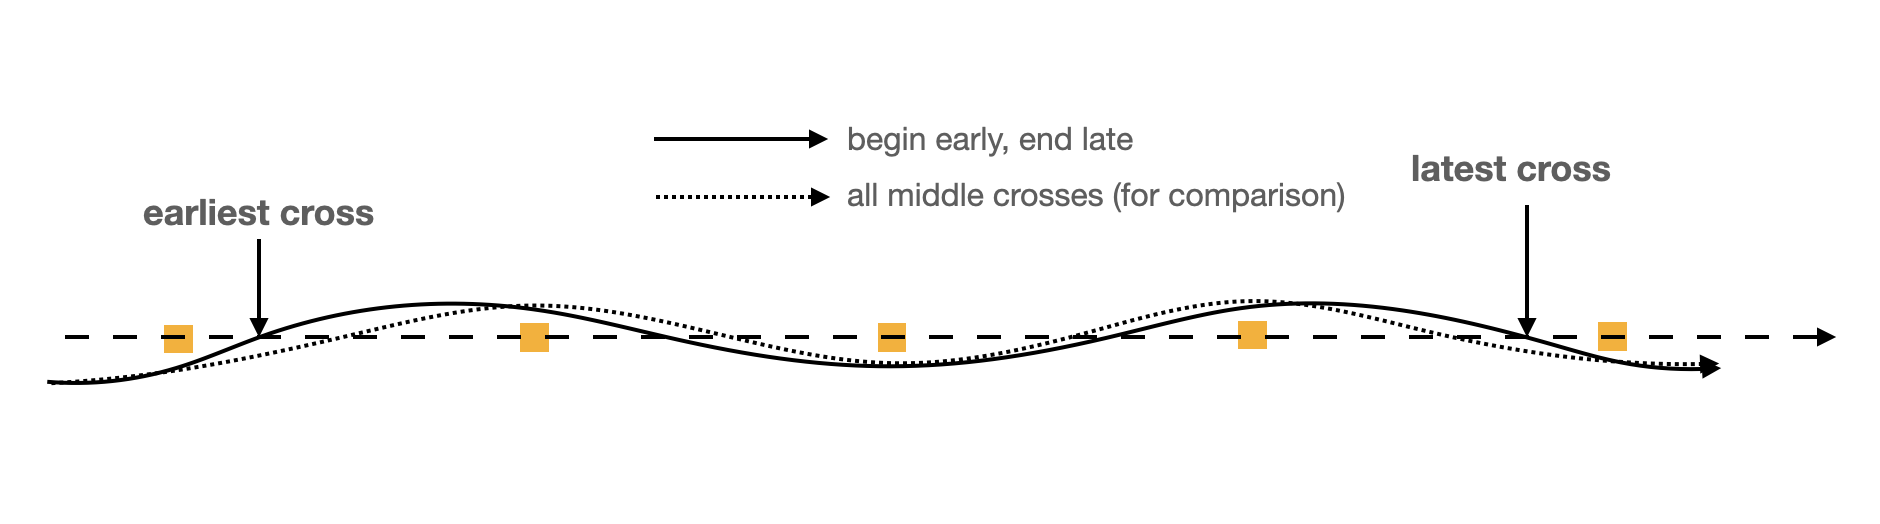
There is much argument about how to drive slaloms, but for the basic 3-cone as shown above most would agree to enter early, meaning cross the center line before the midpoint between cones, and leave late, meaning cross the centerline after the midpoint between cones.
This produces a middle arc with the largest radius which in turn allows the fastest speed to be maintained. It almost always pays to do what’s necessary to set the car up to achieve the early cross. It does not pay to slow in the middle to achieve a tighter turn around the middle cone in order to add gas early on the exit.
At the transition point, the point where you must turn the wheel to change direction, turn the wheel as fast as possible. Take advantage of every bit of transient response the car can deliver. Anything less requires the car to be traveling slower to miss the 3rd cone.
For a slalom with more cones the exact same theory applies as shown in the figure below.
5-Cone Slalom
In slaloms with more than three cones start early and end late, proportioning the difference equally so that the arc radii are all as large as possible. Start accelerating as soon as possible in the last gap, but, just as in the 3-cone slalom, don’t slow around the next to last cone to produce a tighter arc in order to move the acceleration point earlier. Similarly, except for the first one, don’t backside all the cones in order to produce an earlier acceleration point in the last gap. It does not pay off unless the car has tremendous acceleration capacity combined with poor cornering power, like maybe 650hp with skinny tires on the front and drag radials out back. Maybe.
OK, that’s about it. I think most people can make a good start on all of the above points in about 20 events. Now you have lots of things to work on at a Test & Tune event this Spring.