Definition 2 of the Late Apex: Intentionally make your apex slightly later than the optimum apex.
Note that implicit in this definition is that there is a known optimum apex location (maybe considered to be the same for all cars, or maybe not) and the driver chooses, maybe for safety reasons, not to apex at that point, but apex a little bit later. This definition has nothing to do with the geometric center of a corner. The optimum apex might be before the center or after the center, but the “late” apex is later than where the optimum apex is considered to be.
Usually the instructor of a novice student (who won’t know where the optimum apex is located in any case) simply shows the student where this “late” apex is located and the student practices precisely hitting that exact spot.
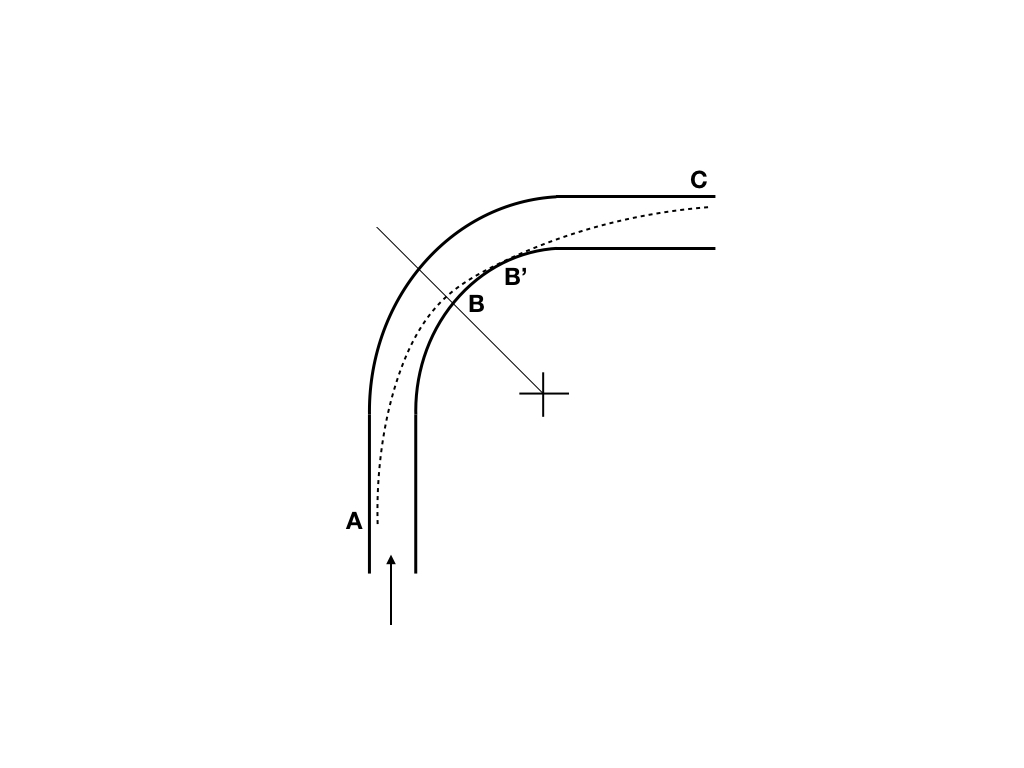
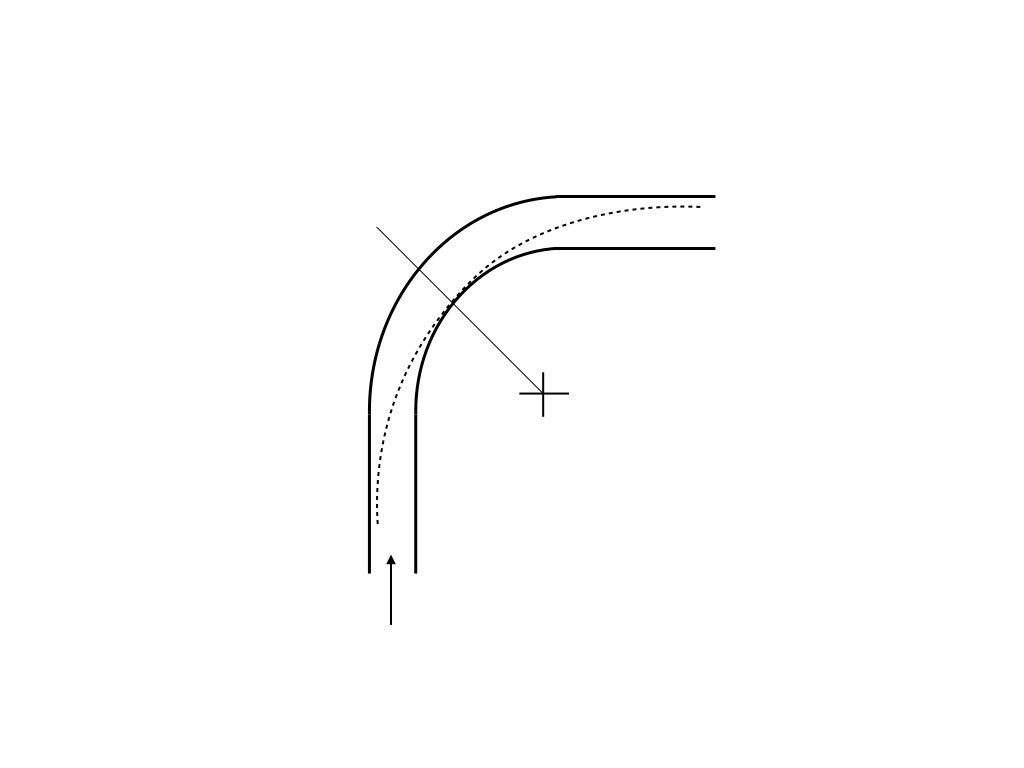
Let’s assume we have a moderately powerful car that needs to late apex a geometrically perfect 90 degree corner per late apex definition 1 that we discussed earlier. Here’s our old Figure 2, repeated, to show us just such a situation, perhaps with the lateness of the apex slightly exaggerated at B’.
Figure 2 (Repeated from part 2 of this series)
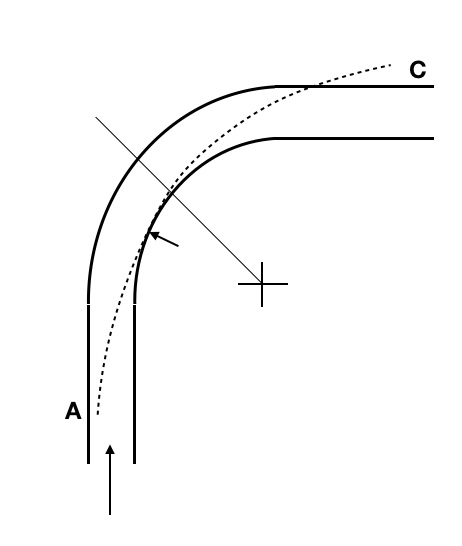
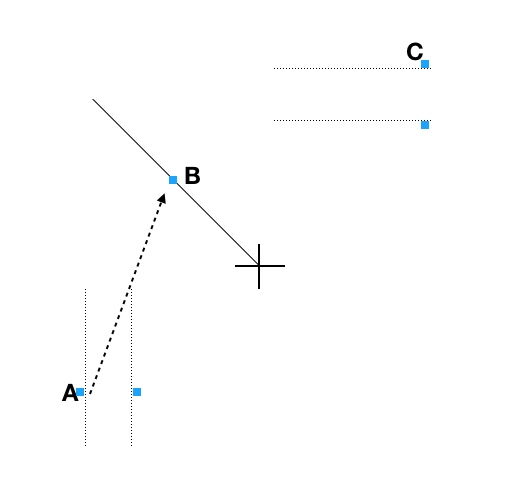
Now imagine John Wannagofast in his 505Hp Zed06 Corvette at his first track day. Johnny’s instructor takes one look as his gold chains, leather pants, loafers with no socks and sticker Hoosiers on the car and knows he’s in trouble. While the line and apex location shown in Figure 2 might be exactly the way the instructor would drive John’s car, what he’s worried about is that John will not be very precise in his driving and may, in a testosterone-fueled frenzy brought on by being forced to give a point-by to a Miata with front fenders in two different colors, enter Turn 3 (let’s call it) too fast and apex too early. This is the driving line shown below in Figure 9 where I’ve drawn an arrow to indicate where, by accident, a novice might apex. Once that has happened there’s almost no way the car, in the hands of said novice, doesn’t leave the paved surface, maybe even spinning as it disappears down an embankment in search of a tire wall.
Figure 9- Turn 3
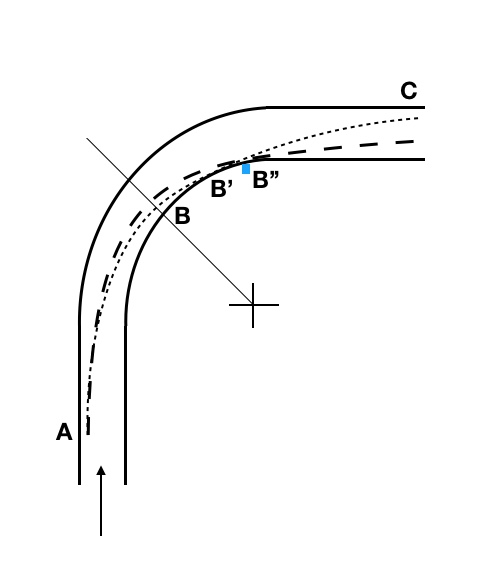
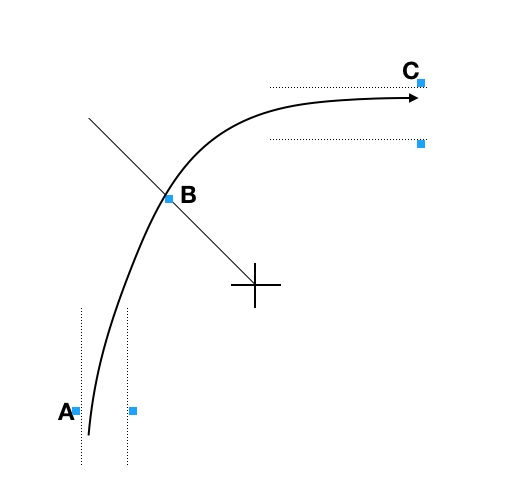
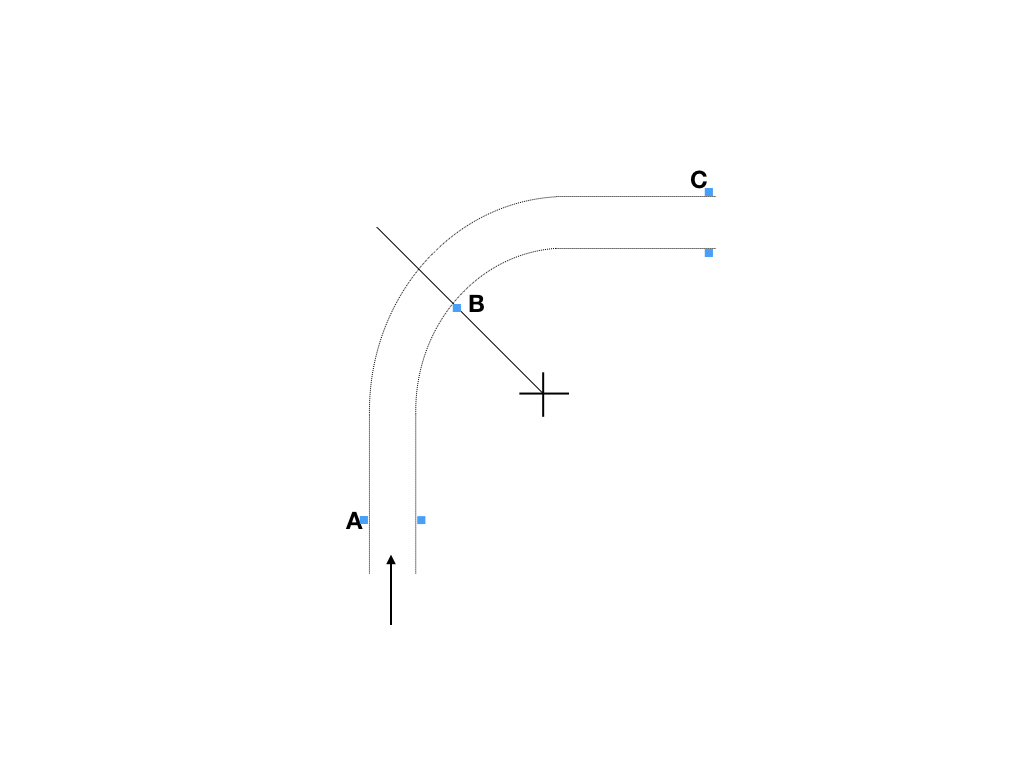
Here’s what happens instead: the instructor gets in his car and zips out to turn 3 and plops a cone down on the inner edge right at B” where I’ve shown the blue square in Figure 10, below.
Figure 10- Turn 3 With Instructor’s Apex Cone
The instructor now tells John, as they circle the course in the parade laps, that the way to take this corner is to get slowed down nice and early, turn in smartly as you come off the brakes, follow an arc around to the cone and then add throttle. About the 3rd session of the day the instructor may even suggest trying to get on the gas early, even before the cone is reached. Just make sure to get close to the cone and then allow the car to track-out to the left edge as you accelerate down the ensuing straight to be set up for the next corner.
This is the longer-dashed and bolded driving line shown in Figure 10.
Problem fixed.
John is now highly unlikely to go agricultural at turn 3. The instructor has built in a margin of safety while giving John plenty of good stuff to work on. Some people used to think (some still do) that this line, by virtue of allowing the start of acceleration to be earlier than the apex, will reduce the lap time because the average speed in the following straight is faster. They were wrong, but that’s another subject.
So far what we’ve explored is well-trodden ground. That’s okay, we’re just getting our bearings within the late apex landscape.
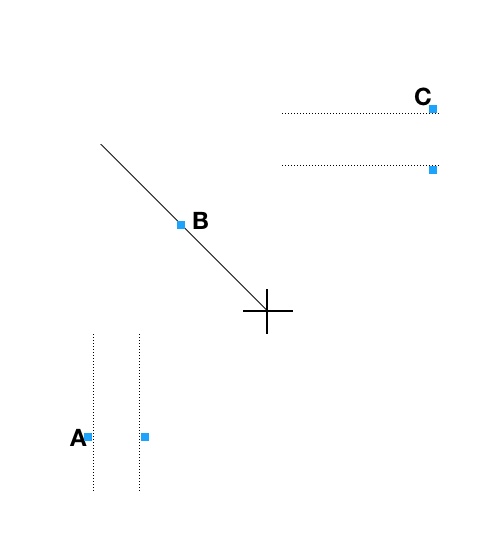
Now I want to shift gears and look at what we’ve just done from the autocross standpoint. There may be discoveries to be made. Let’s start with Figure 4, below.
Figure 4
Here I’ve deleted the track edges and substituted a simple gate at the entry at point A, a single cone at the former geometric center apex at B and another 2-cone gate at the former track-out point C. I left in some dotted lines to indicate the former track edges, the crosshair that indicated the former inside edge arc center and the 45 degree line for reference. Now that we are free from the inside track edge the only limitation becomes the cone at B. (Yes, it would normally have a pointer cone on it. Please use your imagination!) So, how to get from A to B to C in the least amount of time and should it, or could it be any different than before?
Certainly our path could be different. For instance, a typical novice mistake is to head at top speed more or less directly toward the cone at B as shown below. We can do this because we can cross over what would have been the inside edge of a typical track corner and change the angle of the car at B.
Figure 5
I used to do exactly this. I still have to fight the urge. I would race toward B and slam on the brakes. I’d still be braking hard way past point B where I would turn hard toward C, then apply lots of throttle to get back up to speed. Man, it feels like your really driving! Unfortunately, as dramatic as it is, it is also a very slow technique. This path would look something like what’s shown below in Figure 6.
Figure 6
Frankly, I see a lot of people who are no longer novices making this mistake. Maybe not as egregiously as I did for much too long, but not getting it completely right either. It can be quite difficult to fully recognize the fast from slow lines on autocross courses, especially courses designed intentionally to give the drivers the ability to hang themselves if they really want to. I continue to struggle with determining the correct trade-off between carrying the most possible speed through a corner and sacrificing a little of that speed to better set up for the next feature.
Why is the line shown in Figure 6 slow? While you initially get to B very quickly, you must over-slow the car in order to negotiate what will be a small radius turn after B, followed by using mostly just the engine to accelerate in the new direction beyond C. What you have failed to do is maximize the use of the much greater lateral acceleration capability of the tires to get turned from the initial direction at A to the new direction beyond C. The tires on my Corvette can push me toward C at 1.2Gs just by turning the steering wheel. Feakin’ 200 tread-wear street tires on a Street-class car produce 1.2Gs! The engine can only push me at about 0.45Gs in 2nd gear. Using the tires’ multi-tasking capability for longer and not braking so much will win every time in any car that has a similar difference between tire capability and engine capability. If this is not clear to you I covered this point in more detail recently in this post.
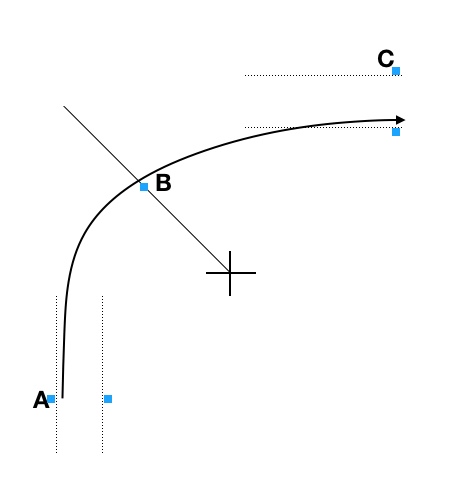
OK, so we can’t massively use the lack of a track edge prior to B to get faster. Is there a way to use the lack of a track edge after point B to get faster? We could take a path something like what’s shown in figure 7, below. Would that help?
Figure 7
What we’ve done now is to brake more prior to point B so that we can execute a smaller radius arc that ends at B after which we add throttle. The problem is that this will be slower than our original line also. We don’t take full advantage of the track width that’s available which in turn means we used the brakes too much and the lateral ability of the tires too little.
Ah, but some of you are seeing a utility to this line, aren’t you? If we need to be at the location of the arrow on the end of the path shown in Figure 7, at the lower boundary of the gate at C instead of the upper boundary, to be best positioned for the next feature, then we will use exactly a line like this. And some autocross people will call this late apexing. But, it’s not really the same as what we previously drew as a late apex line on a track with edges in Figure 2, is it? In track driving the key component of a late apex is the fact that the position moves around the inner edge of the track and the angle moves with it. In autocross the position of your apex in any feature similar to this is not going to change. It’s going to stay at the cone at B. What will change is the speed and angle at B. So I prefer to not even use the term early or late apex for autocross. Leave those terms for the track environment.
You have to figure out how to drive this feature on the course walk. My method is to stand on the cone at B and look toward the exit at C. I estimate the speed the car will have when arriving at B and decide what the angle of the car needs to be when it passes B, that is, what angle will allow maximum possible throttle-up starting at B and still make the cone at C, or be where I want to be within the gate at C. (The car’s angle at point B is something very easy to recognize, easier than the speed.) This is the definition of optimizing the corner exit. Then I work backwards to determine the line, braking and steering inputs I will need to execute from A to B to arrive at that angle and speed. I don’t call the result either an early apex or a late apex. It’s just the correct apex which really consists of three things: a location, a speed and an angle.
When you drive the course for the first time you probably won’t get it perfect (or anywhere near perfect) so you have to understand how to make the right correction. If you find you can’t deploy all your car’s power after B without hitting the cone at C (equivalent of going off the edge of the race track) then you arrived at too vertical an angle and probably also too fast, i.e. you didn’t slow enough and turn enough before B. So on run 2 you slow a little more and turn a little more between A and B and thus arrive at B at a more horizontal angle and a little slower to allow taking full advantage of all the tire capability and whatever engine power you have after B to reduce time in the corner. This will then optimize the exit as well as the entry specifically for your car (and your car only) within the prevailing conditions. If you’re driving an A-Street C6Z06 Corvette don’t go to your E-Street 1999 Miata buddy and tell him he’s apexing at the wrong angle just because it’s different from you. (Especially if he’s beating you on PAX!) He may be doing it right for his car and it should be different than what you’re doing.
If you arrive at your anticipated point at C but don’t feel you were working the tires to the limit all the way there then you must have arrived at B at too horizontal an angle and too slow. (Full throttle in a straight line does not work the tires to their total capacity even in most four wheel drive cars. Most cars can still turn while accelerating fully.) You correct it by slowing less after A and turning less after A so that you arrive at B faster and more vertical. Then you keep the tires on the limit by continuing to turn (while slowly opening the wheel) while feeding in throttle. In a Miata it may well be full throttle immediately. In a GT350 you’re gonna have to be careful with the right foot!
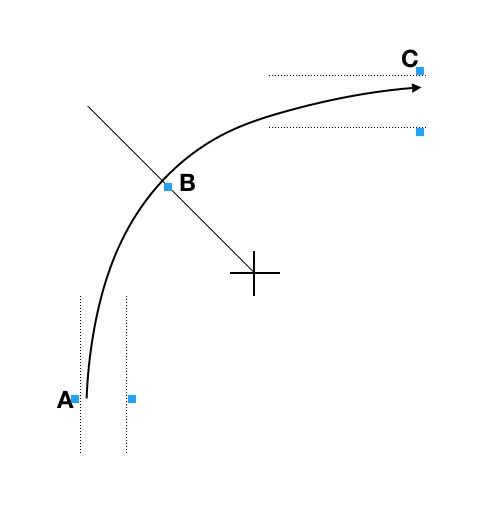
If you’ve applied the corrections then you will arrive at a line that looks something like the one shown in Figure 8, below. Yes, it’s our old Euler spiral, if done correctly. A decreasing, trail-braked radius from A to B and an increasing radius from B to C. Theoretically, the tires are worked to their limit from A to C with combinations of braking-turning (A to B) and accelerating-turning (B to C.)
Figure 8
This line is similar to, but not exactly the same as the late apex line shown in Figure 2 of the previous post. Previously, for a high-power car, we needed the late apex to optimize the exit. Now, for the exact same car, the apex has moved from the previous B’ back down to B and the angle and speed at B change slightly. This new line will probably cross the previous track edge before getting to B. The angle at B will be more vertical since there is a longer distance from B to C during which to complete more of the turn than from B’.
The higher the power to weight ratio, for the same grip level, the more turning has to take place prior to reaching the cone at B. Therefore, the more horizontal the angle will need to be at B in our example. So, in autocross, we don’t make a “later” apex with a more powerful car, i.e. change the location of the apex by moving it around the inside track edge. Instead, we revise two of the three properties of an apex, the angle and speed at the apex location.
We could drive the exact same late-apex line of Figure 2 and it would be almost the same time, but I think it would be slightly slower because it feeds throttle in later and is very slightly longer. We would be some distance off the cone at B which most experienced autocrossers would recognize as a fault. It would not quite optimize the exit that could now start at B instead of B’. If the cone were in fact at B’, instead of at B, then the line from Figure 2 would be correct.
This is not to say that some randomly placed cone in the middle of a corner is always the apex point. Most assuredly this is often not the case. Some cones in the middle of a corner may not even be on the racing line, much less mark the apex! What if there’s no cone at B at all, similar to the case of a 2-cone turnaround discussed in this post? In that case we have to decide where, out in the vastness of space, we will reach our slowest point and decided what speed and angle to be at. All without a good landmark. Ain’t autocross grand?
Now we are ready for the next installment where we’ll present definition 2 for late apexing, the one that I was taught in order to be able to drive track corners safely as a novice, meaning without leaving the pavement! I don’t yet know if it will have any autocross relevance.
On to definition 1: In the simplest of terms a late apex means the car touches the inside of the corner somewhere beyond the geometric midpoint of the corner.
The figure below is intended to show a perfect 90 degree corner and a typical path through it. The borders of the corner are intended to be circular with the center point of the inside arc indicated. A 45 degree line is drawn through the corner.
In this perfect representation of a corner (which never actually occurs in nature) the geometric midpoint of the corner is point B where the 45 degree line intersects the inside edge of the track. (Of course, we have no track edges in autocross. We’ll get to that later.)
The dashed driving line shown starts on the outside at A, makes an apex at B and tracks out to C. Most of us know that something like this is the fast way through such a corner. It’s assumed that the car approaches A at high speed and must brake. Let’s not quibble just yet about trail-braking, spiral entry arcs or whether the length of an ensuing straight makes any difference. Keep it simple.
Figure 1
A late apex line is, per definition 1, any line where the car contacts the inside edge of the track beyond point B, as shown below. The new apex is at B’ and it is “later” than B. Simple as that.
Figure 2
So, when the road racing expert says “You want to late-apex almost every corner on this track” I think what he means is probably definition 1. Why you should late-apex the corners is left unsaid (other than it’s faster) and many assumptions are being made when he says that.
Assumption number one is that the expert is talking about a range of similar cars. Most cars that don’t have extensive aerodynamic downforce, but have relatively high power to weight ratios need to late-apex most corners at most every track on the planet. Does the expert know why? No way for me to know, but his statement is basically correct anyway. This is because if such cars apex at B while cornering at the limit and then try to apply full power as they unwind the steering wheel they will go off the track somewhere around point C. In Brouillard’s terms, they are unable to optimize the exit. To stay on the track they are unable to use their excess power to decrease time spent in the corner. A late apex “fixes” this issue.
By the way, I tend to roughly define a high power to weight ratio as about 10 lbs/hp or lower. A stock 1999 Hard S Miata at 2200 lbs and 120 hp does not qualify at 18.33 lbs/hp. My 2000 Corvette at 3100 lbs and 345 hp barely qualifies at 9.0 lbs/hp and it will need a slightly late apex. A Mustang GT350 at 3800lbs and 526hp is at a power to weight ratio of 7.2lbs/hp and needs an even later apex. If all three cars drive to the same geometrically centered apex at B the Miata wins.
For the stated Miata, for example, late-apexing at B’ is not the fast way through this corner. That car wants a nearly circular arc that apexes very near the geometric center. The same for a Formula 1 car. In spite of their huge power, F1 cars have proportionally even more downforce, and therefore cornering power, so they take cornering lines more like the Miata. Watch any F1 race and this will be evident. What Brouillard made really clear is that it’s the ratio of power to grip that determines the proper line through the corner for any particular car.
What happens when the “corner” is defined only by an entry gate, a single cone “apex” and an exit gate, like in the figure below? That’s what we’ll talk about in the next installment.
Since writing the post Never Late Apex in 2015 and then revising it here I’ve come to realize that people have different ideas about the term Late Apex. Time to get it straight. Of course, when an autocrosser says “straight” better hold onto your wallet!
I’ve heard racing experts say, when advising how to drive a particular track, “You want to late-apex almost every corner” and they mean to be talking about the fastest way around the track. The problem is, what exactly do they mean by late-apex?
I’ve heard autocross experts say two things apparently interchangeably: “You want to late apex this cone” and “You want to backside this cone” as if they mean the same thing. To them, maybe it does mean the same thing, but not to me. What it tells me is not that the instruction is incorrect but that they might not actually know what late-apex means, though there’s no question about backsiding a cone. Backsiding a cone is an easily understood way of driving around a cone. It refers to the angle of the car as it passes the cone with respect to the general direction of approach. (There, I almost defined it.)
Late apexing a cone? Late apex, when it comes to autocross, is an extremely hard term to pin down because you apex, either late or early, with respect to an entire corner, not a single cone. A single cone on the autocross course rarely forms a complete corner, with the possible exception of a single cone turnaround. (Even then I would argue the point.) And a single cone within a corner may or may not be the proper apex, though you can always be wrong (and slow) and make it the apex. So, when someone told me to “late-apex that cone” I was always sort of confused, being as slow in the head as I am, until I realized they just meant to backside it. Hey, I can do that! Why didn’t you just say so?
Frankly, and this may shock you, I’m not even sure it’s worth thinking about the concept of late or early apexing for autocrossers once we get it all straight. I no longer use these concepts at all when thinking about autocross driving lines. They have zero utility for me. Maybe I can get you to that point as well. Maybe if I take the time to write it you will find it worthwhile to spend the time to understand it.
Definitions
I’ve come to recognize three definitions for Late Apex. Maybe there are more, but I think these cover most of the territory. Number 1 is a simple geometry concept that can become exceedingly not simple in autocross. Number 2 is an actual technique for taking corners on a race track (with dubious utility on the autocross course) and is the one I was taught at my first track day. It sort of uses definition 1 as a given. Number 3 is the newest and best one, the one that as far as I know became fully developed only with the publication of Brouillard’s The Perfect Corner in 2016. It fully encompasses definitions 1 and 2. Using definition 3 apexing late or early is always a mistake when it comes to the fastest way around the track. There is only one correct apex for a particular car and set of conditions. All others are incorrect, in theory.
When I wrote Never Late Apex I was talking about definition 2 and attempting to relate it to autocross racing, not trackday driving. It can be found in many books and articles on performance driving and I’ve seen it taught to novices at various trackdays. (However, at least one person who claims to be a track instructor has told me I’m crazy, nobody would ever teach it to a beginner or anyone else.)
If you really understand definition 3 your whole approach to performance driving may change. Or maybe not. There is much to recommend the technique of definition 2 for the trackday enthusiast who knows it’s not a competition and chooses not to inordinately risk car or health. But, I think that a deep understanding of definition 3 will inform your technique, broaden your understanding and allow you to be both faster and safer.
(This is the end for part one. As I’ve sometimes done in the past, I’ll keep iterating with additional posts as I create diagrams to go along with the narrative. I’ll probably end up with 3 times the number of words necessary, but that’s the way this type of writing goes.)