Transient Response 6.3- Final Answer

How much does transient response really contribute to Saving Time on the autocross course? Time to answer that question.

Turns out we already have what we need to get a first-cut approximation. Back in Transient Response 5, if you’ll recall, I found out three things.

Thing 1: All typical slaloms, no matter the length between cones, take almost exactly the same time in the gaps between cones for a given car

…therefore it doesn’t matter what size slalom we get data from, as long as the spacing is consistent, or we average over enough different designs

Thing 2: I showed data for my BS Corvette that indicated 1.05s between cones

Thing 3: I showed data for a Street Prepared car that indicated 0.98s between cones.

I think we can safely conclude that any properly prepared Street Touring car will be similar, on average, because of the similar amount of suspension preparation allowed (springs and bushings) which I think are the key factors. Car to car variations can be big, of course.

So, we now have all we need except one thing: how many gaps between slalom cones are there on a typical autocross course? If we count them up we can calculate a first-cut approximation.

Here’s the map for the 2019 Nats East course with the slalom gaps counted.

East count

Figure 1- 2019 East Course Slalom Gap Count

I get 15 slalom cone gaps. Multiply this number by the difference between the Street time number and the ST/SP time number gives 15 x (1.05s – 0.98s) = 1.05s

Here’s the 2019 Nats West Course counted:

West count

Figure 2- 2019 West Course Slalom Gap Count

I count 14 slalom cone gaps. So, 14 x (1.05s – 0.98s) = 0.98s.

Both results are right at 1 second.

Assuming these courses are typical I conclude that the increased transient response of ST and SP classes over Street classes is worth about 1 second on a Solo Nationals course. I think this result is exclusive of weight differences, power differences or grip differences to any great extent. Just transient response. It’s also conservative in that it doesn’t take into account the gain into each standard corner where a high TR car can turn in later, thus extending the previous straight.

I really don’t know what to make of this. I don’t know if it’s more or less than I expected or more or less than generally understood. Let me know what you think.

Also, I’d love for people to post their data for average time between slalom cones along with the car and prep level. If we could create such a database we might have something very useful.

Transient Response 6.2 Rev A

Additional charts and info has been added at the end.

Now I owe you the explanation for the statement: “The fastest way through any generic, non-infinite slalom is probably achieved by starting early and ending late.”*

I’ll try to illustrate the idea. Let’s assume we are negotiating an 80′ slalom, meaning 80′ between cones. It might look like Figure 1, below.

6point2fig1

Figure 1- Car And Path In An 80′ Slalom

There are two little blue dots… those are the cones at 40′ and 120′, so 80′ apart. The path in the picture crosses at the 80′ mark, exactly half-way between the cones.

If the slalom is infinite, then trying to be early or getting late is the equivalent of shifting the path (and car) left or right with respect to the cones and results in hitting a cone as discussed in the previous post, Transient Response 6.1. So to be early or late you must alter the path. The different path could be one with more (wider) lateral movement or it could be one with smaller radius curves connecting straight sections. If you think about it for a while and maybe even draw it I think you will come to the conclusion that any of the possible alternate paths that would allow the car to be early will take at least a little bit more time than the perfect path that crosses exactly in the middle.

But, of course, infinite slaloms are rare. (That’s a joke.) More importantly, the entry and exit of non-infinite slaloms can take all sorts of forms. Let’s look at a fairly common non-infinite slalom as shown below in Figure 2.

6point2fig2

Figure 2- A Non-infinite (5-cone) Slalom With Same-Side Entry And Exit

Here’s the same 80′ slalom, showing 5 cones, with the same red line showing the infinite-slalom perfect path. But now let’s assume that we enter from point A and exit at point B.

We could enter from A and get on the red path and follow it faithfully to the end.

But, because of the entry location at point A something more interesting has become possible. We can be early on the first cone without losing anything. (Let’s assume that’s true, though it’s not really, quite, absolutely, positively true.) I’ve drawn a dashed line path that shows the cross between the first and second cone at 10′ from the first cone, which is the 50′ mark on the chart.

What if we now follow the dashed path and make our next crossing at 20′ beyond the second cone, at the 140′ location. And then the next crossing is at 30′ past the third cone and the crossing after that is 40′ beyond the fourth cone. Do you see what’s going on?

In the infinite slalom we cross every 80′. In the non-infinite slalom we cross every 90′ (or more.) Necessarily the non-infinite slalom path (dashed line) must have a bigger radius than the original path (red solid line.) Therefore, the car can travel faster through the slalom for the same lateral acceleration and transient response capability.

I know that many of you are saying that I’ve missed a key point, which is that we can start accelerating early to the exit, somewhere about the fourth cone. That’s true for almost all non-infinite slaloms (except ones where the course designer is really obtuse and prevents us from doing that via what comes next) and of course we can and should do this, but that’s not my point here. I assume you already know about accelerating early.

There’s a possible glitch, however. The dashed-line path cannot actually be a series of perfectly smooth and efficient curves, circular, sinusoidal, or otherwise. We still have to modify it somewhat to not hit the cones. There’s just no way to perfectly fit the path with 90′ nodes into an 80′ slalom without altering the path somewhat due to the finite size of the cone and the finite width and length of the car. A little bit of a wider line is required. How much this degrades the net result I don’t know.

In any case, I think that in many real-world situations the start-early and end-late path Saves Time but I recognize that I’ve certainly not proven it.

Rev A Addition

Maybe an easier way to think about this is to start with the 3-cone slalom, constructed as and known in some circles as the Chicago Box.

The figure below shows the situation with the infinite slalom driving line in red.

6point1reva 1

Figure 3- The 3-cone Slalom

If we were entering at A and exiting at B would we try to find the infinite slalom, midpoint-crossing driving line? I don’t think many people would. I think most everyone understands that the 3-cone slalom is a special case where we should enter as early as possible and exit as late as possible to produce the biggest radius path, as shown below.

6point1reva 2

Figure 4- The Correct Path Thru The 3-Cone Slalom

We tend to treat the 3-cone slalom as a special case and it is. A special case of what? It’s a special case of the generic start-early and end-late path shown above in Figure 2.

Here’s another one, a 4-cone slalom, shown below.

6point1reva 3

Figure 5- The 4-Cone Slalom

With a 4-cone slalom we necessarily enter on one side and exit on the other, but the principle is the same. We make the first cross as early as possible, make the 2nd cross at the midpoint between cones and make the third cross as late as possible. This creates a path with the maximum radius curves possible, which means the highest speed.

  • *I must give credit to Steve Brolliar who teaches this start-early, end-late concept at our Advanced Autocross school each year. I hope I’m presenting his point faithfully.

Transient Response 6.1

Update: Figure 3, 4 and 5 were added on 8/5/2020.

Here’s the proof for the statement I made in the earlier post: The fastest way through any infinite slalom is by crossing over mid-way between the cones. Any other strategy, i.e. being early or late, at any point, will be slower overall.

Let’s assume we are driving a car with infinite transient response, which means we drive through an infinite slalom on perfectly circular arcs. (It doesn’t really matter, but I drew the figure this way.) We can make our crossover either at the midpoint between cones, or before the midpoint (being early) or after the midpoint (being late.)  Figure 1, below, shows the path crossing over at the midpoint.

6point1 fig 1

Figure 1- Infinite Slalom with Midpoint Crossover

For purposes of illustration I’ve drawn the cone supersized. The point is the same even if the cone is very small as compared to the track width of the car.

If we try to be early on the cone but use the same path then we get the situation shown below in Figure 2.

6point1 fig 2

Figure 2- Crossing Early Before the Midpoint Between Cones in an Infinite Slalom

Do you see the problem? To be early we can no longer drive a path with the minimum lateral movement of the car. The car has to move farther laterally to miss the cone.

Let me show this with more realistic graphics. Take Figure 3, for instance.

path1

Figure 3

Here we are negotiating a slalom with 80′ between the cones. The car is following the red path, will cross exactly at the midpoint between the cones at the 80′ mark and just misses the orange cone at the 40′ mark with both front and rear tires.

What if we want to “backside” the orange cone and cross 20′ earlier. Then we have the situation in Figure 4.

path2

Figure 4

In Figure 4 the car is now following the dashed path and will cross at the 60′ mark.  The dashed path is the same path as the solid path, just displaced to the left. But, there’s a problem: we run over the cone.

To prevent getting a 2 second penalty for displacing the cone we have to drive a different path, something like the dotted one in the Figure 5.

path3

Figure 5

This path allows the car to cross early at the 60′ mark, only 1/4th the way to the next slalom cone. But, it requires the car to take a path that is wider laterally, i.e. farther from the slalom center line. That means it is longer. It will also probably have a smaller radius. A longer path with a smaller radius always means one thing: slow.  Unless we do something different. That something different will be discussed in the next post.

Being late causes exactly the same problem. Most autocrossers think of getting late in a slalom as the kiss of death. We watch novices do it over and over again and shake our heads at how slow it makes them as the car slews sideways and slows terribly in the attempt to not hit the (usually) last cone in the slalom. But, are we really so smart being consistently early?

The above figures prove that any deviation from crossing at the midpoint has an associated time cost. So, when we think we have a good reason for not crossing at the midpoint it needs to Save More Time than it costs.

Transient Response 6.0

I will try something a little different with this final part 6 of my transient response series. I’ll be making a series of slightly raw and unfinished posts that build on each other rather than work it all out, edit it all down and then post it all at once.

I’ll begin by freaking out some people with the following general statement which has arisen out of this work on transient response:

*** The fastest way through any infinite slalom is by crossing over mid-way between the cones. Any other strategy, i.e. being early or late, at any point, will be slower overall. ***

I think this statement is easy to prove and I plan to. But notice I said an “infinite” slalom.

Here’s another statement:

*** The fastest way through any generic, non-infinite slalom is probably achieved by starting early and ending late. ***

Notice the word “probably.” I say this because I’m not sure I can prove it. Notice the word “generic.”  What I mean by this is not considering the course design immediately before and after the slalom.

What happens before (the entry) and after (the exit) of a slalom, like all other features in autocross, must always be considered because autocross is nothing if not an exercise in optimizing multiple variables. But we need to understand the two baseline, generic statements above first in order to have a clear way to optimize all three parts, i.e. the entry, the slalom itself and the exit. Common, relatively simple rules such as “enter early and stay early until the next to last cone, then accelerate out” is a rule that may actually be correct for 2 out of 3 slaloms in 2 out of 3 cars but if the 1 out of 3 times it’s wrong means the difference between a Nationals trophy and no trophy then maybe it would be good to know something more so you can know when to do something different.


Pinchy Entry 2

At the end of the last post I said I didn’t know how wide to go on entry. That’s not exactly true.

I was trying to explain this to a friend last night and I realized that maybe I owed it to the readers to get down off the theoretical high horse and explain the process I use during the course walk to figure it out, i.e. when is a chicane necessary and how wide to go. It’s a little bit complicated, but it really is what I do. You can, as always, decide for yourself whether to take it or leave it. If you think any of this helps, fine. If not, forget about it.  Most people do it basically right anyway, at least after a some experience. Only a poor few of us have to really think it through before we can do it at all correctly.

Let’s go back to the beginning and get a few things straight. Maybe this will be all too obvious to you. If so, I apologize.
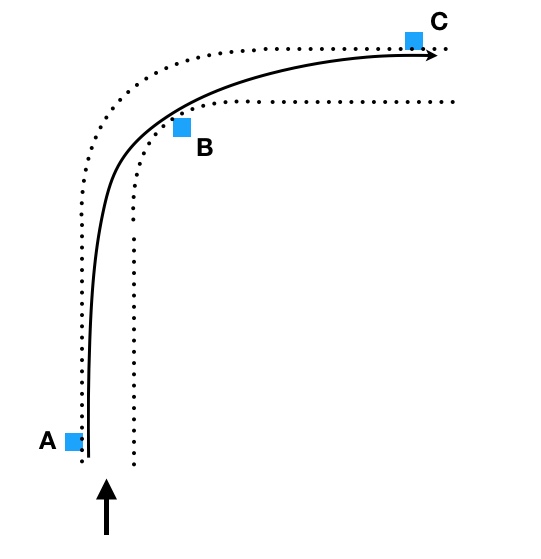
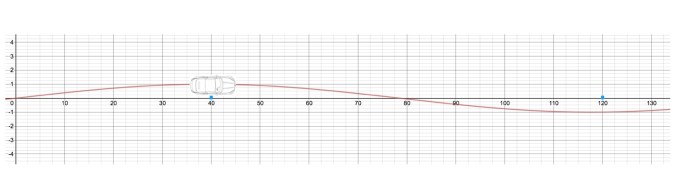
fig 1

Figure 1

First thing: in Figure 1 above, we can rest assured that cone B is the position of our proper apex.

Oh, I better make this clear: the definition of apex. The apex is the location and angle at which the trail-braking entry spiral, during which the car is slowing and the path radius is tightening, ends and the exit spiral, during which the car is accelerating forward and the exit spiral is opening, begins. It is therefore, by definition, also the location of minimum corner speed. Furthermore, for each car, corner and set of conditions, there is only one correct apex in the sense of the fastest way through the corner.

[Update: the “exit spiral” is mostly circular for low-power cars in a medium-sized corner, or a high-power car in a fast corner. In the small, slow corners of autocross it is somewhat of a spiral even for low-power cars. You know it’s mostly circular if you keep the steering wheel in about the same place until the end of the corner when you quickly turn it to center. It’s more of a spiral if you are gradually opening the wheel after the apex.]

This is actually a peculiar situation and one of the key differences between autocross and track driving. In the track corner, say the dotted lines shown, we will find the correct apex somewhere along the inside curve, maybe at B, but it takes some thought to figure out exactly where. This is because the apex is as much the angle of the car as a position and with the paved border of a track the angle changes with position, thus complicating things. Not so in autocross.

In autocross the apex position is the cone in the situation shown. I’m going to assume you understand this. If you aren’t completely clear why this is the case, go read Brouillard. If you’re a beginner, do me a favor, give me the benefit of the doubt and assume that cone B is the location of the freakin’ apex.

But, what about the car’s angle at cone B, the second part of the apex definition? Ah, there’s the rub. That’s what we have to figure out in autocross. 

Second thing: regarding track limits, we know the almost-always-correct rule for a race track is to use all the available space. That is, go as wide as the track limits allow, at least 99% of the time if you aren’t limited by, say, another car in an actual race or some weird traction situation. There’s almost never enough track so the basic rule is simple: use it all.

In modern autocross we often find the opposite. There can be too much track. So the road racer’s rule to use all the available track is of dubious utility. In autocross we actually have to decide whether to use all the available space or not. This is one of the cool things about the sport. (Unless you’re at one of those retrograde locations where they line the whole course with cones.)

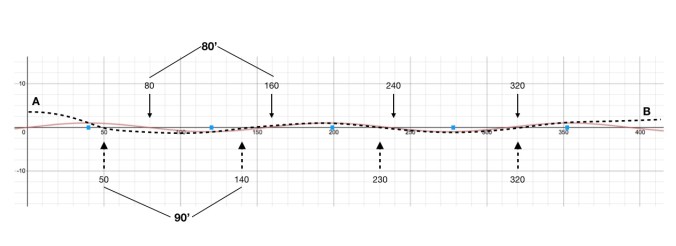
Third thing: to be slightly ridiculous, we need to be clear that the path shown in Figure 2, below, might be possible in an autocross, but is probably not optimal. We could brake at entry cone A, turn left, do a loop and accelerate to the apex cone. Perhaps we pass the apex cone going 100mph and we’re doing a buck-thirty-five at the exit. Now that would be maximizing your exit speed! 
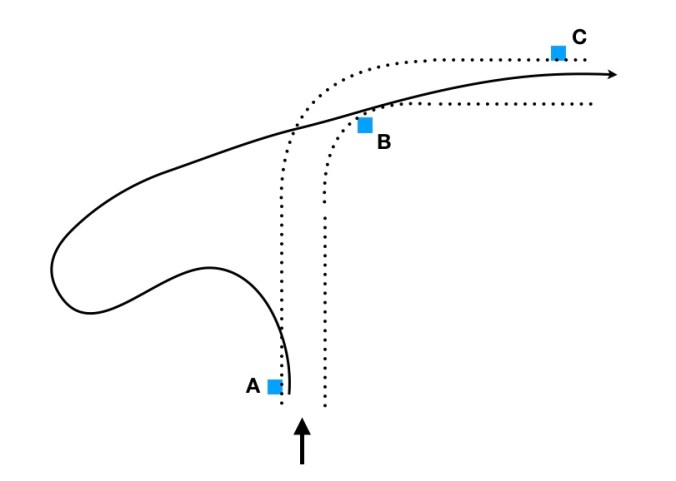
fig 2

Figure 2

I’m going to assume that we all know it wouldn’t Save Time, however, even if the following straight was of infinite length. You never catch up to the guy that did it right yet exited the corner at 45mph. If you don’t understand this then, once again, go read Brouillard. I sometimes think of it like this: it is rarely correct to go in the wrong direction.

Didn’t Yogi Berra say that?

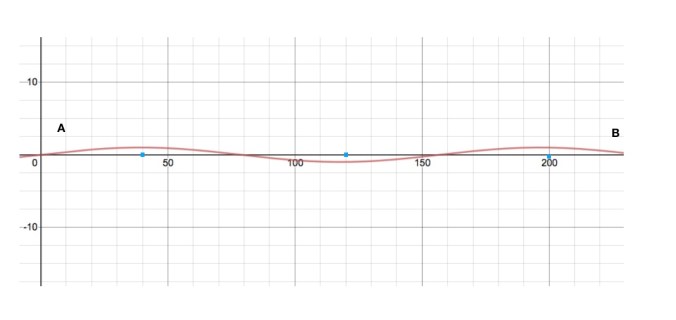
So, the path we need to drive may be something like what’s shown in Figure 3, below. The question is whether and if so how far “outside the track limit” should we go. I’m going to give you  my process for figuring that out. This will necessarily be a qualitative treatment, however, not quantitative. (Thank God for that, I heard you mumbling.)
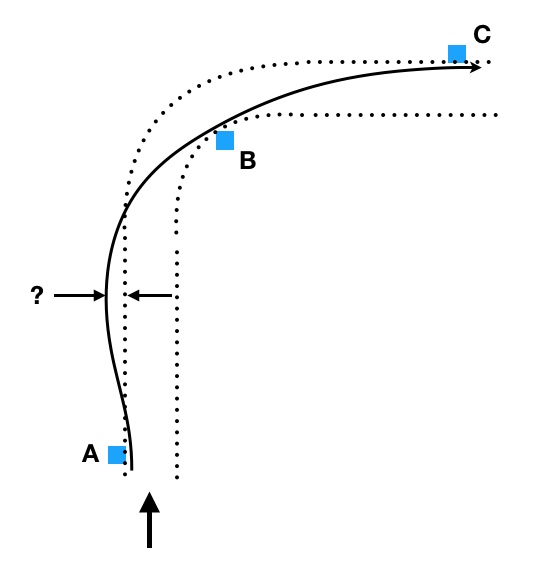
fig 3

Figure 3

So, here’s what I do during the course walk, in two parts. (If you find this backwards, it’s perfectly reasonable to reverse the steps as it’s a back and forth, iterative process by nature. Brouillard, in fact, starts the other way around, which may be easier for some.)

First part: optimize the exit, that is, the path from B to C

Second part: figure out how to drive the entry, A to B, to ensure the optimal exit

I start by standing at cone B and looking toward the exit like in Figure 4.
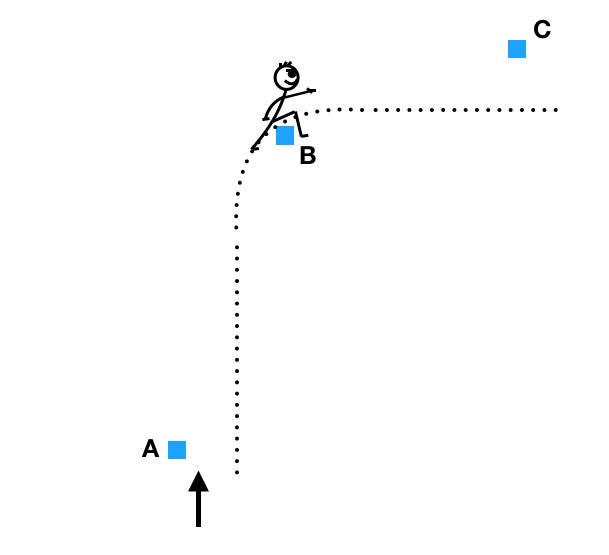
fig 4

Figure 4

Now I ask myself what angle the car (my car, not your car or any other car) needs to be at cone B so that when I add throttle at B and start opening the wheel I’m able to use as much acceleration (both forward and lateral) in the new ideal direction as the car is capable of and yet not hit cone C.

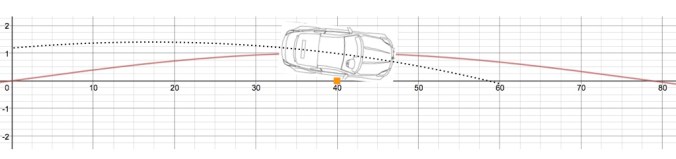
Here in Figure 5 is our angle and an estimated (Euler spiral) acceleration path in red to the exit at C.
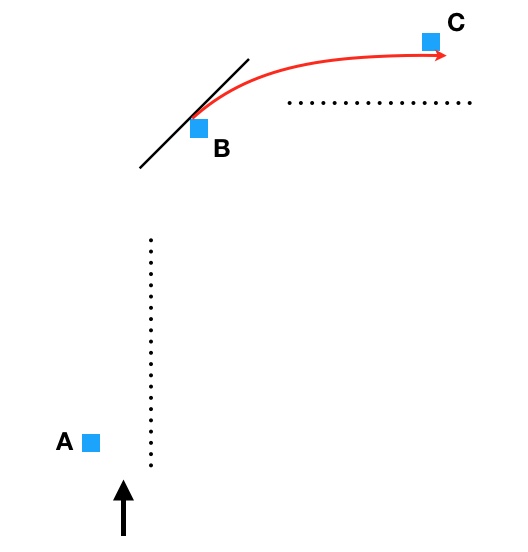
fig 5

Figure 5

But, in order to draw this exit path I necessarily have to imagine one more thing: how fast I’ll be going at B when I hit the accelerator and start opening the wheel.

You may ask, how can I know how fast I’ll be at B, when I haven’t planned the path from A to B yet?

That’s a good question. The answer is that you have to sneak a peek back to A, estimate it and then iterate. (I know that some people say to never look back during your course walk. Sorry, no can do. You gotta study the course from all angles.)

Now that we have an estimated, optimized exit path, we think about how fast we will be going at A and what path and how much braking we need to get to B at the speed we estimated in step 1. Simple, right?

But, that’s what we do. And we draw the green path as shown in Figure 6. In our head. During the course walk.
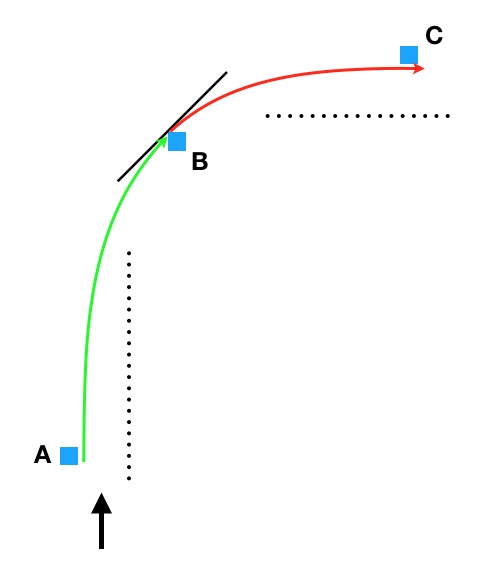
fig 6

Figure 6

Did the green path exceed the track limits? Hell if I know. This is autocross. There is no track. All I know is that the green path gets me to the apex in the least amount of time and at the right speed and the right angle to produce the fastest possible exit.

Okay, I played a little fast and loose with you there. Let me make it up to you. In the next figure, Figure 7, I’ve moved cone A over to the right make it clear that the original green path won’t work. What do we do now?
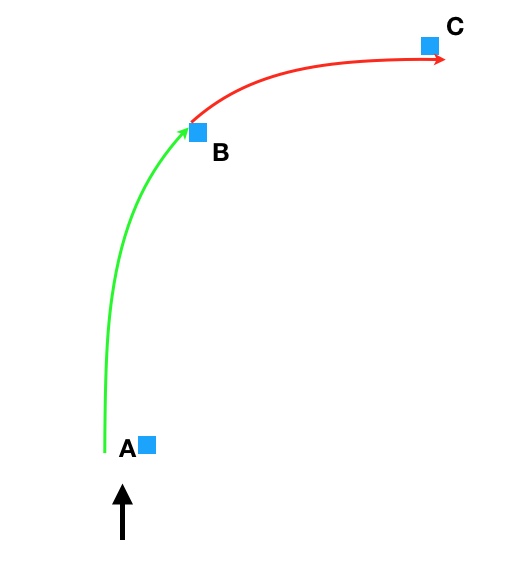
fig 7

Figure 7

Now we clearly have to create a chicane by turning left at cone A in order to get any kind of reasonable angle at cone B. Otherwise we will be forced into a very small radius corner which will be really, really slow. In theory we’d like to get to the same apex angle and same speed at cone B as before, but we probably can’t. The problem is that having to turn left at A and then back to the right (unless there’s a whole lot of distance) means that our speed when we get to B will be a little bit slower. All because the location of cone A is pinching our entry.

If our speed at B is a little bit slower it means that we may be able to reduce the apex angle a little bit and still get full power on the exit. So, in Figure 8 I rotated the dashed angle line a little bit counter-clockwise from the original angle and modified the red exit path accordingly. The original exit line was for a different speed at the apex, so it must change to use a different part of the Euler spiral.
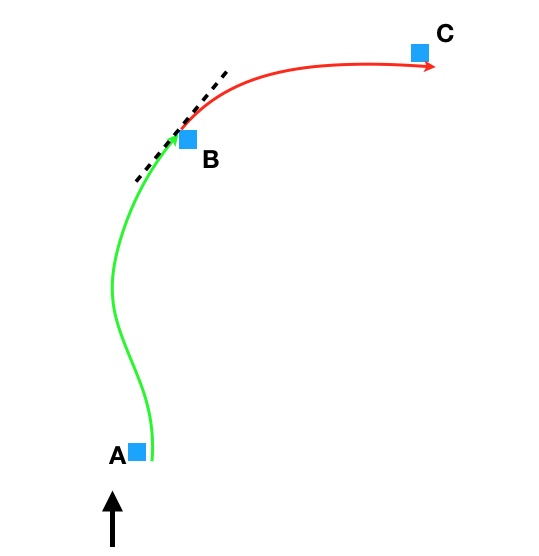
fig 8

Figure 8

The exit is not quite as fast as before thanks to the pinchy entry. There’s no way it can be.

The answer to the original question is, therefore: Chicane it out only as far as necessary to produce an optimized exit for your particular car, namely one where you can create as much speed as possible at the apex at an angle that allows you to use all the car’s lateral and forward acceleration ability after the apex and still make it past cone C. We must play off the entry path and the exit path against each other, taking into account the braking ability, cornering ability, acceleration ability and transient response ability of our particular car. We have to mutually and concurrently optimize a chicane entry into a corner for minimum total time through the combination.

Going out any farther in order to increase the speed at the apex will not Save Time. Going out any farther will be a variation of using the crazy path shown in Figure 2, except so small that only the stop-watch will notice.

Or, you can just wing it. You get three attempts.