I’ve been on pins and needles hoping that one of my three orders for rear tires at Tirerack would come through. Finally, a set of 305/30-19 Falken 660s arrived. This will allow me to do another event before Nats. The present tires have 84 runs, so I wouldn’t have run them again until the test & tune course in Lincoln.
I still have an order for a pair of the new 315s, but they are tentatively expected in October, not soon enough for Nats.
One of the other orders was for a pair of Yokohamas. Just got an email from Tirerack saying they are now expected Spring of 2023!
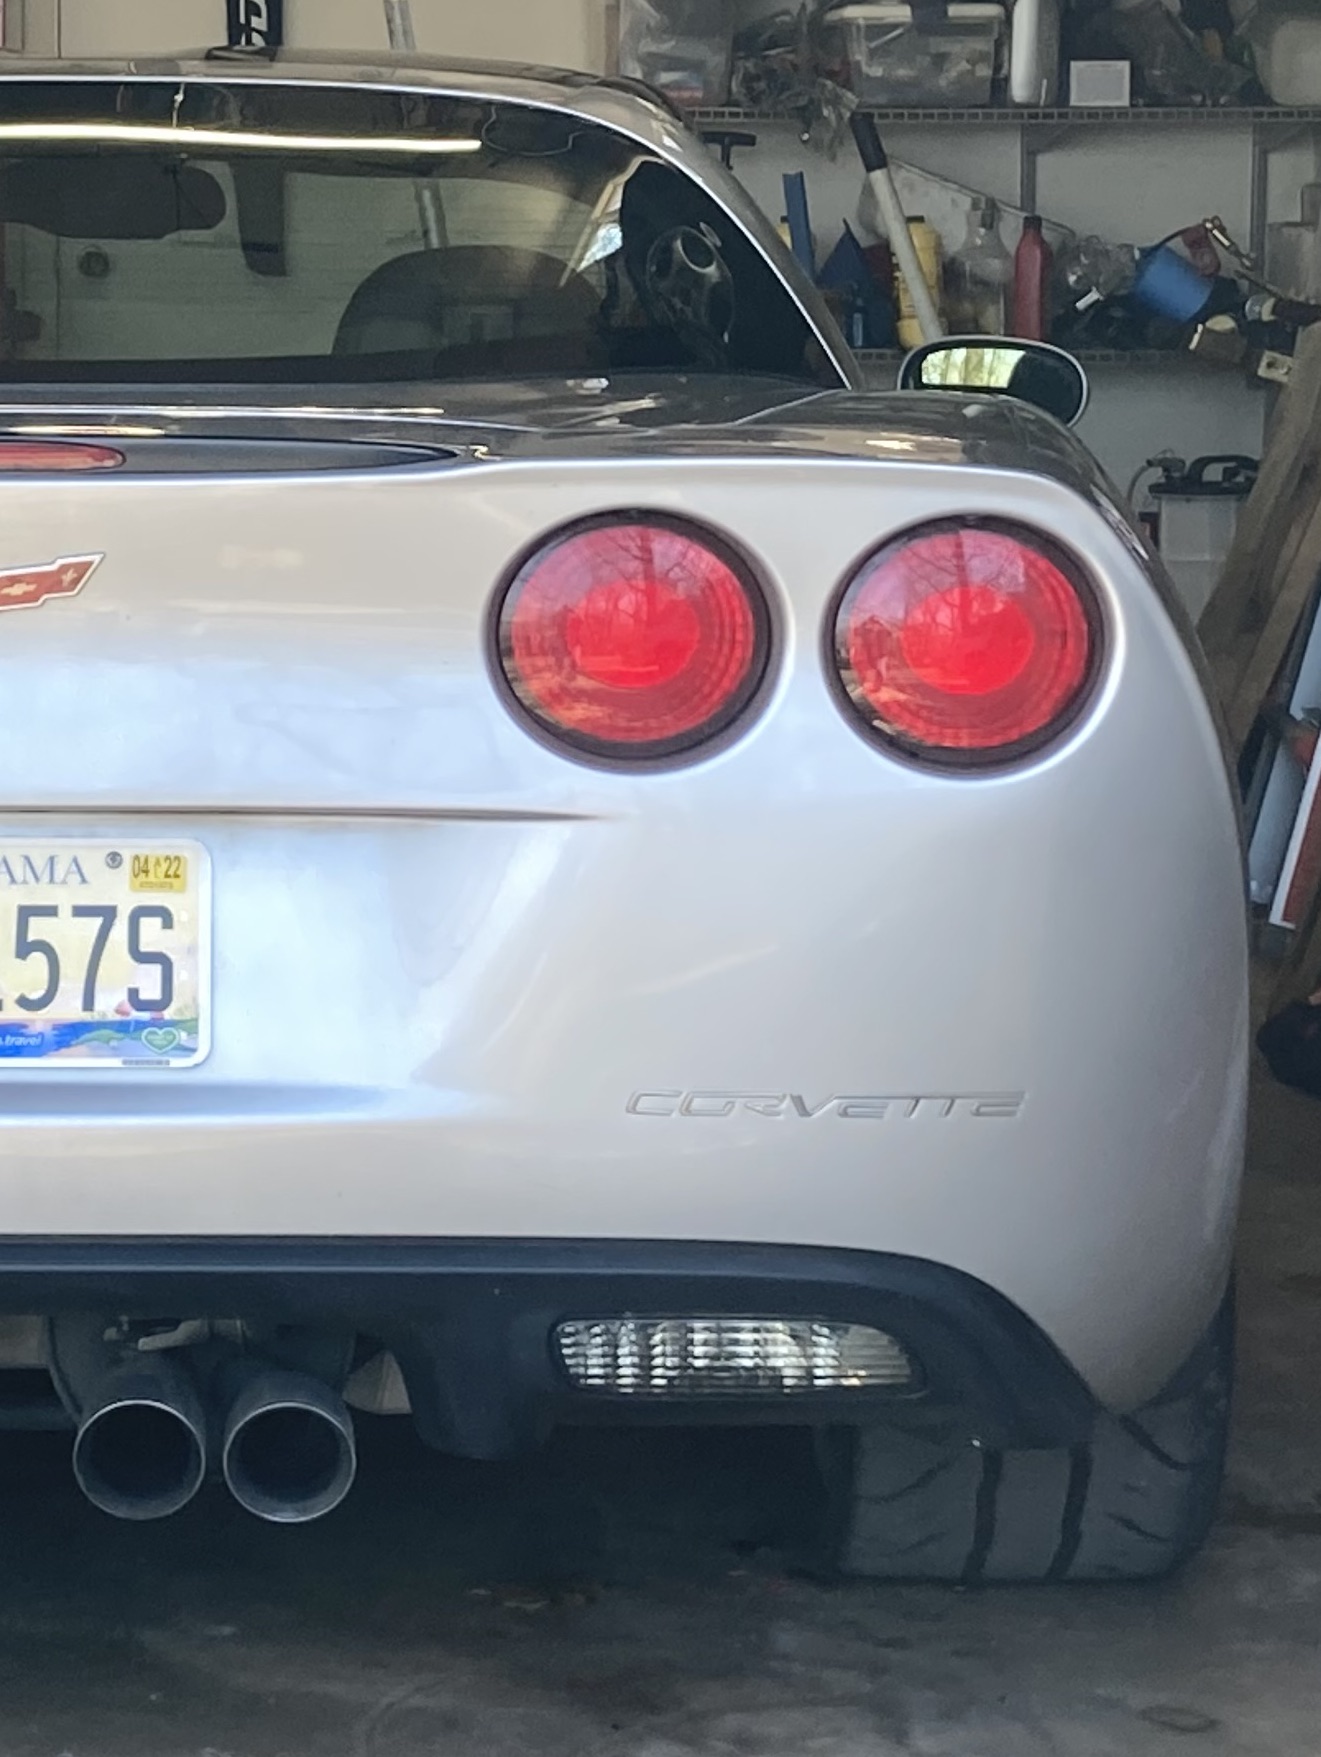
After the last local event we had a good setup. We thought.
Aaaand, we were right!
At Bristol Silver Ghost was great! Grip for miles, transitioned well, no bad habits. I mean, you can provoke understeer if you ask too much, too fast on corner entry, and you can produce oversteer if you give it too many beans on corner exit, but you really have to try hard. You can slither it in the slaloms and 4-wheel drift it around offset cones like nobody’s business.
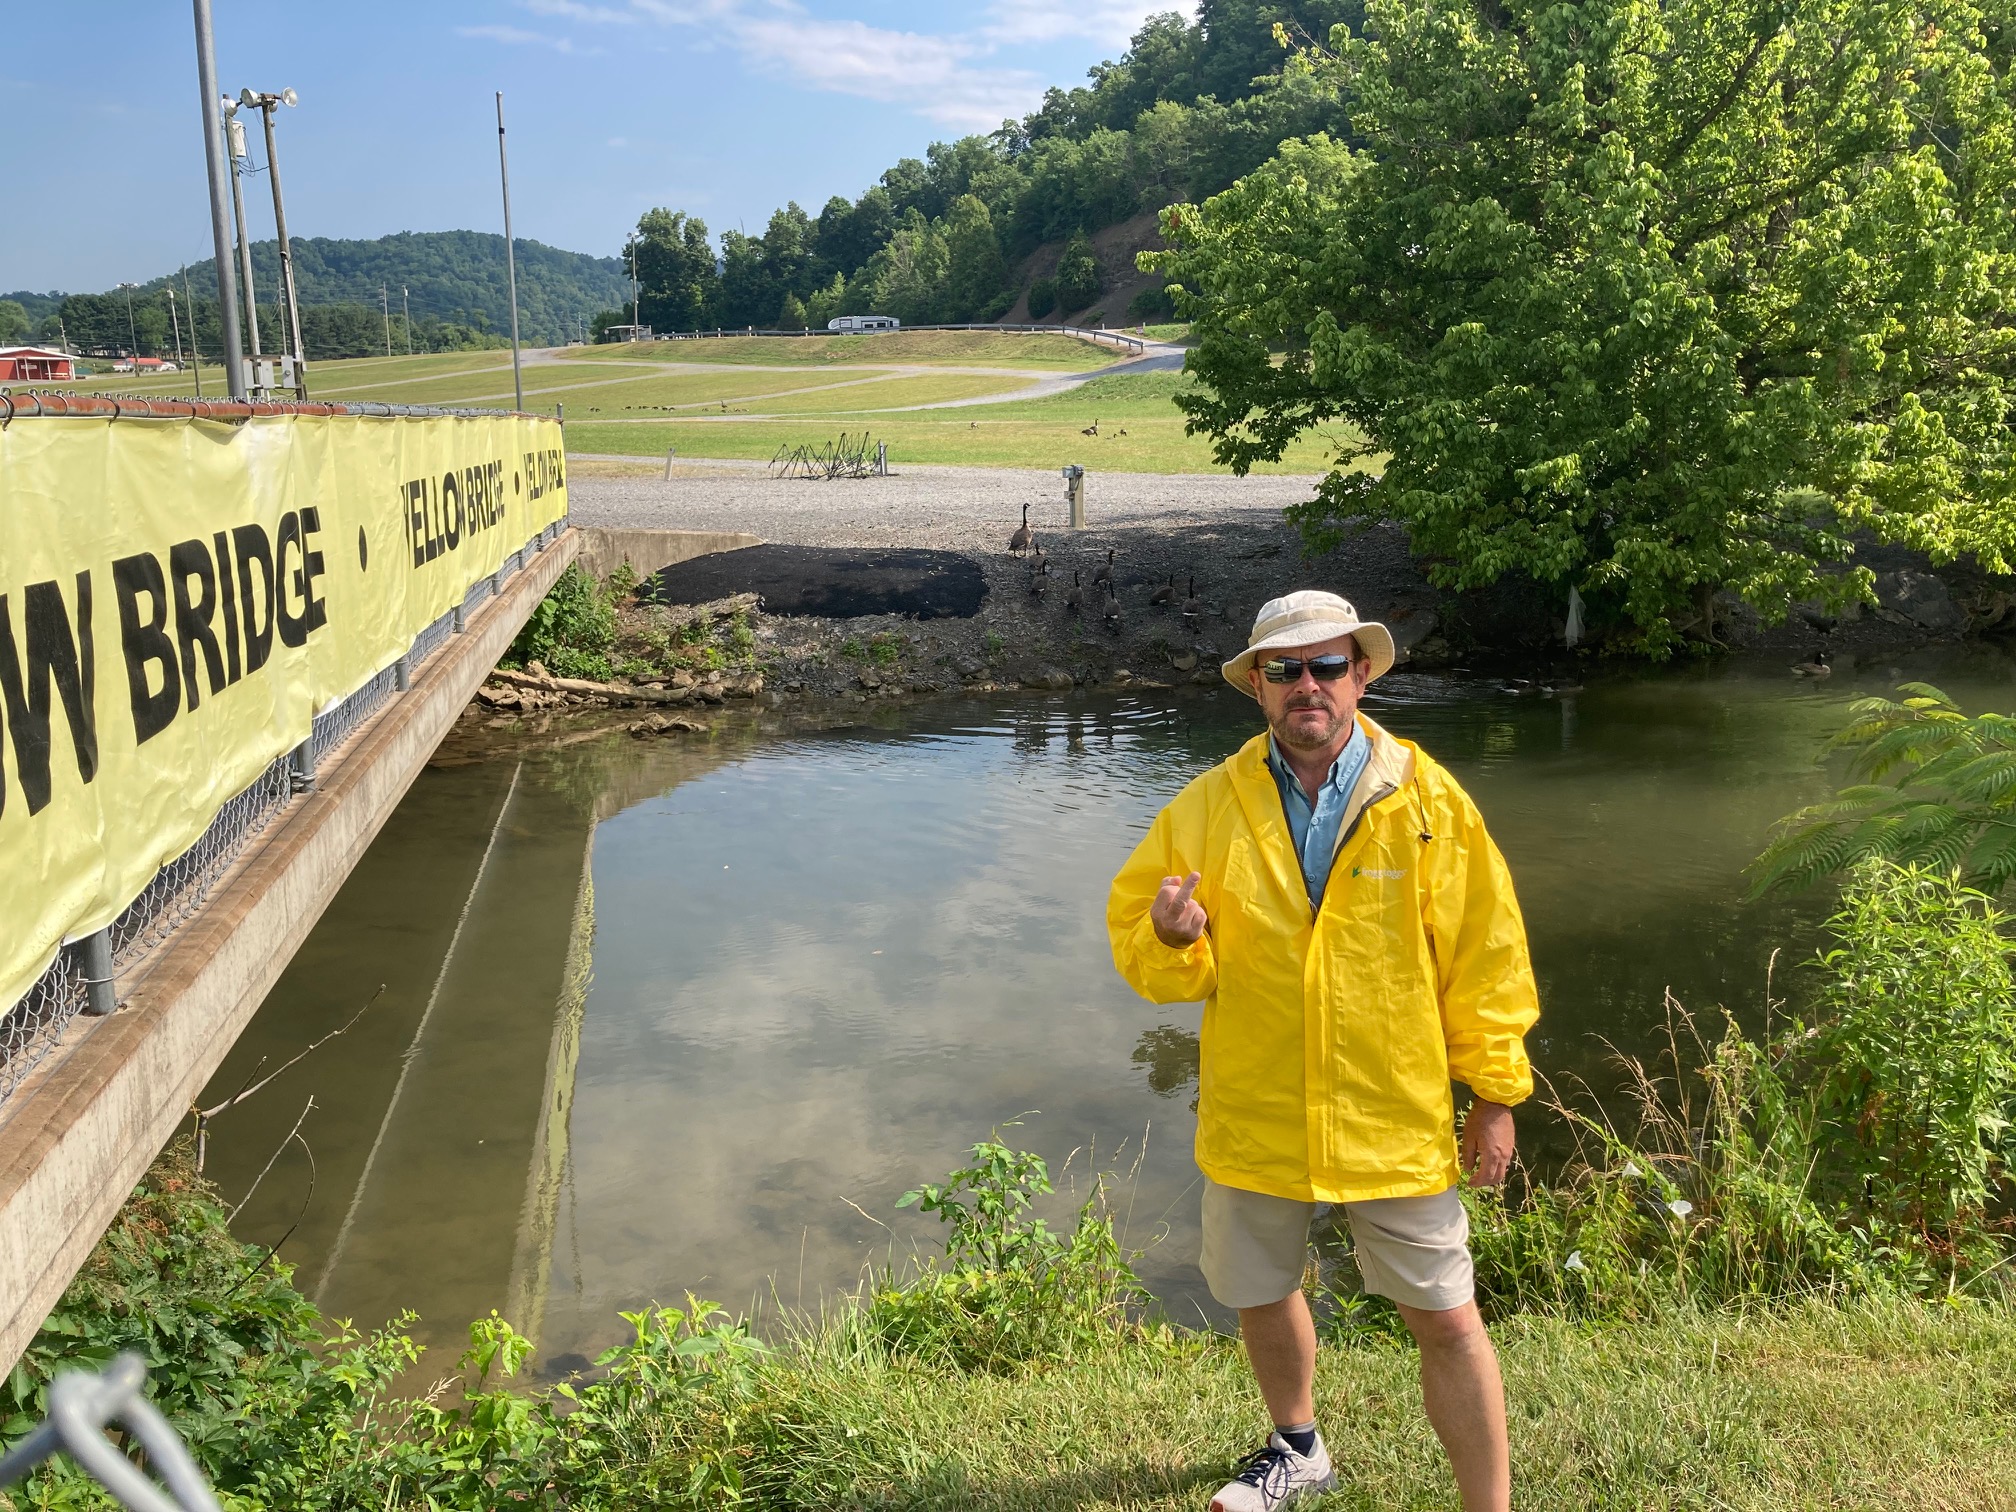
Fig. 2: Yellow-jacketed Co-driver Spotted At The Yellow Bridge
Pro-Solo
The drivers were not quite as good as the car. At the Pro-Solo I moved from 4th and out of the trophies to a trophy and 2nd place when I finally combined a good start with a good run in the last session. 2nd, 3rd and 4th were extremely close, but we were all far behind first. This is only my second trophy at a Pro. I was pleased to be 3rd on the Masters index, got into the Super Challenge, won the first round and should have won the second, but a 1+ second reaction time (due to forgetting to switch off traction control until the yellow lights were counting down) put an end to the Challenges for me. I lost that challenge match by 0.04s after giving away ~0.40s at the start.
Fig. 3:Pro-Solo Start At Bristol
The Pro-Solo courses were unusual, even by Bristol standards. Each side, though not symmetrical, had the longest acceleration zone I’ve ever seen at a national event, good for 80mph for the C6Z06 AS cars on the left side. My car maxes out at 70mph in 2nd gear, so I had to sit on the rev limiter for 1.5s on the left side and 1.0s on the right while my auto-box competition continued speeding up. I expect entering a slalom at 70 to 80mph was a new thing for many drivers…. it sure was for me. Such unusually long, high-speed sections damage fairness both within the class index system and within different cars in specific classes and endanger course workers. I saw a worker run to avoid being hit by a car sliding through what would normally have been a safe location given slower speeds. The car slid directly over the spot where he and others, including a person from my region, had been standing earlier.
Then there were the mid-site bumps, which are always a consideration at Bristol and part of the site’s charm and challenge. In the Pro they were located at the 60-65mph point of the long acceleration zone on both sides. The coneage was incredible. If the driver made an input, or otherwise had the car unevenly loaded when crossing the bumps, the car would take a big hop one way or the other, at the least, or spin, at the most. (My work assignment gave me a perfect rear view of the shenanigans.) The Porsche GT3s had a terrible time of it. The back end would violently bounce. (With the exception of the 96/196 SSP car. That one traversed the bumps relatively smoothly. Better shock valving? Less stiff springs?)* The mid-engined cars were next worse. My front-engined Corvette on Penske’s? After the first round someone asked me how my car was handling the bumps. I answered, “What bumps?” Only after that did I really take note of them while driving. But, on one run my co-driver proved that if you didn’t have the wheel straight when hitting the bumps bad things (like an off-course) would happen even to my car.
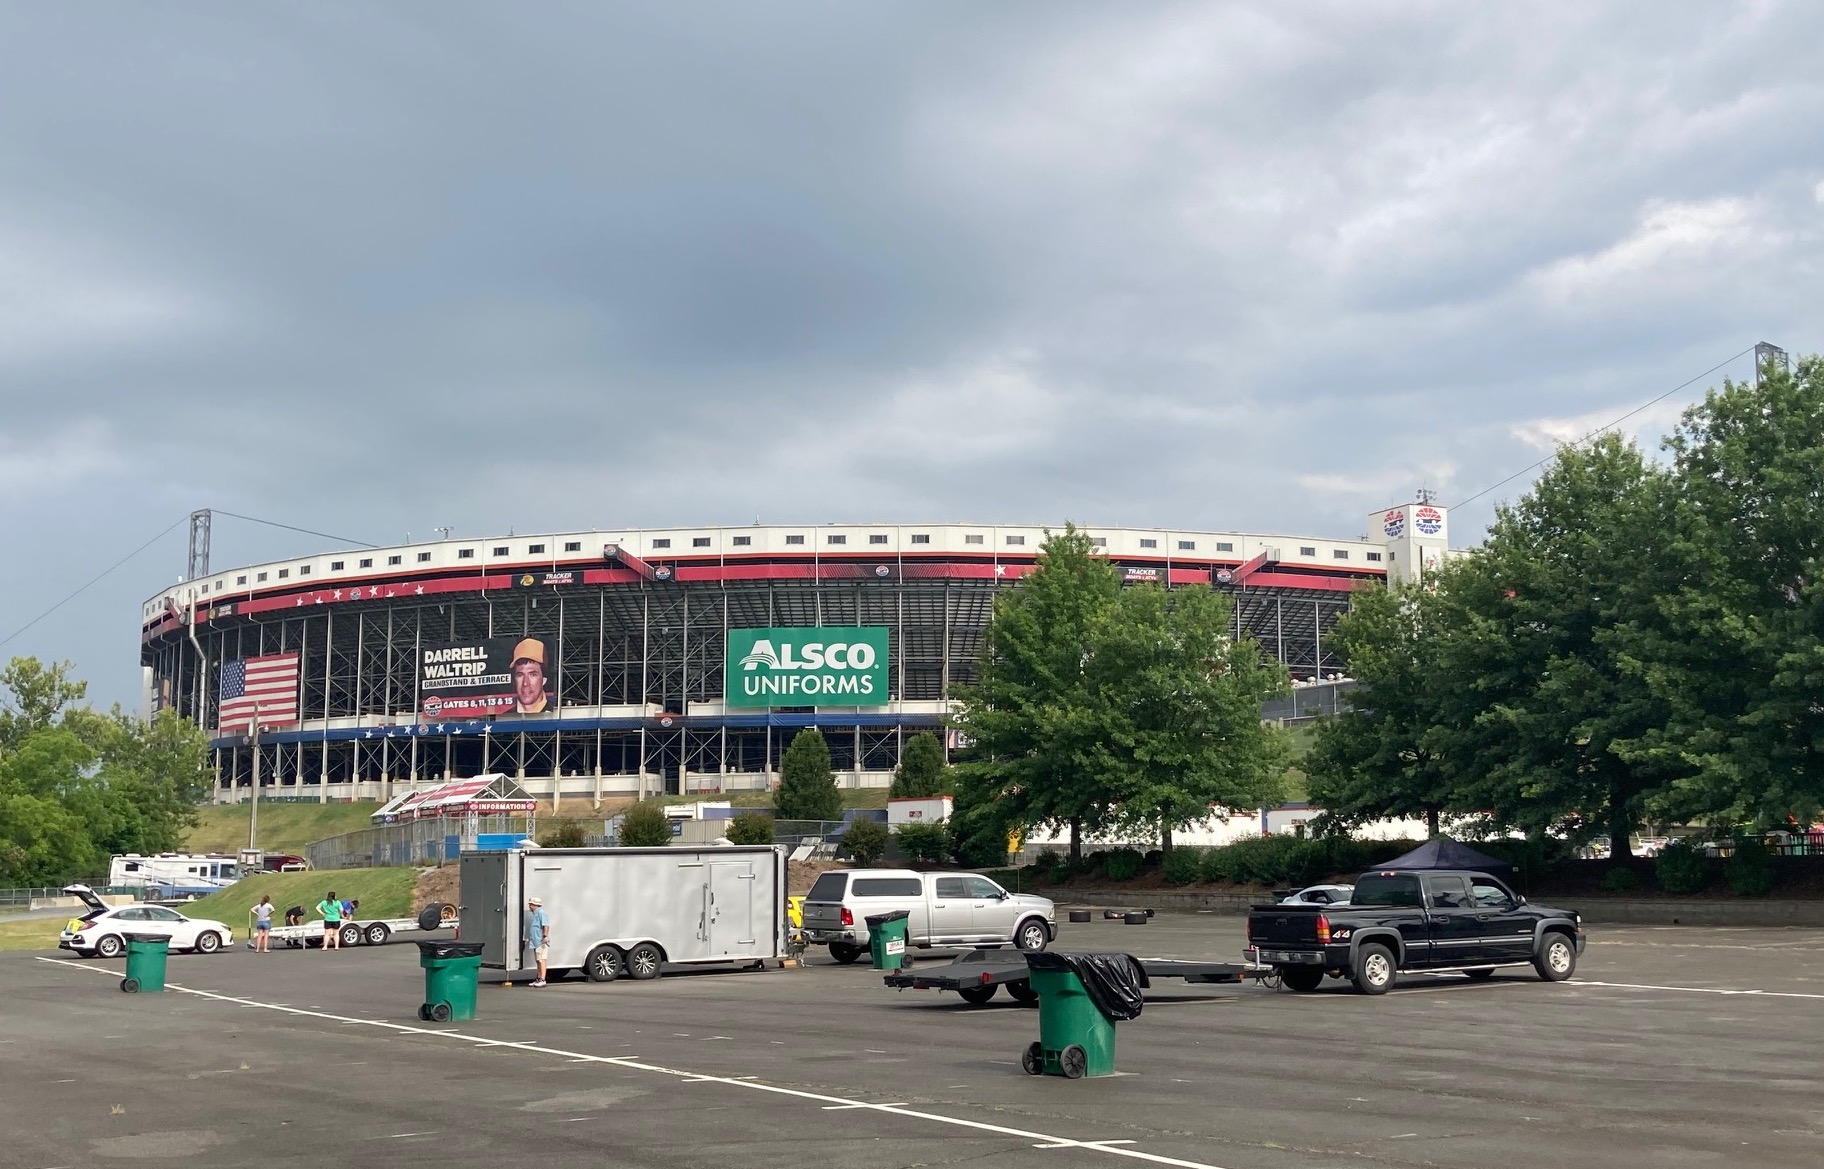
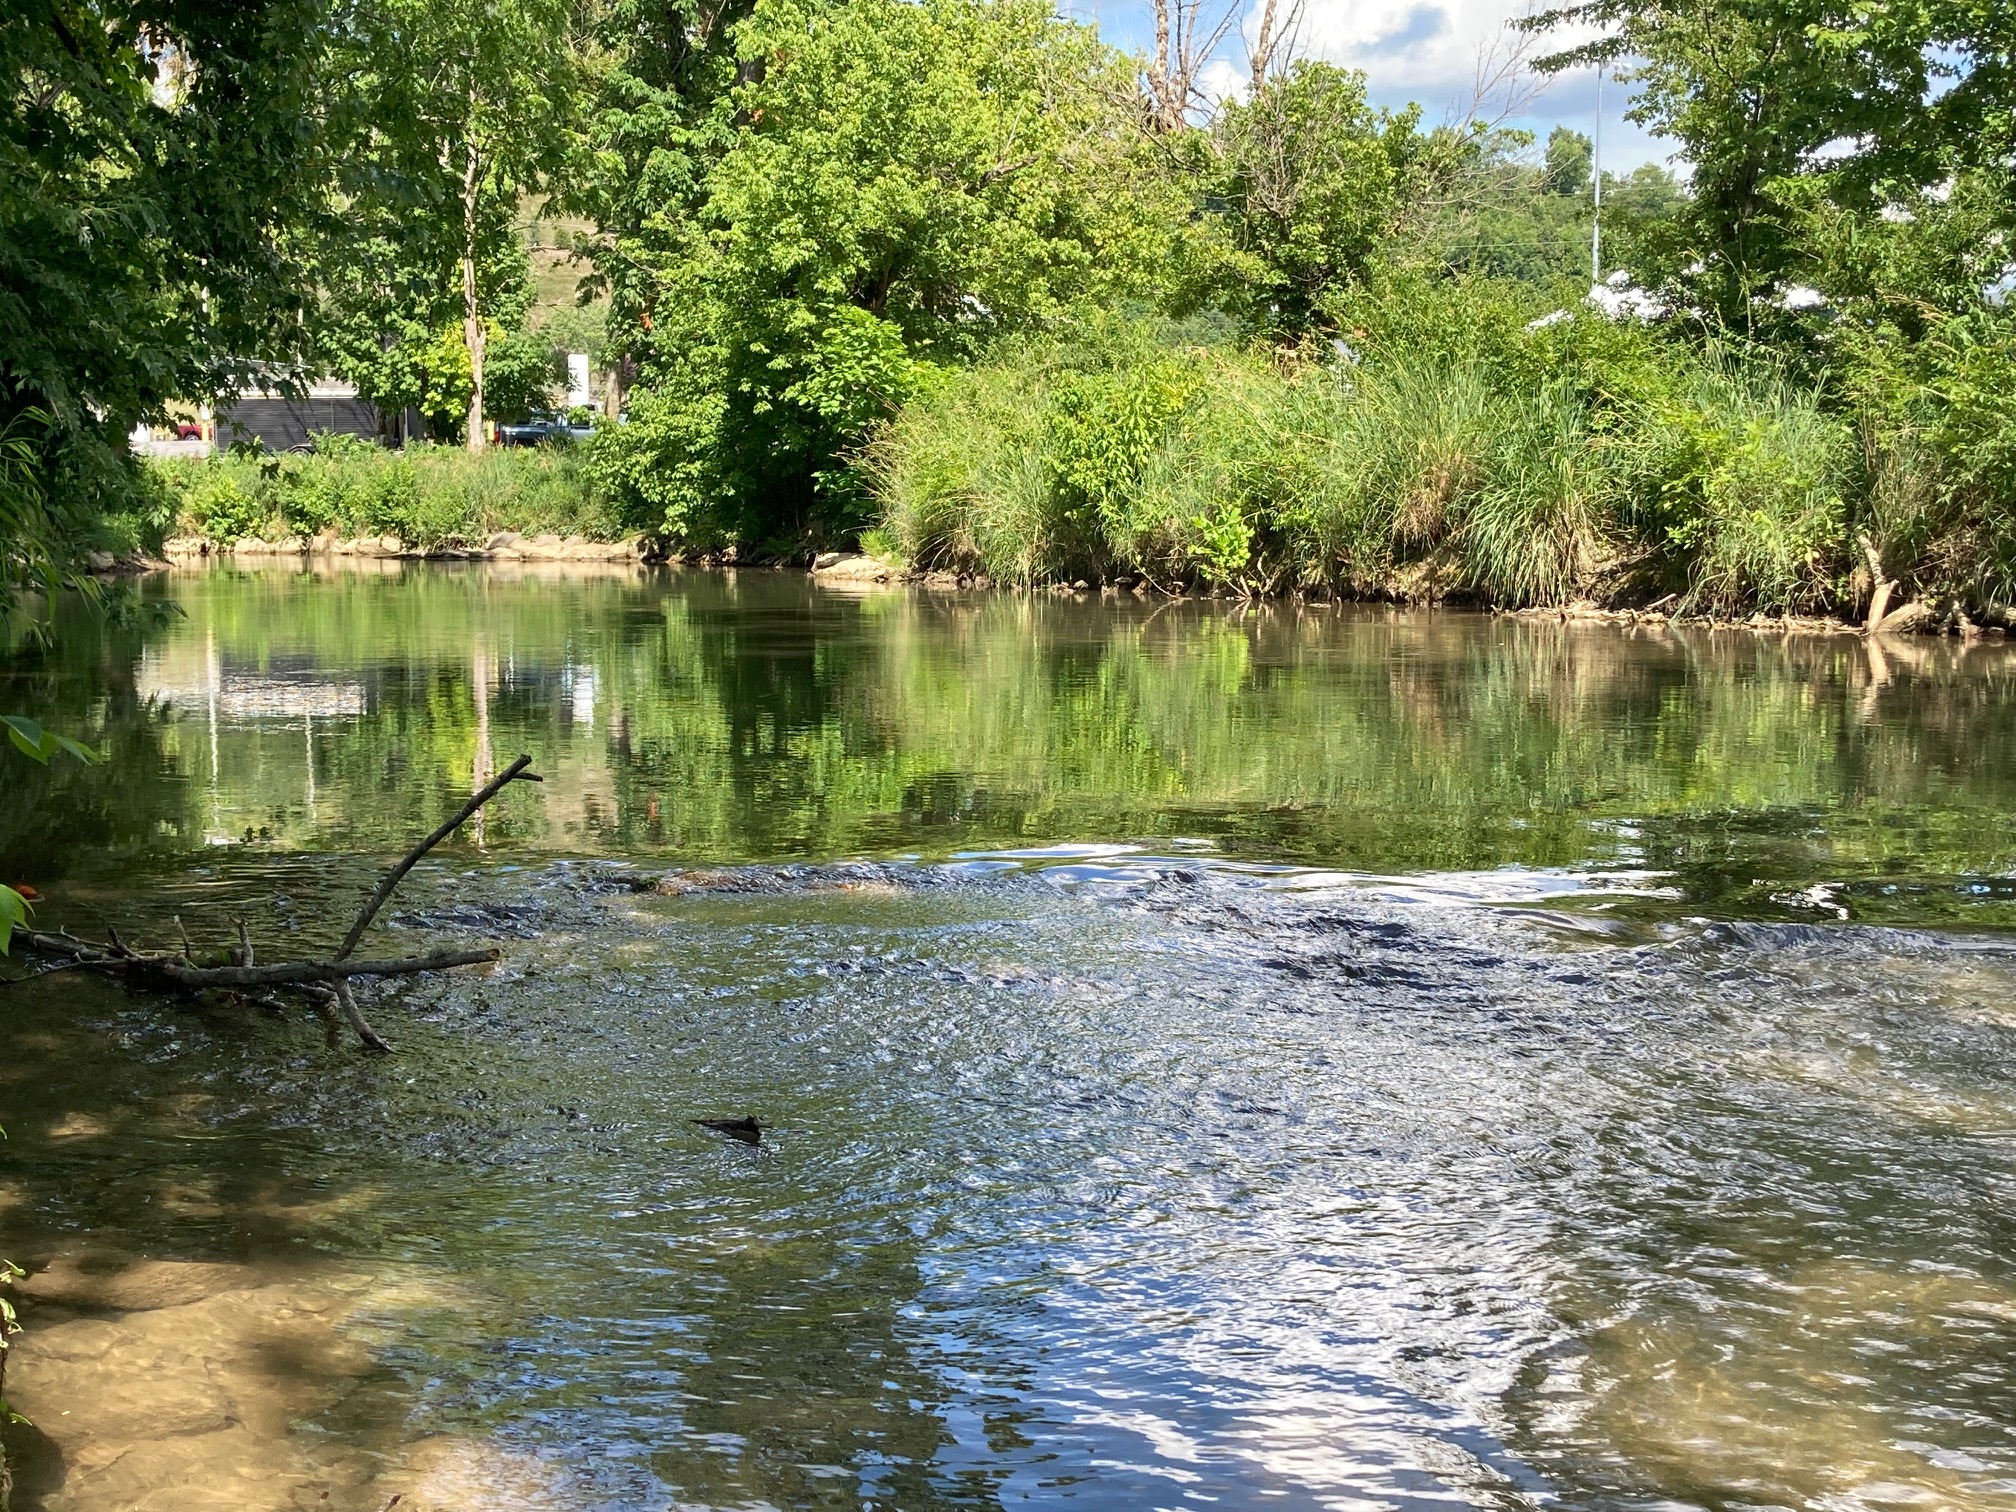
Fig. 4: Beaver Creek Winds Around Bristol Motor Speedway
Solo Tour
The courses for the Tour event were the best I’ve seen on this site. Kudos to course designers Dave Marcus and Charles Krampert! The day 1 course really kicked my butt. I was a full second off the pace and don’t really know why. If I had to guess I’d say I was slow to appreciate how much speed you could carry through certain sections. Plus, I’m consistently not as fast through slaloms as my co-driver. I think I’ve been slow to find the dynamic limits of the car now that it has such good lateral grip. This put me in fourth place at the end of day 1, one spot and half a second out of the trophies. On day 2 I was right up there, however. I turned in the second fastest time in the class on my second run with a good chance to improve on the third. It didn’t happen. I totally blew the first big turn by entering it too fast after doing it well previously. I’ll present a technical discussion of that turn below. I stayed in 4th and my co-driver took 5th.
First Turn On Day 2
The First Turn on Day 2 was similar to ones I’ve seen several times previously at that location on this site. It’s quite complicated to look at and maybe confuses some people, but the fast way to do it, I think, is simple in theory if difficult to accomplish in practice.
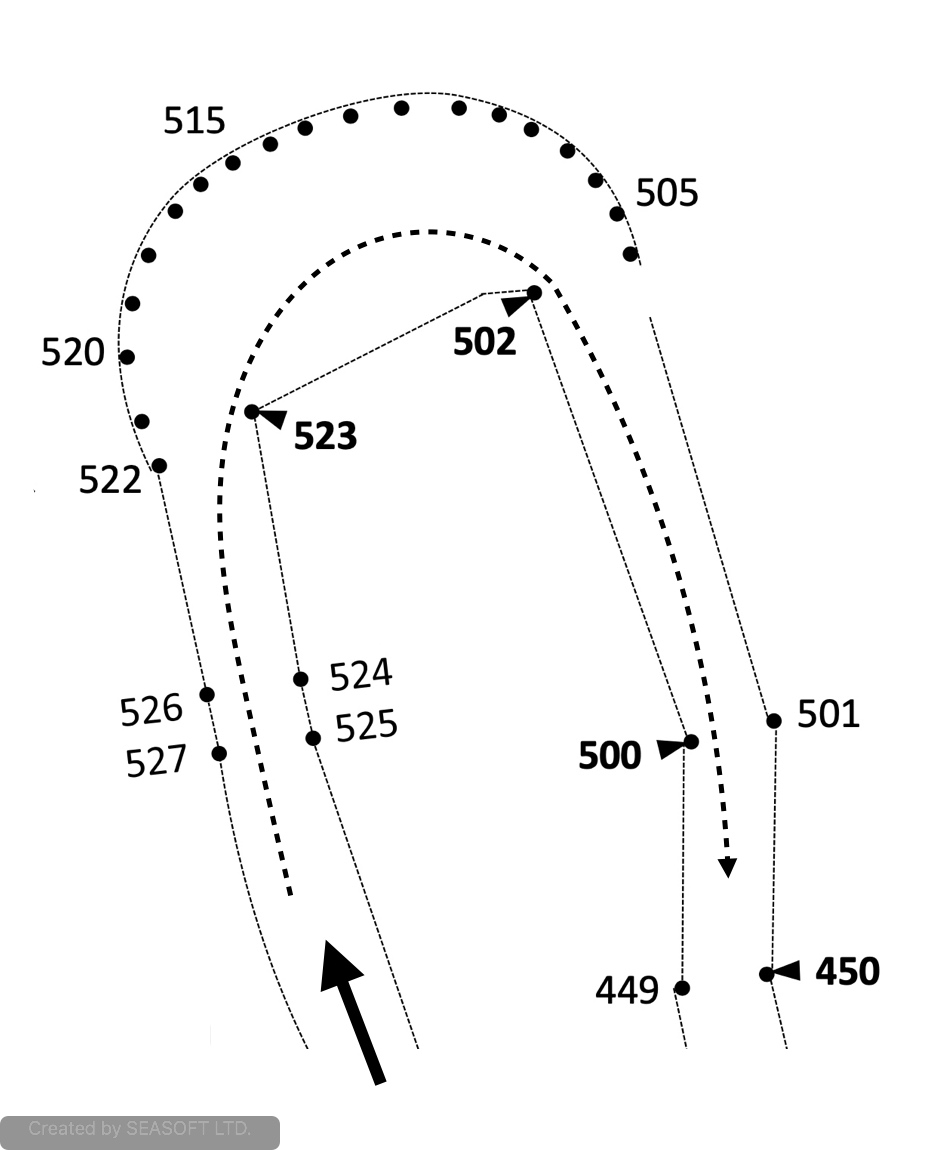
Below is the turn as drawn on the course map, except that I think cone 503 had been removed. The exit was not as pinched as shown below.
Fig. 5: First Turn As Drawn On The Course Map (courtesy Charles Krampert)
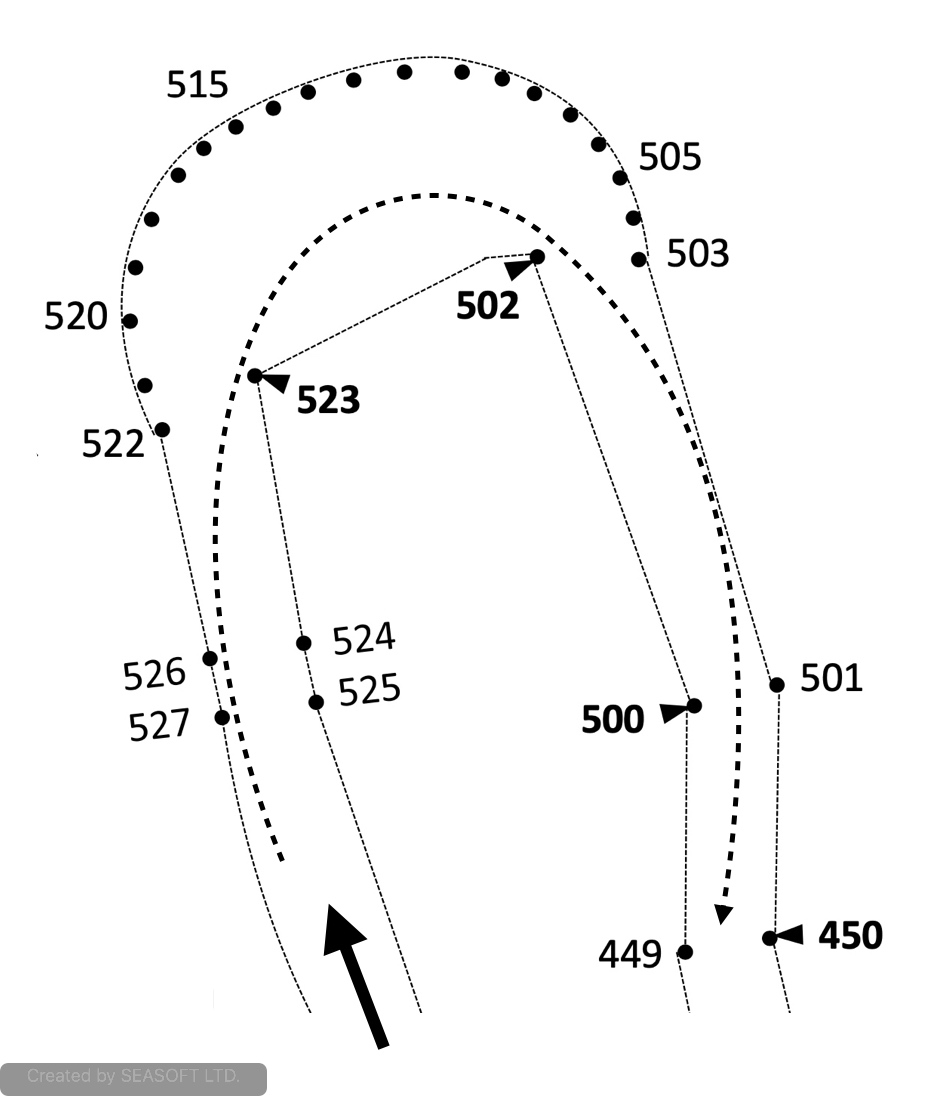
I think most of us, with nothing more to go on than the map, would plan to drive this corner something like the dotted line path as shown below. Enter wide, be on cone 523, cross from 523 to 502 as fast and shallow as possible, exit on 502 at the angle that allows maximum acceleration yet still make the 500/501 gate.
Fig. 6: Correct Path Assuming No Complications
In reality there is a complication, i.e. a complex slope. Take a look at the next three figures to see that we have a downward slope from left to right that flattens out in the corner exit path, plus another slope that rises from front to back in the center of the corner.
Fig. 6: First Turn With Section Views Annotated
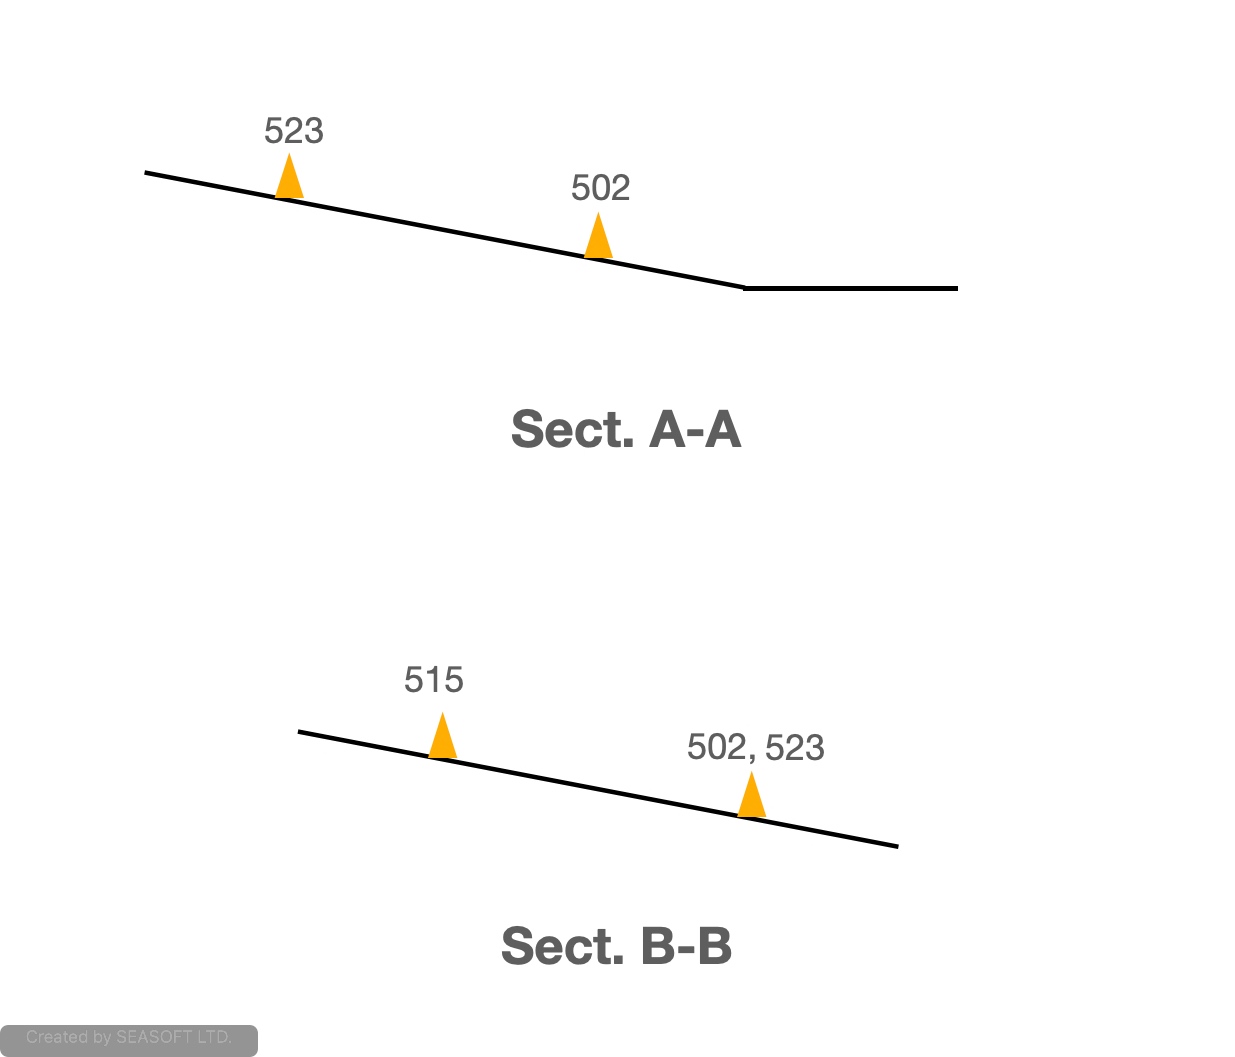
Section A-A from Fig. 6 shows a slope from above cone 523 down through 502, extending a distance beyond 502 and then flattening out. Section B-B shows another camber from an axis through cones 523 to 502 sloping upward to the rear of the corner as defined by cone 515 and others creating a back wall.(These figures are not to scale. In reality the Sect. B-B slope is less than the Sect. A-A slope.) You may need to think about the sections for a while to understand the two slopes I’m trying to illustrate if you’re not familiar with section views.
Fig. 7: Section Views
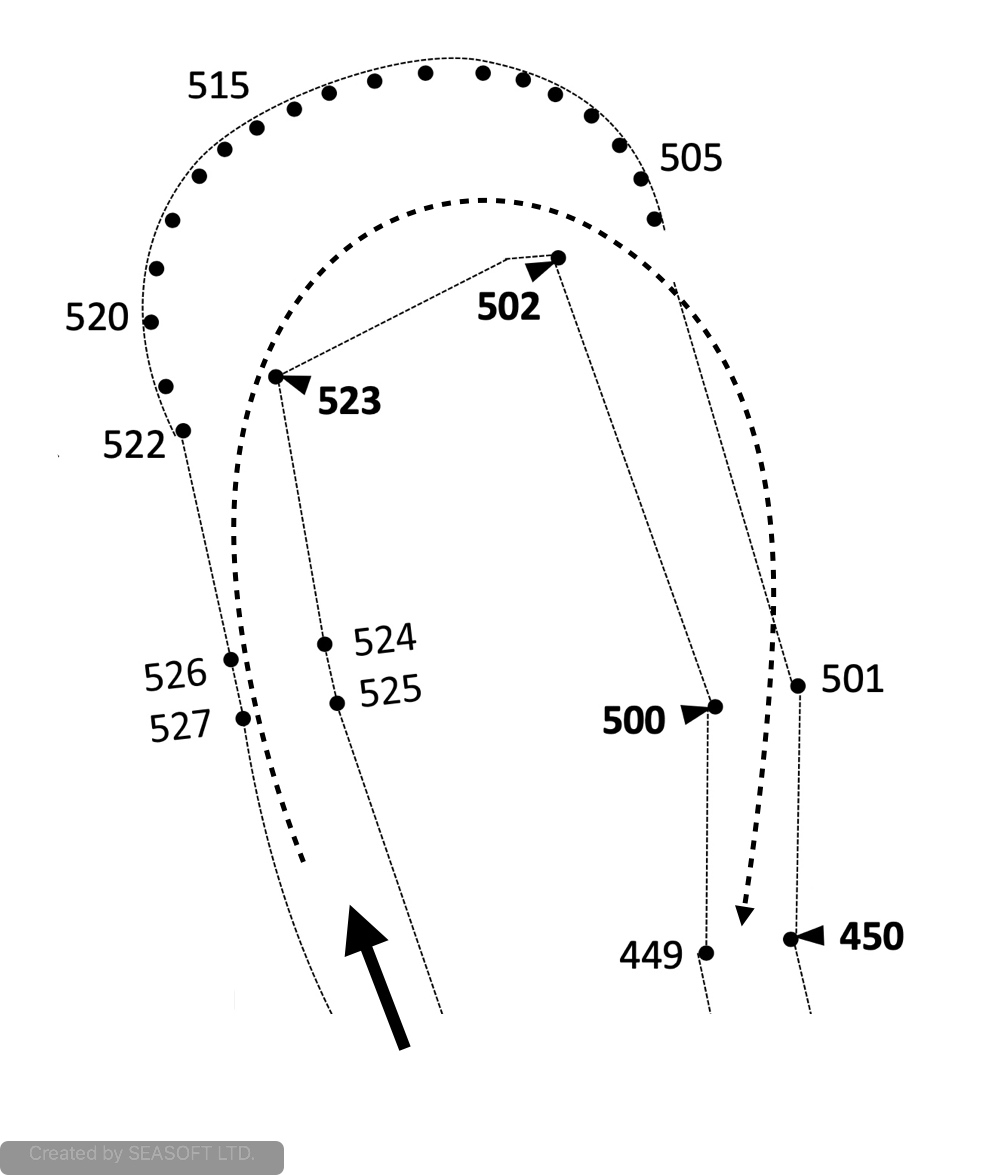
What happens to most drivers when they attempt to drive the path shown in Fig. 6 is that the slope shown in Section A-A makes them understeer wide of cone 502, fall down the slope crossing the chalk line with the left-side tires and land in the flat below 502 where they struggle to get turned and then back up the slope toward cone 449 while not hitting cone 501. Therefore, the vast majority of drivers find themselves on a path similar to, or worse than, what I’ve shown in Fig. 8. It feels terrible to an experienced autocrosser. It feels, and is, very slow. I got sucked into this line plenty of times at previous events held on this site. I vowed not to let it happen again!
Fig. 8: Actual Line Most Often Taken, If Inadvertently
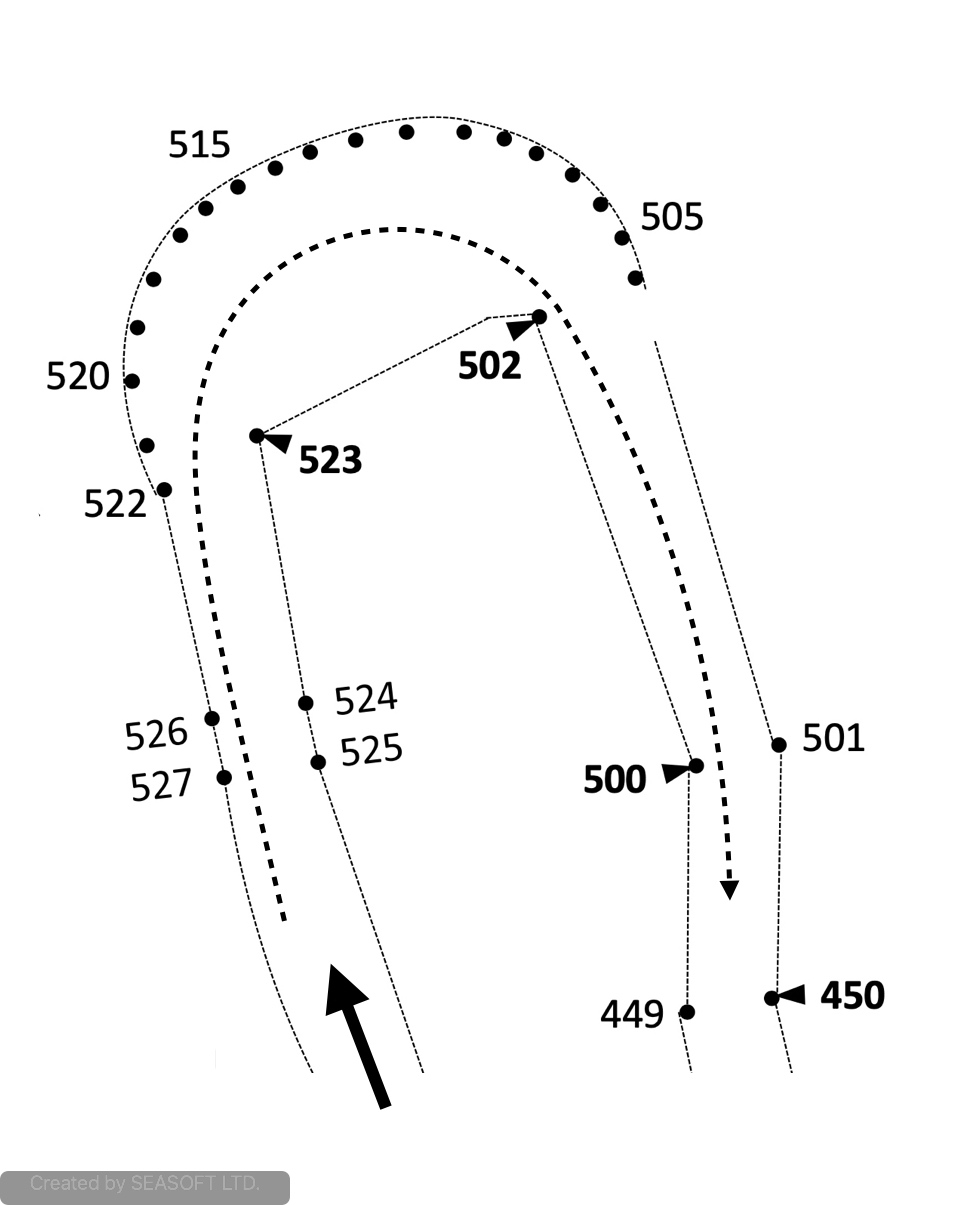
When walking the course my plan was to take advantage of the slope shown in Sect. B-B. Everyone seems to see and worry about the other, more severe slope, the one shown in Sect. A-A, but taking advantage of the B-B slope seemed to me to be the solution. My thought was to go deeper into the turn, effectively using the discredited “late apex” strategy, but using the B-B camber to help slow the car down in the first half of the turn and increase the efficiency of the entire turn to allow an exit close to cone 502 and at an exit angle that allowed the car to 1) stay on the A-A slope, never venturing lower than necessary and especially not all the way down to the flatlands, and 2) achieve an early acceleration into the next, fairly significant acceleration zone. This would also give the advantage of not spending as much horsepower having to climb back up the A-A slope on the way to cone 449. This planned path is shown in Fig. 9 and is basically what I drove on my first run as verified by data and video.
Fig. 9: Path Taken On Run 1
Below is a video clip of this corner as I actually drove it in Run 1.
Fig. 10: Video Clip Of First Turn, Run 1
Well, the first turn felt pretty good in Run 1. The 180 degree turn in the back of the corner seemed efficient and quick. But, I was way off of the entry cone, cone 523, and thought it could be done better, i.e. shorter. (It always Saves Time to go shorter and slower in a smaller arc than longer and faster on a bigger arc.)
On the next run I tried to do essentially the same thing but wanted to be right on cone 523 and slow down more so that I could turn sharper with less distance traveled. The result was a line similar to what’s shown in Fig. 11, though I over-slowed a bit on entry and flattened out the arc in the middle, meaning that the tires fell below their multi-tasking limit for a moment and costing time. (You can see the double move with the steering wheel.) The clip of the actual run is shown in Fig. 12.
Fig. 11: Path Taken Run 2
Fig. 12: Video Clip of First Turn, Run 2
While I think I was faster than most in this corner in Run 1, the path taken in Run 2 was 0.20s faster than Run 1 as measured from the entry braking point to the next braking point.
Let me know in the comments how you think this corner should really have been done! I’d like to hear your thoughts.
One more thing: this is one big reason why the Bristol events are so successful:
Jeff Cox, event master, 8PM on Friday, still working to prepare the courses for Saturday
*I later learned that this car had electronic shocks with aftermarket tuning, something only allowed in Super Street class at present.