Slalom vs. Slalom

I’ve always assumed that there are parallels to be found between downhill ski competition and autocross. I never bothered to look into it, until now.

Full disclosure: I never became anything more than an intermediate recreational skier. So, you ski-racers out there can comment and tell me where I’ve got it all wrong.

Four main types of ski-racing events seem to exist at the world-championship level. The event called Giant Slalom (GS) most closely parallels autocross, I think. It runs about 1 second between gates, basically the same as an autocross slalom. The distance between gates varies a bit and sometimes there are two gates to pass on one side, but there are ranges for proper course design based on vertical drop. From Wikipedia, based on a formula: “… a course with a vertical drop of 300m would have 33 to 45 direction changes for an adult race.”

Maybe we could learn something about standardized course design for national autocross events from ski-racing.

The second type of event, Slalom, is shorter in length than GS with faster transitions and only about .82 seconds (I saw this number somewhere) between gates. I think this was the first type of ski-racing of the four to be established. Slalom transitions are faster than most, but not all, cars can achieve.

Of the two so-called speed events, Super Giant Slalom (Super-G) I’d say is most similar to Solo Trials and the Downhill is more comparable to road racing. The speed events have gates set farther apart, thus allowing higher velocities, are longer, have big radius turns and not much in the way of quick transitions.

From my brief reconnaissance of the sport, ski-racing technique has evolved rapidly over the last 20 years and maybe much longer. Much of this change has been driven by the evolution of equipment, in particular the advent of scalloped (side-cut) skis. As equipment got better humans have had to adapt their technique to take full advantage.

The ski-racing authorities have imposed limits on the equipment to keep things from getting out of hand, to keep things (somewhat) safe. They’ve had to impose minimum ski length and side-cut radii for each of the four types, for instance. They’ve had to change these requirements more than once. We call those “take-backs” in autocross, of course.

Something vaguely similar to equipment limits is happening in autocross. As power-to-weight ratios go up along with lateral-g’s in the lower prep classes, the courses at most venues have to necessarily get tighter to keep the maximum speeds in the safe range.

In general,  however, I’m not sure we can say that autocross evolution has been much driven by equipment evolution. While street tires have increased rapidly in performance, and street cars certainly handle better straight off the showroom floor than ever before, there have always been race tires and race cars at a much higher level of performance. That’s where most evolution due to technology has occurred. Someone with more knowledge than me will have to discuss whether better race tires have caused evolution in the classes where pure race tires are used.

Not that I think autocross is static. Far from it. I think it has been evolving fairly rapidly over the last 15 years or so. I think the best drivers of today are faster than those of 25 years ago. The reason? One word: data.

It’s almost comical what some people considered gospel 25 years ago. Data has cleared away a lot of the rubbish, the old wives tales, and the many ideas borrowed from the more mature sport of road-racing that just don’t apply to autocross. I think data is still driving autocross (and, for that matter, road racing) evolution today.

So, most of the talk/forums/instruction in ski-racing deals with human technique, and rightly so, especially since there are significant physical dangers in the sport, but there is some thinking about line and course strategy.

For instance, “high and early” vs. “low and late” discussions about apexing gates are common, especially with respect to the best line for beginner vs intermediate vs expert. Most teachers seem to recommend completing about 2/3rds of the turn prior to the gate, except for an expert skier who may do more of the turn after the gate. I’m sure the reader will recognize the direct parallel to autocross. I’ve done quite a bit of related data analysis elsewhere in this blog. Turning high and early is equivalent to late apexing in most peoples’ minds (not mine… I think that phrase should be banned from autocross as it is almost invariably misused) or, more properly, “back-siding the cones.”

I was particularly struck by the thoughts of Bob Harwood in an essay entitled The Road Not Taken- A philosophical approach to line and tactics, published on-line at modernskiracing.com.

Mr. Harwood writes “…what Bode [Miller] has taught us is that the old myth of one right line, the high line, is simply not true. Bode has learned that if he rocks his weight back a bit at the apex of his turn, he can ski a lower, tighter turn and still carve. Bode is able to bend the tail of the ski with more arc to carve a small radius turn with a high degree of confidence. Bode also has an amazing ability to shift his weight forward at the end of a turn so he can initiate the next turn smoothly and not get caught on the back of his skis at the start of the next turn. The end result: Bode’s balance and skills let him ski a lower, straighter line with less chance of DNF-ing than a more tradition skier…”

Sound eerily familiar? Race car driving has often been boiled down to the aphorism “The driver is simply a manager of shifting weight.”

Example: I recently co-drove a BS S2000 at the last two regionals of the year. I’d never autocrossed an S2000 before. The first event I wasn’t particularly fast. I focused on an efficient line and not spinning. (I spun anyway. But only once.)

Several places I took too slow of a line and dropped out of VTEC, which you really don’t want to do in an S2000 if you can help it. By the end of the day I had managed to get a feel for how much I could slither the rear of the car and yet not spin. I managed to beat the owner by a small amount but we were both down in the standings… I PAXed 17th of 112 and 8th of 9 in Pro, down from my average position.

In between events I watched a particular video (here) over and over again. This video shows a split-screen comparison of the best runs of Geoff Walker and co-driver Matthew Braun in an STR S2000 at the 2014 Wilmington champ tour.

Geoff Walker is one of the guys from an adjoining region that I’ve always considered quite fast. I’ve been trying to match him for years. He trophied in STR at Nationals in 2013, one of the very toughest of classes.

Matthew Braun is simply one of the fastest autocrossers alive with multiple Solo National Championships and podium trophy positions. Lately he’s been 3rd in SSR in both 2015 and 2016, having been the SS National Champion in 2006, 2010 and 2012 and the A-Stock champion in 2003, just to name of few of his accomplishments. I’ve been lucky enough to meet him on occasion.

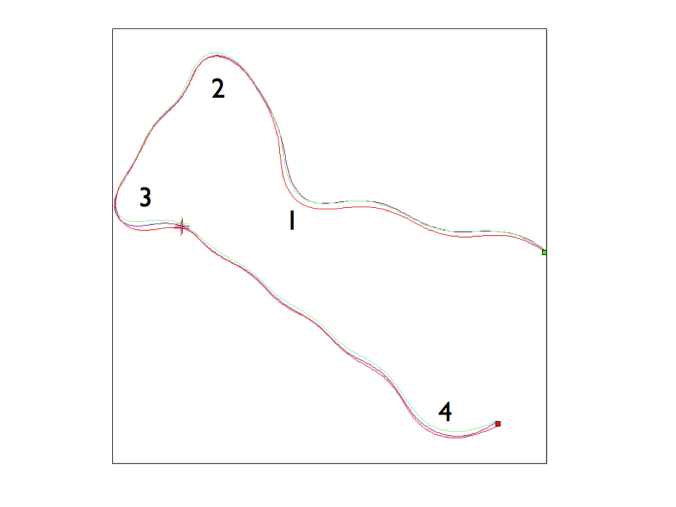
Walker was driving great, by my standards. As far as I can tell he only makes one slight mistake in the entire run, getting a little bit late in the first slalom. That’s it. Everything else is just perfect. Perfect, until you see what Braun does on the same course.

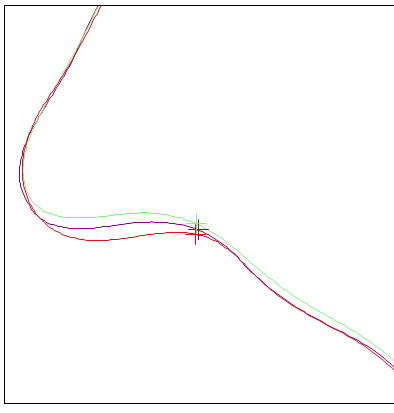
I see a consistent difference between the two. Braun takes a slightly smaller radius at each offset cone. He then rotates the car while going past and is able to get on the throttle earlier as a result of the car being pointed in the new direction sooner. He walks away from Walker with a higher average speed (and possibly a shorter distance traveled) at every point in the course.

Braun and Miller: Both take a tighter radius by controlling weight shift. Braun manipulates weight over, and lateral forces at, the rear tires and gets them to slide at just the right spot and rotate the car during a tighter radius turn. According to Harwood, Miller manipulates his body weight, bending the rear of his skis more, allowing him to carve tighter at the apex and take a more direct, and thus faster, downhill line. The parallelism between these techniques is striking to me.

Cause and effect are often difficult to sort out in autocross, but the 2nd event in the S2000 I beat the owner by a much larger margin, took 2nd of 6 in Pro and PAXed 6th out of 74. This is about normal for me, maybe even better than normal.

axsm033

Data Analysis of Sharp Turn At Wilmington Pro-Solo

Just back from Wilmington, Ohio where I ran the Spring Pro-Solo. Great event with the usual close competition and great competitors in B-Street. This was my 3rd Pro-Solo, spread out over a 4-year period, and first Pro-Solo trophy, 3rd place.

B-street at Wilmington

Fig 1- B-Street Class at 2016 Wilmington Spring Pro-Solo


If you don’t know about Pro-Solo, it starts with a short drag-race between two cars lined up side by side. After 150 feet or so of full-throttle acceleration the cars peel off in opposite directions into mirror-image autocross courses. After the finish, the two cars cross over to the other lane and run the other side, again with a drag-race start. Then you swap sides two more times. Very, very intense.

The “amateur” or “old” drag race light-tree is used: a white light indicates the car is properly staged, then three yellow lights illuminate in sequence leading to the green go-light. The idea is to get in sync with the lights, learning when and how to launch, so that everyone leaves more or less at the same time, but no earlier than 0.500s after the green light. (0.500s is theoretically about the typical human reaction time to any signal.) Otherwise, people would simply guess the green light, most runs would be early and red-lighted (disqualified) and the winner would be the lucky one who managed to go right on the green without being early.

With the light-tree skill and experience are required to match your start time and technique with the car to get an on-time start (low, but not too low, reaction time) and best acceleration. Too much wheelspin and you’ll be slow, even if you started at the right time. Bog the motor and you’ll also be slow. Reaction time and time to cover the first 60 feet is recorded so you can analyze how good you’re doing. Any reaction time less than 0.500s (called a 500 light) results in a red-light and disqualification of that run. A good 60 foot time might be in the range of 1.9s for a car like mine when the start area has rubbered-in… I got one of those. A more normal 60 foot time for me was in the range 2.1s to 2.2s, so significant room for improvement exists. Too much wheel-spin at launch is my typical issue.

Each heat consists of four runs, two on each side of the course. Your final time is the best run on each side added together over three rounds, two rounds on Saturday and the third on Sunday. Three rounds times four runs per round equals 12 runs total, six on each side to determine the class winner.

Pro-Solo courses are typically shorter and faster than standard Solo courses, sometimes even less than 30 seconds if the area is small. These courses were 36+ seconds for B-Street and a bit unusual in that each side contained two very sharp, slow corners. These sharp corners were clear examples of age-discrimination. Both were more than 90 degrees, the second being a turn of an estimated 130 degrees. Many of the over-60 crowd (like me) can’t turn their head that far! I smell class-action lawsuit. (Just kidding, Mr. Herbst, course designer!) The options for taking that sharp corner are the main subject of this post.

A path plot from my data is shown in the figure below. This is only the left side course and the green start dot is placed near the end of the drag-race section, just before turning left into the autocross course. At that point the car is moving 30+ mph.

wilm course numbered

Fig. 2- 2016 Wilmington Spring Pro-Solo Left Side Data Paths

The plot shows three paths, one from each of the three rounds. There may be a little bit of GPS drift evident, but not enough to ruin the comparison. Light green is the best run from the 1st round, purple is from the 2nd round and red is the best run from the 3rd round.

I’ve marked the key turns as 1, 2, 3 and 4. Turns 2 and 3 were the sharp, slow corners I mentioned earlier. Turn 4 continued into the finish lights, so if you did it right, you never did get back straight until after the lights. Lots of fun testing your resolve and ability to control the car as you exited the 50+ mph, 7-cone slalom and negotiated this turn. After walking the course my plan was to stay tight, tight and tight on turns 1, 2 and 3. Sometimes I pushed out by mistake (entering too fast), but the plan was to stay very tight. In fact, the wide green path in corner 2 is a push-out caused by entering too fast. Later runs I fixed that.

After analysing data Saturday night, I changed the plan to: flow-thru 1, maintaining more speed and not trying to be close to the second cone that defined this sweeper, stay tight on 2, and not quite as tight as before on 3. My idea was that the entrance to the slalom after turn 3 is slow and short and therefore, 1) wouldn’t be much affected by more turning to get into it, and 2) didn’t afford enough of an acceleration zone to be worthwhile, especially starting from such slow car and engine speeds.

Not over-braking and flowing thru 1 to maintain more speed and engine rpms saved time down to turn 2 as compared to a tighter and shorter path… about 0.2 seconds. This should have saved time on both sides Sunday, but I red-lighted an otherwise mistake-free run on the right side, so I lost that improvement.

Staying tight and short around 2 was clearly correct. I had several different paths, due to mistakes, to compare one to another. I kept doing it as tight as I could on Sunday.

How tight was right around turn 3? That’s the question we are going to explore with the data. Turns out my first plan was best, but not by much. Though it certainly felt better to go faster around that corner, and was not any further distance, it didn’t quite pay off like I thought it would.

The figure below is a closeup of turn 3. It shows tight (green), not quite so tight (purple) which was a failed attempt to stay tight, and significantly wider and faster (red), which was done on purpose…

Wilm corner

Fig. 3- Wilmington Sharp Turn 3

… and here is what that corner looked like in reality:

wilm corner 3 annotated

Fig. 4- Approaching Turn 3

You approach at full throttle, figure out where to brake and what speed to brake down to, turn about 130 degrees and then accelerate while curving back to the right into the entrance to a long slalom.

The choice was this: whether to maintain the corner super-tight, which is almost always best, plus it gave a better entry to the slalom, or maintain more speed with a bigger arc, which takes a more direct path to the first slalom cone, but then sacrifice the slalom entry angle and acceleration to some extent. Because of the rather unique geometry of this corner as it led into the slalom, the various paths were all about the same total distance, so we can neglect distance effects. What does the data say? Here it is:

Wilm data 1

Figure 5- Turn 3 Data

The 340 position index is about the braking point. The LongAcc curves are all very negative by 350, indicating heavy braking. Looking at the top Speed trace you can see (if there were more gradation marks) that the minimum speed for the tight, green path is 22 mph, the next slowest is the purple path at 24.5 mph and the faster red path slowed only to 28.4 mph. So, we have three instances with different speeds around this corner and quite different paths.

Right of the vertical cursor line (set at 440 Position Index) on the Speed graph we see that the green path is higher (faster) than the others. The cursor is located where the green LongAcc trace turns positive, indicating acceleration. That’s one advantage of the tighter green path: it gets back on the gas earlier. In this case, that was made possible by starting from a lower speed.

Of course, what we really want to know is the time saved. This is shown in the DELTA-T traces on the bottom. The red path has been chosen as the baseline, so it stays flat while the other two fluctuate around it. We see that both the green and purple traces lose significant time during the corner, as much as .37 seconds. The time saved by the red path is 0.3s or more compared to the other two all the way out to the where the cursor is located, which is about where I begin to turn around the first slalom cone in each case. If we stopped our investigation at this point it would appear that the wider, red path saved significant time. The issue becomes clouded with what happens next, however.

Both wider paths have to continue turning longer in order to get around the first of the 7 slalom cones. The purple path almost, but not quite, makes up all the time lost to the red path by the time the car is half-way to the 2nd slalom cone. In fact, it might have made up all the time except for a drop-out in acceleration that’s evident in the LongAcc trace at about 465 Index. Probably the rear tires slipped out a bit.

By the end of the data trace the green path has saved almost 0.1s as compared to the red path. This isn’t a lot, but there are some other facts we must consider:

1) the grip was the least during the first round (green trace) and best during the 3rd round (red trace). So, if I’d continued to always take the tight path the time saved by the tight path probably would have been a little more because the cornering speed would have been higher at the same tight radius.

2) a significant slow down is evident in the red Speed trace at the 450 position index. The car slows back down to 28.5 mph a second time in order to negotiate the first slalom cone turn, which is sharper due to being “out of position.”  This is what really hurt the wider, faster red path.

Conclusions: for my car, with its particular grip and acceleration characteristics, it didn’t much matter how I took this turn! There’s hardly any difference in the Delta-T once you take the first part of the slalom into account. What appeared at the time to be better, namely a wider, faster turn with a more direct path to the slalom did not actually save any time. On the other hand, it appears to have cost only a very small amount.

What about for other classes and cars? Well, a faster accelerating car would gain more accelerating into the slalom. So, tighter would have definitely been better. A weakly accelerating car might very well have saved time by not staying super tight and maintaining more speed, more like the red path.

2016 Plan: Improve Transient Response

I have a simple goal for the near future: do better at Dixie Tour, the first National Tour event of the year.

I’ve always done poorly at that event, held for many years at South Georgia Motorsports Park near lovely Adel, GA. I think at least part of the problem has been the site: it’s a long, thin parking lot. As a result, the courses have been similar, transient-heavy things. Wiggle your way to one end, turn around and wiggle it back. Almost a constant speed. Not much of anywhere to use much power. Not especially good for a Corvette against S2000s and MSR Miatas. In fact, in 2012 Jadrice Toussant won B-Stock in an S2000 with a time that would have been 3rd in Super Stock. He beat every Lotus, every GT3 and every Z06 except for Strano and Braun. Now, Jadrice is a heck of a driver and National Champ and he flat tore it up that day, but I think the course had something to do with it.

Here’s what it looks like. You can even see some tire marks.

SGMP

South Georgia Motorsports Park

So, the plan is to improve transient response. Mostly to see if I can do it and maybe do better at Dixie.

Two years ago I concentrated on maximizing lateral grip. Then last year I got some better shocks that I’d hoped would improve transient response via higher low-shaft-speed compression damping, but I was still focused on lateral grip. It worked to some extent, but not enough to place in the top 3 in class at Dixie. ( I was a miserably slow 4th.)

Before I start making changes, I figure I should review what I think I know about what happens when you turn a car and what factors control the transient response. So, I tried to write it down. (You’ll note that I like to start an analysis at the very beginning.) I focus on the front of the car.

  1. Turn the steering wheel. (We all do this pretty well, I guess.)
  2. The tires turn to an angle with respect to the car direction.
  3. Due to friction provide by gravity and proportional to the weight on the tires, the tire contact patches deform and twist, producing slip angles and lateral forces at each contact patch.
  4. Tire patch lateral forces transfer to and act on the sprung and unsprung forward masses and do two things: change the direction of the front of the car by creating a lateral acceleration, and create lateral weight transfer.
  5. Lateral force acting at the unsprung mass CG acts to instantaneously create weight transfer (like on a kart) and tends to reduce the ultimate lateral acceleration possible as weight is transferred from inside tire to outside tire, reducing the total contribution of all the tires added together.
  6. Lateral force acting on the sprung mass through the roll center rolls the sprung mass on the springs and bars to create (what Dennis Grant calls) elastic weight transfer, neglecting any small lateral translation of the CG. (I’m going to simplify things and neglect jacking force, or Geometric weight transfer, again per Dennis Grant, as it is small in the Corvette because the roll center is close to the ground.) The amount of roll does not affect the [total] amount of weight transfer. Update: I think I wasn’t clear, as Mr. Glagola has pointed out. What I mean is, the total amount of weight transfer is not dependent upon roll stiffness. Yes, the weight transfer build-up is proportional to roll angle, but that is because both the roll angle and the weight transfer are proportional to lateral acceleration. When the car gets to it’s final roll angle, whether it be 1 degree or 15 degrees, weight transfer is complete.
  7. Compression damping turns part of the sprung mass roll, during the roll transient, into increased downward force on the outside tire contact patch. This temporarily increases the lateral force capability of that tire. (It also turns some of this roll energy into heat, which leaves the system, so it never gets into the springs or bars.) This is why high levels of low-shaft-speed compression damping assists transient response. It acts as if the spring temporarily got stiffer. At the extreme it would allow the outside spring to compress only very slowly. In a slalom, with enough compression damping, very little roll might have time to actually occur before the car is asked to change direction again.
  8. Rebound damping on the inside wheel also resists sprung mass roll during the roll transient and once again some energy is turned into heat. The rebound force tends to hold back the roll of the sprung mass. To do this it picks up weight from the inside tire and tire patch, which tends to decrease the lateral turning force produced by that tire. In the extreme case the tire might leave the ground as the body rolls and the wheel follows. (I don’t think any shocks have that much rebound damping, but it could be done. If you were an idiot. Or an engineer trying to prove a point. Or some mixture of both, as is the usual case.)
  9. Roll of the sprung mass extends the inside spring, thus reducing the load on the inside tire. Roll compresses the outside springs, increasing the load on the outside tires. Without shocks, achieving maximum cornering force is delayed until the sprung mass roll is complete, if for no other reason because the outside tire doesn’t get to it’s final, proper camber until then. By resisting roll both rebound and compression damping forces speed up weight transfer across the front axle, getting the car into a cornering attitude faster and with slower roll, and thus less total roll during the transient. In this way, we don’t have to wait for the sprung mass to roll to it’s maximum before achieving high lateral cornering forces, though reaching the maximum cornering force is probably not going to happen. I suspect this will increase the maximum achievable cornering force when time is short, such as in a slalom. However, almost all of the increased energy in the compressed spring will be delivered back into the sprung mass when the turn is reversed, helping to roll the car the other way. The shocks absorb some of this energy in both rebound and compression, turning it into heat, and thus assist in keeping the car controllable during repeated maneuvers.
  10. All roll twists the front sway bar. Like the springs, most of the energy absorbed by the sway bar is given back when the car is turned the other way. Therefore, during transient maneuvers the energy put into the bar during whatever roll occurs wants to come right back out and roll the car the other way. Once again, shock rebound and compression damping absorbs some of the energy, keeping the car from rolling uncontrollably during repeated maneuvers. (Unless you are a certain production SUV and fail the Scandinavian Moose Test.) By limiting maximum roll, and thus camber loss, the sway bar may increase maximum lateral G forces in a sweeper by keeping all tires working better than otherwise. The sway bar also slows the rate of roll, assisting transient response. [However, the sway bar, unlike the springs, acts across the car to create an increase in the total weight transferred from the inside to the outside, which tends to decrease total lateral G capability.] Update: I now believe the statement in brackets to be false. In softly sprung production cars it is almost always better to limit camber loss by limiting roll with stiff sway bar(s). However, it may be that during the roll transient of a production car (with soft springs) it may be better to trade sway bar stiffness for an increase in shock damping, especially compression damping, in order to limit weight pulled off the inside tire.

So, based on this assuredly imperfect understanding of what happens when a car turns, I’ve come up with an action plan:

  1. Choose a tire known for it’s lateral stiffness. The RE71R is known to be one of the stiffest & most responsive. That’s what I’ve been running.
  2. Properly support the tire with a wide-enough wheel. I’m  down from an oversized 275mm to a less-oversized 265mm this year on the required 8.5” wide front wheel.
  3. Increase support to the tire with air pressure. The past two years I found a relatively low pressure was needed to maximize lateral grip in sweepers. This year I will test using higher pressure in front to maximize tire support and hopefully produce faster transient response at the contact patch.
  4. Keep using significant toe-out on the front tires to more rapidly establish a bigger slip-angle on what will be the inside tire in the turn. This worked well last year. This allows the inside tire to more quickly create a lateral force, pulling the front end of the car into the turn. As the weight shifts to the outside tire, it has now developed a good slip angle and can really drive the front end into the turn. Because of weight shift, the inside tire is of lesser importance by then. I reset the toe before driving home after out-of-town events. The poorer front-end response with no toe-out is palpable.
  5. Test using the softer setting on the front anti-sway bar. The final roll angle may be less important because the final roll angle will not be reached in a slalom situation. I used the stiffer setting last year on a stiff bar to maintain proper camber of the tire during sweepers. For best transient response, it may be better to reduce the stiffness to reduce weight transfer off the inside tire. It may be possible to keep the inside tire working longer in the initial part of the turn. I will try to figure this out at an upcoming Test & Tune event. Update: As noted in an update above, the basis of this is false. So, I won’t be reducing roll bar stiffness, at least not for this reason. I might reduce roll bar stiffness for balance or stability reasons.
  6. Test with the shocks adjusted for higher front rebound and compression damping than used before.

Of course, all this may completely unbalance the car and I’ll be even slower than last year. I expect I’ll learn some things either way.


The Really Weird Thing About Modern American Autocross- Revisited

Notice of update: I realized after publication that I’d used an entry speed of 55mph rather than the 50mph used in the previous installment of this series. So, I’ve got back up at 12:30 A.M. and changed it back to 50mph. Didn’t make much difference to the results data and no difference to the conclusions. (I also tried to make Figure 4 less of an eye test.) My apologies to the over 400 of you who have already read this in the first few hours of publication.

I received some good comments on the earlier post “The Really Weird Thing About Modern American Autocross- Part 2”. Charles Krampert, for one, pointed out that I wasn’t taking into account the angle one must drive after leaving the first cone to be set up for the same radius around the next cone. I finally got some time to put that extra turning into the graphics and the spreadsheet. Turns out it makes a significant difference.

Remember that I’m trying to figure out what radius is fastest around a cone, depending on the acceleration capability of the car. (If you don’t remember, you might want to go back and read the earlier posts.) I assume an infinite procession of cones 150 feet apart which require a nominal 90 degree change of direction around each cone. I also assume 1.2G lateral capability and 1.0G braking, which is typical for many street-class autocross cars. The basic idea is shown in Figure 1, below.


proper path

Figure 1

More specifically, Figure 2 shows what I’m analyzing and, in fact, represents the actual fastest radius for a car with 0.3G acceleration capability, namely a radius of 15 feet.

tic3 .3g curve

Figure 2

From A to B the car has to take an angle to the outside of B to produce the 15 foot radius. The car then has to go more than 90 degrees in order to exit B to allow it to go around the next cone, 150 feet away (not shown) at the same 15 foot radius. I  calculate the time from the start at A, going 50 mph, to the finish at C, 75 feet beyond B.

It turns out that considering the extra turning to get to the proper angle for the next cone reduced all the answers. Here are the results, with the old radii results, then the new radii results. The remaining data is all for the new radii.

TIC3 results updated.png

Figure 3

We can make a few observations:

-As before, as the accelerative capability of the car goes up, the best radius goes down. This agrees with what most people think.

-As before, we see an immediate issue with the curve velocities: they are too low for most cars to accelerate strongly from in 2nd gear. More on this below.

-The new best radius values are lower and more compressed over the G range than calculated previously. The extra turning required to be oriented correctly for the next cone greatly penalizes big arcs. A lot of time is lost going around at minimum radius at minimum speed. This goes a long way to answer the doubt I had expressed about the large radius values that the previous analysis showed as best and which I have not seen being used in practice. (I’m a big believer in the idea the most experienced people are doing it  mostly right most of the time.) By the same token, if you don’t have to turn the car as much for the next cone you are better off with a somewhat larger radius. The data seems to be very sensitive on this point.

The very low curve velocities associated with very small turning radii mean that there’s a big problem with using this data to make firm conclusions. I began this study thinking that I was using acceleration ranges that were typical of peak torque in 2nd gear. What this has shown is that we can’t think of it that way. The best theoretical radius is always too small. Instead, we have to think of the acceleration that is actually available at the particular curve velocity required by such small radii.

For instance, my BS Corvette can accelerate at 0.45G at peak torque in 2nd gear. But at 25 mph it may struggle to reach 0.3 G. The results chart says the best radius for 0.3G is 15 feet, but my car will only be going 16.4 mph around a 15 foot radius and will really struggle to accelerate in 2nd gear from that low speed.

On the other hand, what this data may be telling me is that I’d be better off taking a smaller radius and downshifting to 1st. I know, this is sacrilege! I’m going to lose roughly 0.2 seconds when I upshift and probably lost some time downshifting as well. Will it ever be worth it to downshift?

Looking at the sensitivity of the results may shed some light. Here is the spreadsheet set for 0.3G in Figure 4, below.

TIC3 graph updated

Figure 4

Looking at the Total Time row you can see that the minimum time is 5.959 seconds underneath the 15 foot radius column. That’s how I get that 15 feet is the best radius for a 0.3G car… by comparing it to the results for radii both bigger and smaller. It’s a brute-force optimization technique. (It’s also 5.959 seconds underneath the 17.5 foot column, so the real minimum is somewhere in between. I just chose one.)

If I change the A 2nd acceleration parameter in the upper-right corner all the columns recalculate and I find the minimum time for that G-level. I graphically determine the arc distance and straight length within the columns for each case.

Now, how far off of that best 15 foot radius do I have to get to equal a 0.2 second downshift loss? I’d have to go beyond a 30 foot radius before losing 0.2 seconds. But, the bigger radius I take the less I will need to downshift. If we assume that at a 30 feet radius I definitely don’t need to downshift, then if I choose to take a 15 foot radius and do downshift I am, at best, breaking even. I think this confirms the majority view that downshifting with a relatively slow-shifting car like mine is almost never a good idea. The corner’s gotta be really tight to consider it.

If we consider a motor with really poor low-RPM torque, say an S2000 that will drop out of V-tec, then no way it should take the smaller radius. Unless…

Here’s the real rub and why I entitled this series of blog posts the way I did. For corners where the car is forced by the course design to take a very tight radius S2000 drivers have learned that it is better to downshift to first when I would not in my Corvette. At least that has been my observation after competing against them the last few years. They “know” that they lose too much trying to get off a slow corner in 2nd. (When I see an S2000 struggling to accelerate below the V-tec RPM switch it just warms my heart!) I think we all know that there is some point that we should shift to first gear if the corner is very tight.

Let’s level set and get our bearings. When do we know that it is definitely advantageous to downshift? Pin cones. All of us who have done 180-degree pin cones know that the best way to take them is absolutely as tight as possible and downshift to 1st by all means. (Thank you, Randall Wilcox.) We never see these at National events, but they had one at every event in Nashville at the Superspeedway lot that I ever attended and we have them quite often in Huntsville when we run at the old airport. I’ve done a lot of those suckers.

Alternatively, when do know we would never downshift? How about a 45 degree turn? No way we would downshift to first. We all know that we cannot even create a radius small enough to force the car so slow to even think about downshifting.

So, somewhere between 180 degrees of turn and 45 degrees of turn is a middle ground where it may or may not pay to downshift from 2nd gear at autocross speeds. We happen to be concerned here with 90 degrees and somewhat more, so we are probably right in the no-man’s land.

Of course, there’s another issue with downshifting. Can you get the power down? If you can’t get enough power down to create the fantastic acceleration promised by 1st gear, no point in downshifting. Also, as soon as the rear end steps out you’ve lost 0.2 seconds, or more.

All this implies that, in certain situations, the right radius for a car on R-comps is not the same as the right radius for a car on street tires. It also means that as tires get better at putting down power, as we saw with the Bridgestone RE71R last year, it may affect the proper radius. Yes, autocross is complicated.

What about dual-clutch transmissions? What if you can downshift and get 0.7G in 1st gear even in a relatively low-powered car and then lose next to nothing when you upshift to second? I think this data says that for large degree turns you should consider braking down to a very small radius and downshift, within the limits of you car’s ability to put power down. You might even alter your whole style of taking large-degree corners in order to use the quick-shift capability.

The Really Weird Thing about Modern American Autocross – Part 2

Recap from Part 1

To recap and clarify, I’m attempting to determine whether and how the proper radius around an offset cone changes with the acceleration capability of the car.  The objective, as always in this blog, is to learn how to Save Time. A series of offset cones and the way I usually drive it looks like this:

general case

Setup

The situation I’m modeling, with the aid of spreadsheet math and some graphical solutions, is an endless progression of offset cones with, theoretically, a 90 degree turn required at each cone. (In reality, the turns have to be more than 90 degrees.) The finish is not in play and I’m not discussing  cornering techniques, per se. (If you want to see what I think about cornering techniques, see previous post  All Those Books On  Cornering are Wrong.) To be clear, what I’m going to show is NOT considered by me to be the best way to take a corner.

The figure below shows the area of analysis, namely the 150′ before any particular cone and 75′ after it:

proper path

I assume, for ease of calculation and graphics, that we go wide on the entry, brake down to the curve velocity the tires can handle, and execute the turn before reaching the cone. Sort of like back-siding the cones in a slalom. (This is simplified as compared to advanced cornering techniques, but I think it will be useful. And, best of all, I can calculate the heck out of it.)  Once alongside the cone the car then accelerates at full and constant capability for 75 feet further. The specific area of analysis and various possible paths are shown in the next figure, repeated from Part 1:

time in curve 1

Diagram of the Specific Area of Analysis

Calculations

I’m now going to discuss how the calculations are done. Those not interested can skip down to the results. Go on ahead. I won’t be offended.

First, I choose a radius for the turn. Given the 1.2G lateral capability assumed for all cars, physics sets the speed in the arc.

I graphically set the tangent point from the approach and determine the arc distance.  Then I calculate the time spent in the curve, which is at a constant velocity. (All calculations use the standard equations of motion I learned a long time ago, forgot for many years and had to re-learn. Far as I know they haven’t changed too much.) From here I can go both forward and backward to determine the remaining segment times.

Since I know the speed in the curve and the acceleration capability of the car, I can easily calculate the time to accelerate through the 75 feet and the speed at the exit. So, yeah, I do that.

Here’s where I have to take the teensiest of short-cuts: I assume a constant entry speed, starting at A in the figure above, of 50 mph. The beauty of this is that now I can easily calculate the distance needed to slow the car from the set 50 mph down to the arc speed given a 1.0G braking capability. (If I don’t make the constant entry speed assumption, this gets too tough for my brain and my spreadsheet.) It’s then not hard to determine the time to cover that distance, figure out how far the car traveled at 50 mph and calculate that segment time as well. Add all the segments times together and you get the time from entry to exit, A to C.

Here’s a picture (probably unreadable) of the spreadsheet. In the upper right corner, in the red box,  is the acceleration capability that can be varied. This shot shows 0.4 g. As it changes, the various columns of figures change. Each column starts with a different arc radius, from 5′ to 55′. All velocities are in feet per second in the spreadsheet.

chart1

Spreadsheet Data for 0.4G Acceleration Capability

There will be one number in the Total Time row near the bottom in the figure above that is a minimum. In this case, it’s 5.674 seconds and it corresponds to a 30′ arc radius, both values in red boxes. So, now I know that for a 0.4g car a 30′ radius is best, i.e. Saves The Most Time.

Results

I’ve worked the spreadsheet and the graphics from 0.1g to 0.6g and converted the velocities to miles per hour. The results are below.

Best Corner Radii per Acceleration

Best Corner Radii per Acceleration

Hmm. Take a look at those curve velocities. More on that in a sec.

Here is what the three radii, 25′, 35’and 45′ look like with 150′ from A to B:

Example Result Paths

Example Result Paths

Conclusions

  1. Hey, the standard wisdom is right! The slower-accelerating the car the bigger the radius you should take. Holy Toledo Pro-Solo!
  2. I’m a little surprised by how big the radii are., i.e. how far outside the cone you have to aim. This says I’ve been driving too tight.
  3. I find it interesting that the time for a 0.2g HS econobox is not really that much slower than a 0.6g STU Corvette.
  4. Some of these radius speeds are really too low. The 0.6g car is only going 16.4 mph around the 15′ arc. Even for such a powerful car, in reality it will lose too much time trying to accelerate in 2nd gear from this speed. For most engines the RPM will be too low in 2nd gear. If we set a lower bound on the curve speed of 25 mph to keep from having to downshift this would limit almost all cars to no less than a 35′ radius. I almost never see people in powerful cars taking such big radii. What gives? Some factor I’m missing, maybe? Maybe a sliding, trail-braked, decreasing radius arc just looks a lot different and gives the impression of a tighter radius.

Sensitivity

One last thing: how sensitive is the data? What I mean is, how close to the theoretically right radius do you need to be? The answer is: not very. This is good news, especially for me and my driving!

If you take a look at the Spreadsheet Data for 0.4G figure, the time difference between the perfect radius of 30′ and plus or minus 5′ radius on either side is only 0.005 seconds either way. Given that, the difference in acceleration available at the cone from taking a bit larger radius than theoretically optimum could be significant. So, looks like it would always be better to go a little big. This means I’ve really been driving too tight. The difference in initial acceleration in my BS Corvette from between 21 mph and 25 mph is significant.

Whew! I’ve been working on the subject of these two posts for a long time. Glad it’s done. Please let me know if you find any errors.