Part 2 will be mostly concerned with 2-cone turnarounds. We will explore the complications of entry and exit widths and angles. From this we’ll also get some insight into asymmetric 3-cone turnarounds where cone 2 is not in the center.
Let’s start by drawing one of the 2-cone turnarounds at the Bristol Champ Tour earlier this year. It was about 80′ across from cone 1 to cone 3 and had entry and exit gates in the range of 20′ wide. I’m going to ignore the fact that the whole feature had a significant slope downward from cone 1 toward cone 3 but in the real event, of course, it played a significant role. (Effectively, the car turns better in the first half of the turn and worse in the 2nd half. This make a symmetrical turnaround (as seen from above) asymmetrical when driven.) This turnaround is represented in Figure 1.
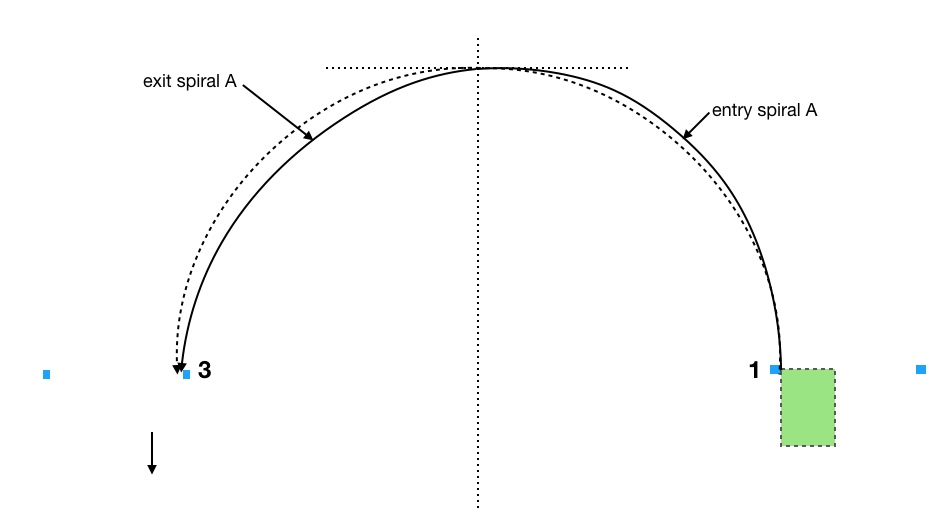
I’ve added a green rectangle to represent the width (75”) and wheelbase (107”) of a typical car, something close to a Mustang GT350, in fact. I think we need to do this to be more realistic than in Part 1 because the size of the car becomes meaningfully large and limiting compared to the turnaround geometry once we start thinking about where to place the car within the gate width and what angle to set. I will use the left side tires as the definition of the line, not the center of the car, since we’re turning left and need to pass the cones on the left side of the car.
Figure 1 shows a 40’ radius dashed reference arc. An extremely low-powered car plus a requirement for a perpendicular exit will result in driving something like this arc in a generic turnaround. However, autocross corners are usually so tight and slow (as compared to most race tracks) that even “low-power” cars can use a slightly spiral exit, something like exit spiral A. The spiral entry shown, entry spiral A, assumes we enter perpendicular to the gate like we did in Part 1. Now we are going to change that assumption.
In Figure 2 we add an angled entry leading to entry spiral B.
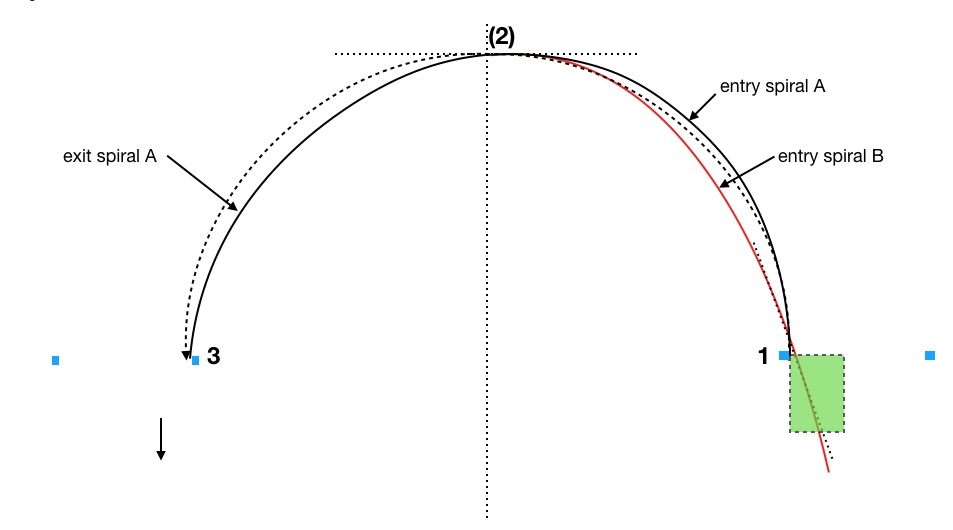
Does entering at an angle help reduce our time? Let’s look at Entry spiral B, the red path in Figure 2, which enters at a 20 degree angle at cone 1.
We can state 2 things about this path: 1) from cone 1 to the former location of cone 2 (that we removed) the path is shorter, and 2) the total amount of turning necessary from cone 1 to missing cone 2 is only 70 degrees instead of 90 degrees. If entry spiral B can connect with the exit spiral A at the same speed as entry spiral A then I think it’s obvious that entry spiral B takes less time. It’s shorter, the car has to turn 20 degrees less and it can arrive at the previous location of cone 2 at a higher speed. In fact, if we don’t modify our speed we will be too fast at the former location of cone 2 to transition to exit spiral A.
So, we need a new apex point to take best advantage of the entry angle, something like what’s shown in Figure 3 as entry spiral C.

This ties in with another thing Brolliard teaches us, namely that we want to take advantage of as much of a 90 degree entry spiral as possible for any corner of 90 degrees or more, which in Figure 2 we did not do. Now in figure 3 we have a full 90 degree entry spiral and the apex, denoted by a phantom brown cone, becomes displaced beyond the centerline where we have no problem transitioning to exit spiral A.
This is what should happen, I believe, when you can create an angle on entry but can have no angle (or less angle) on the exit: the apex point moves toward the exit.
Can we improve with even more entry angle? Look at Figure 4.
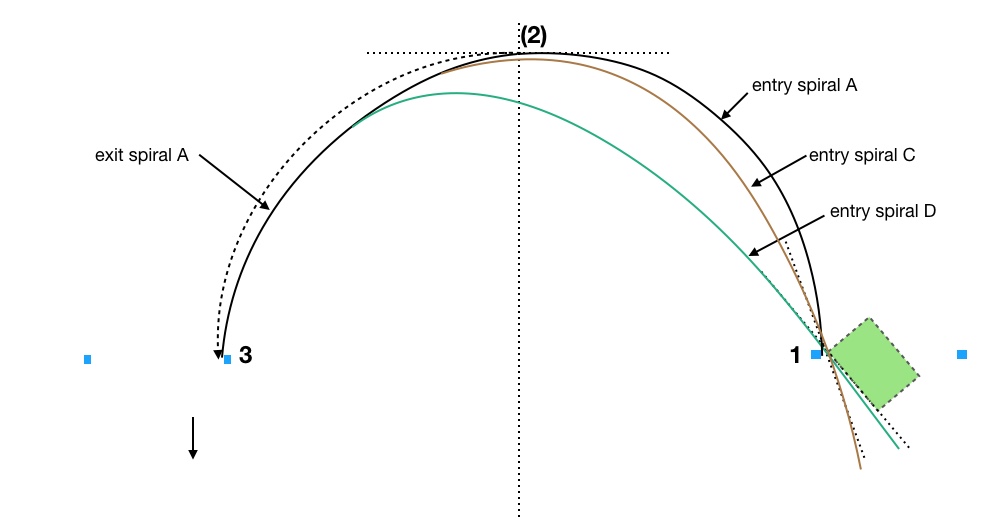
Entry spiral D enters at 40 degrees and connects with exit spiral A at yet an even later apex. It is clearly shorter and straighter to the center line and the entire path from entry to exit is clearly shorter. It also passes the entry gate at an even higher speed than entry spiral C so its average speed from the entry gate to the apex is higher. Finally, it turns less from entry gate to exit gate, exactly 40 degrees less, but, again, we do turn 90 degrees from entry to the new apex where the entry spiral joins the exit spiral.
Of course, there’s no free lunch, or not very often, anyway. We always have to weigh the cost it took to achieve that 40 degree entry angle at high speed which transformed the nominally 180 degree turnaround into only 140 degrees. If getting the entry angle is free, or nearly free, then use as much angle as you can get and fit a 90 degree entry spiral into the feature. Usually we have excess speed on approach so we can do this. (Without excess speed our exit would end up inside cone 3 if we kept the tires working at the limit. In that case the feature is no longer a single corner. It becomes an acceleration zone (or a “curved straight” some people call it) and only later a corner.
When thinking these things through remember that Brouillard has taught us that what counts is finding the path that gets us to the exit gate first. The point is Saving Time, as someone(?) once said. Even if we are only going 5mph at the exit gate, when a different path (go out wide to the next county?) could have us arrive at the exit gate at 150 mph, the car that went deep never catches up no matter how far it is to the next feature even assuming the car can accelerate above 150mph at the same rate from that point onward. We can always find a (stupid) way to start our acceleration at a further location back from the exit. What counts is starting our acceleration at an earlier point in time. As I’ve said before, it rarely pays to go in the wrong direction no matter how fast you travel. Taking a bigger arc (longer path) or less angle in order to increase velocity is “going in the wrong direction.”
It seems that we have discovered something about 3-cone turnarounds that have offset apex cones. Take a look at Figure 5.
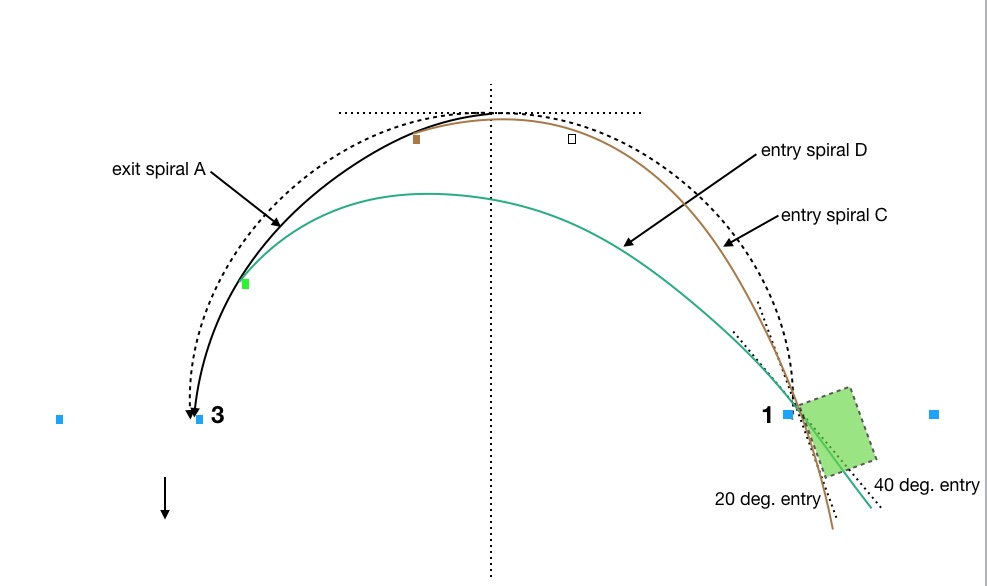
Entry spiral C is equivalent to having the brown cone placed for real at the apex. This 3-cone situation occurs often in autocross, i.e. we have 3-cones but the center cone is offset one way or the other from the center. It may also be deeper than it’s nominal position on the point of an equilateral triangle as I assumed in the previous figure. This tells us that for offset apex cones we want to enter at more of an angle the more the cone is offset closer to the exit, up to some point where we begin compromising the exit. This allows the use of a full 90 degree entry spiral. If we can’t enter at the best angle, or if getting that angle requires too much of an earlier compromise, then the best we can do is to perform a 90 degree entry spiral, even up to a straight-in entry, with an earlier apex out in space. Our exit spiral must then pass by the brown cone.
What if we have a cone offset toward the entry as shown by the empty box in addition to the brown box? Then, still using entry spiral C, we simply pass by it on the way to our most efficient apex at the brown cone. In fact, any cones that happen to lie just inside our most efficient entry spiral based upon entry angle are simply passed by on the way to the best apex. Turnarounds often have cones thrown out there that may or may not be apex cones and may not act as line constraints either.
Don’t we want to enter and exit as wide as possible (using all the available track) at as much angle as possible? This makes our turnaround significantly less than 180 degrees, which should mean it can be done faster.
The answer is Yes, but with reservations. We can minimize our time in the corner this way, the time from entry gate to exit gate, with path wide, angled A, as shown in Figure 6, for instance. If we have an offset 3-cone situation (the black square) and a need to have a perpendicular exit we use wide, angled B, which will be slower than path A. More braking will be required prior to the apex at the black square in order to produce an exit spiral that achieves the perpendicularity requirement at cone 3.
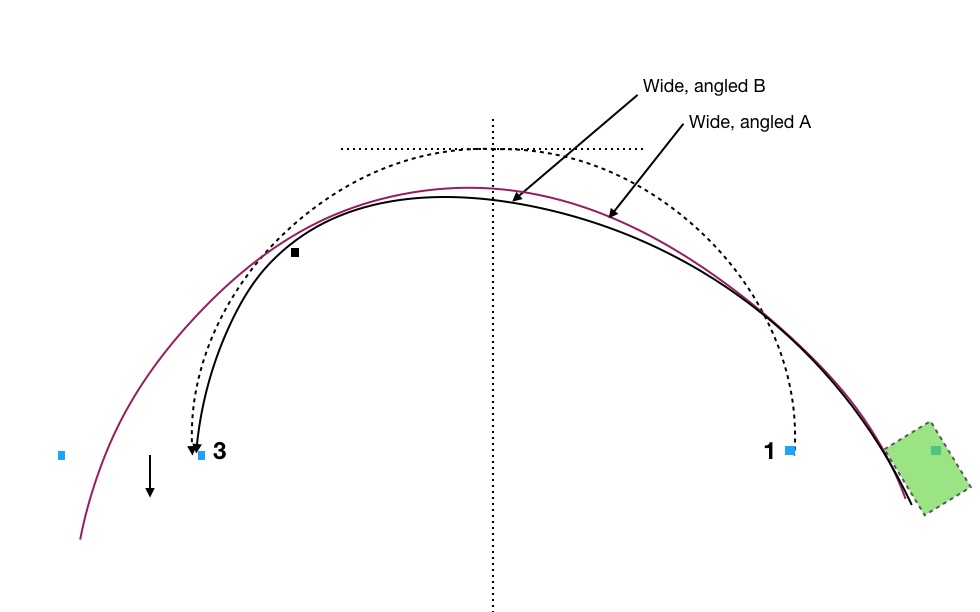
These wide and angled entry and exit paths work if 1) we have lots of speed to use at the entry, 2) it doesn’t cost us much to get the angle and position and 3) an angled exit works for the next feature. But note the issue with the car. We have become severely limited in how wide we can enter due to the size of the car as compared to a typical entry gate which is a minimum of 15’ but usually about 20’ as drawn. This often constrains the possible entry and exit angles and widths such that the ones I’ve drawn in Figure 6 are untenable.
This brings up an interesting point. Why wouldn’t we always take the widest and shallowest possible arc through the entry and exit gates if there is no apex cone? Why would we ever take Wide, angled in Figure 7 which goes so deep and apexes at the brown cone (whether it’s there or not) after turning 90 degrees, if we could take the extremely shallow green path in which we don’t even turn 90 degrees?
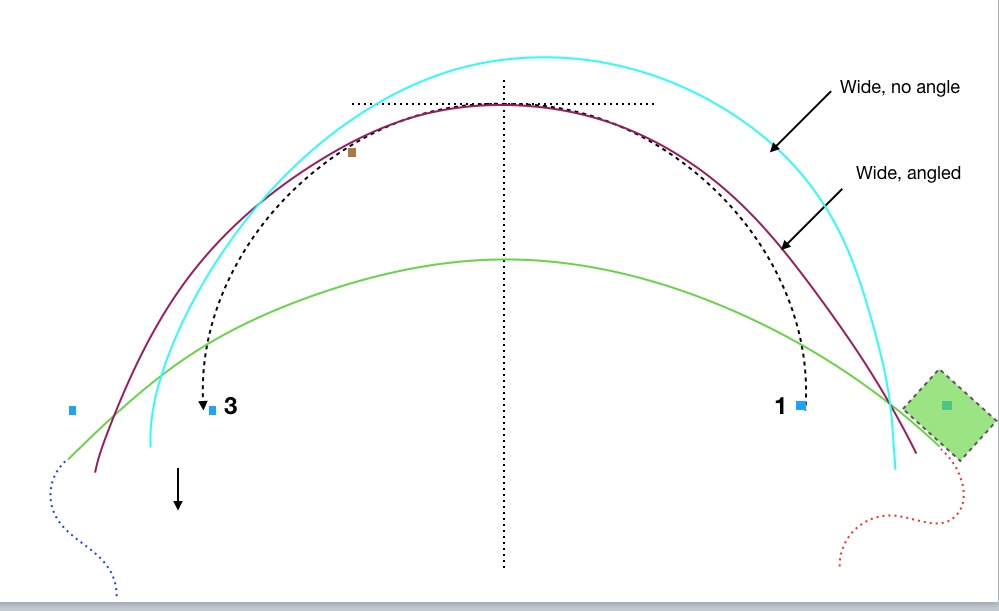
The answer is that we do want to take a shallower path, all else equal. If we can fit a larger radius path in between gates 1 and 3 then we want to do that. Don’t turn more than you have to, as long as its consistent with using high-efficiency entry and exit spirals, doesn’t involve a big cost to get to the entry and still correctly sets the car up for the following feature. I hope it’s obvious that you would never want to take the red dotted path, for instance, just to connect with a wide entry and shallow, low turning path. Nor would you want to take the green path only to have to do something crazy like the blue dotted path to set up for the next feature.
The 2-cone path that we really want to avoid would be a wide entry with no angle. This is analogous to the mistake of substituting a faster, larger circle for a smaller slower circle. Every degree of angle we can achieve at low cost significantly decreases path length and time in the turnaround. I’ll publish a real-world example in the next post.
I think if you have the gate width and an entry angle that works, then use them, as long as they don’t cost too much to obtain. Unfortunately, all too often the cost is too high and we have to compromise.
Stay tuned for Part 3.

Pingback: Let’s Get Straight about Late Apexing-3 | Saving Time – An Autocrosser's Blog