Key Driving Skills
I think there are several basic driving skills that the novice should begin developing during the first year of autocross. As mentioned in Part 1, the idea is to focus on what’s most important at the beginning.
- Develop a steering method that maximizes feel and control while limiting hand repositioning
- Learn to put weight on the front tires prior to turning
- Learn to add throttle in coordination with opening the steering wheel
- Learn to trail-brake
- Learn basic line theory
Develop a steering method
We wish to develop a method that maximizes feel and control and limits hand repositioning to a minimum. In the end (and also in the middle, as well as in the beginning) being able to drive a car fast and stay within the autocross course is highly dependent upon your sensitivity to what the car is doing.
Most of the information as to what the car is doing will come to your hands through the steering wheel. We also get information through the seat and a fair amount actually comes through your feet, especially when you’re braking. The beginner should focus on the hands.
First point: Drive with two hands!
I know this seems obvious, but you might be surprised how many times I’ve seen people drive with one hand on the wheel and one that never leaves the gear shift lever. Palming the steering wheel with one hand through the entire course is a recipe for incredible slowness.
So, keep both hands on the wheel at all times except for the minimum time necessary to shift. Once the shift is complete, put the hand back on the wheel.
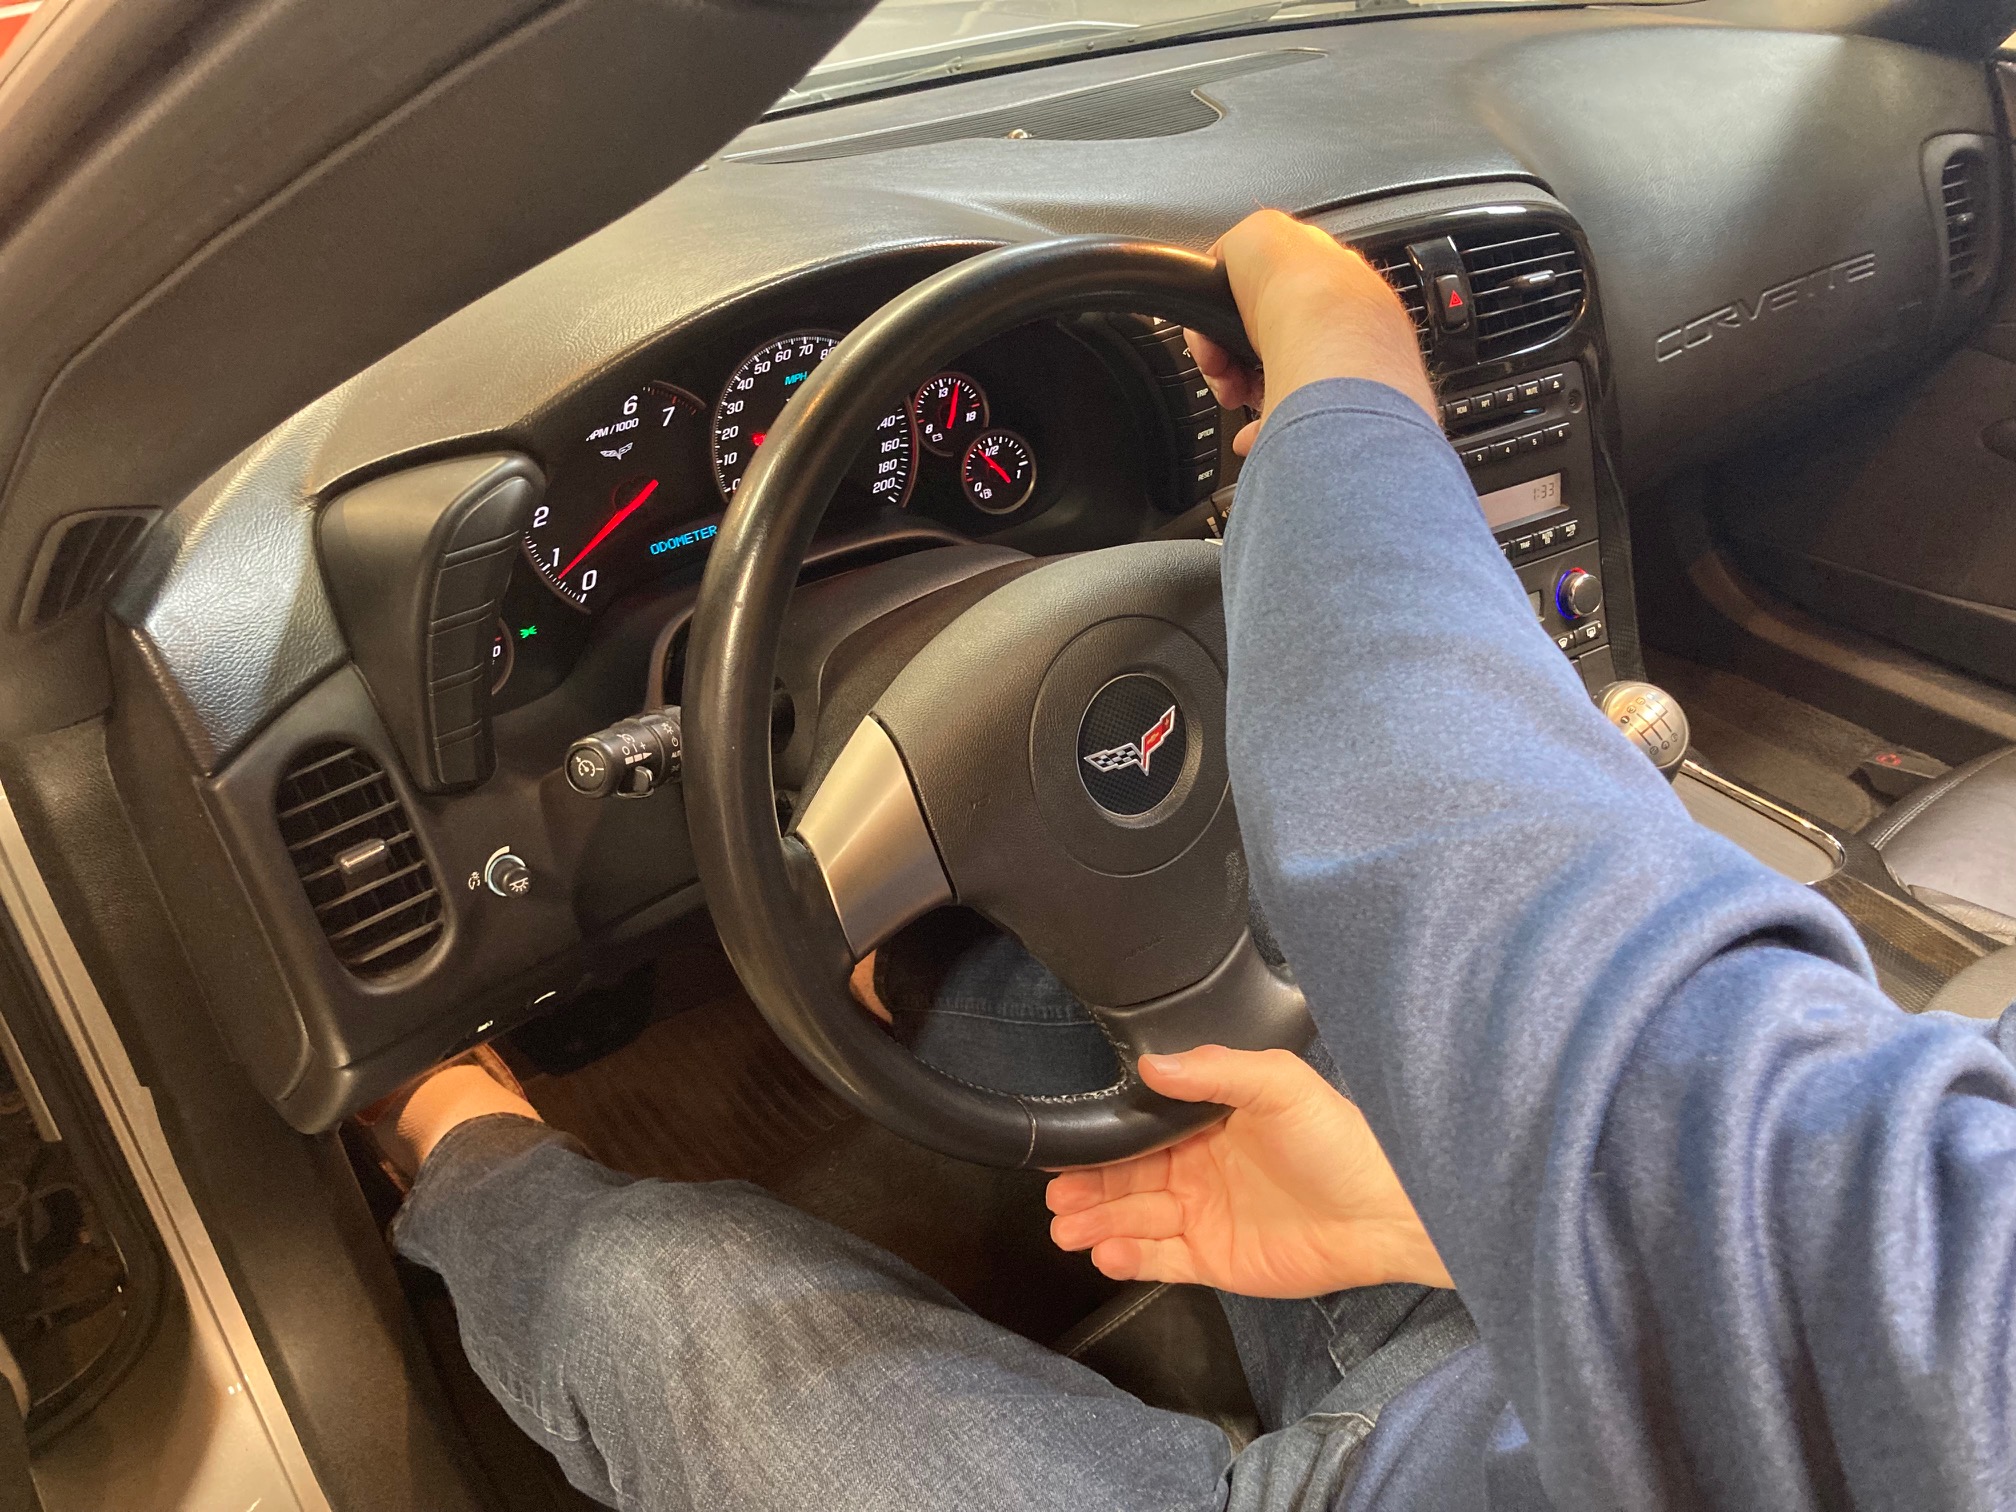
Second point: For maximum sensitivity, get the maximum amount of skin on the wheel.
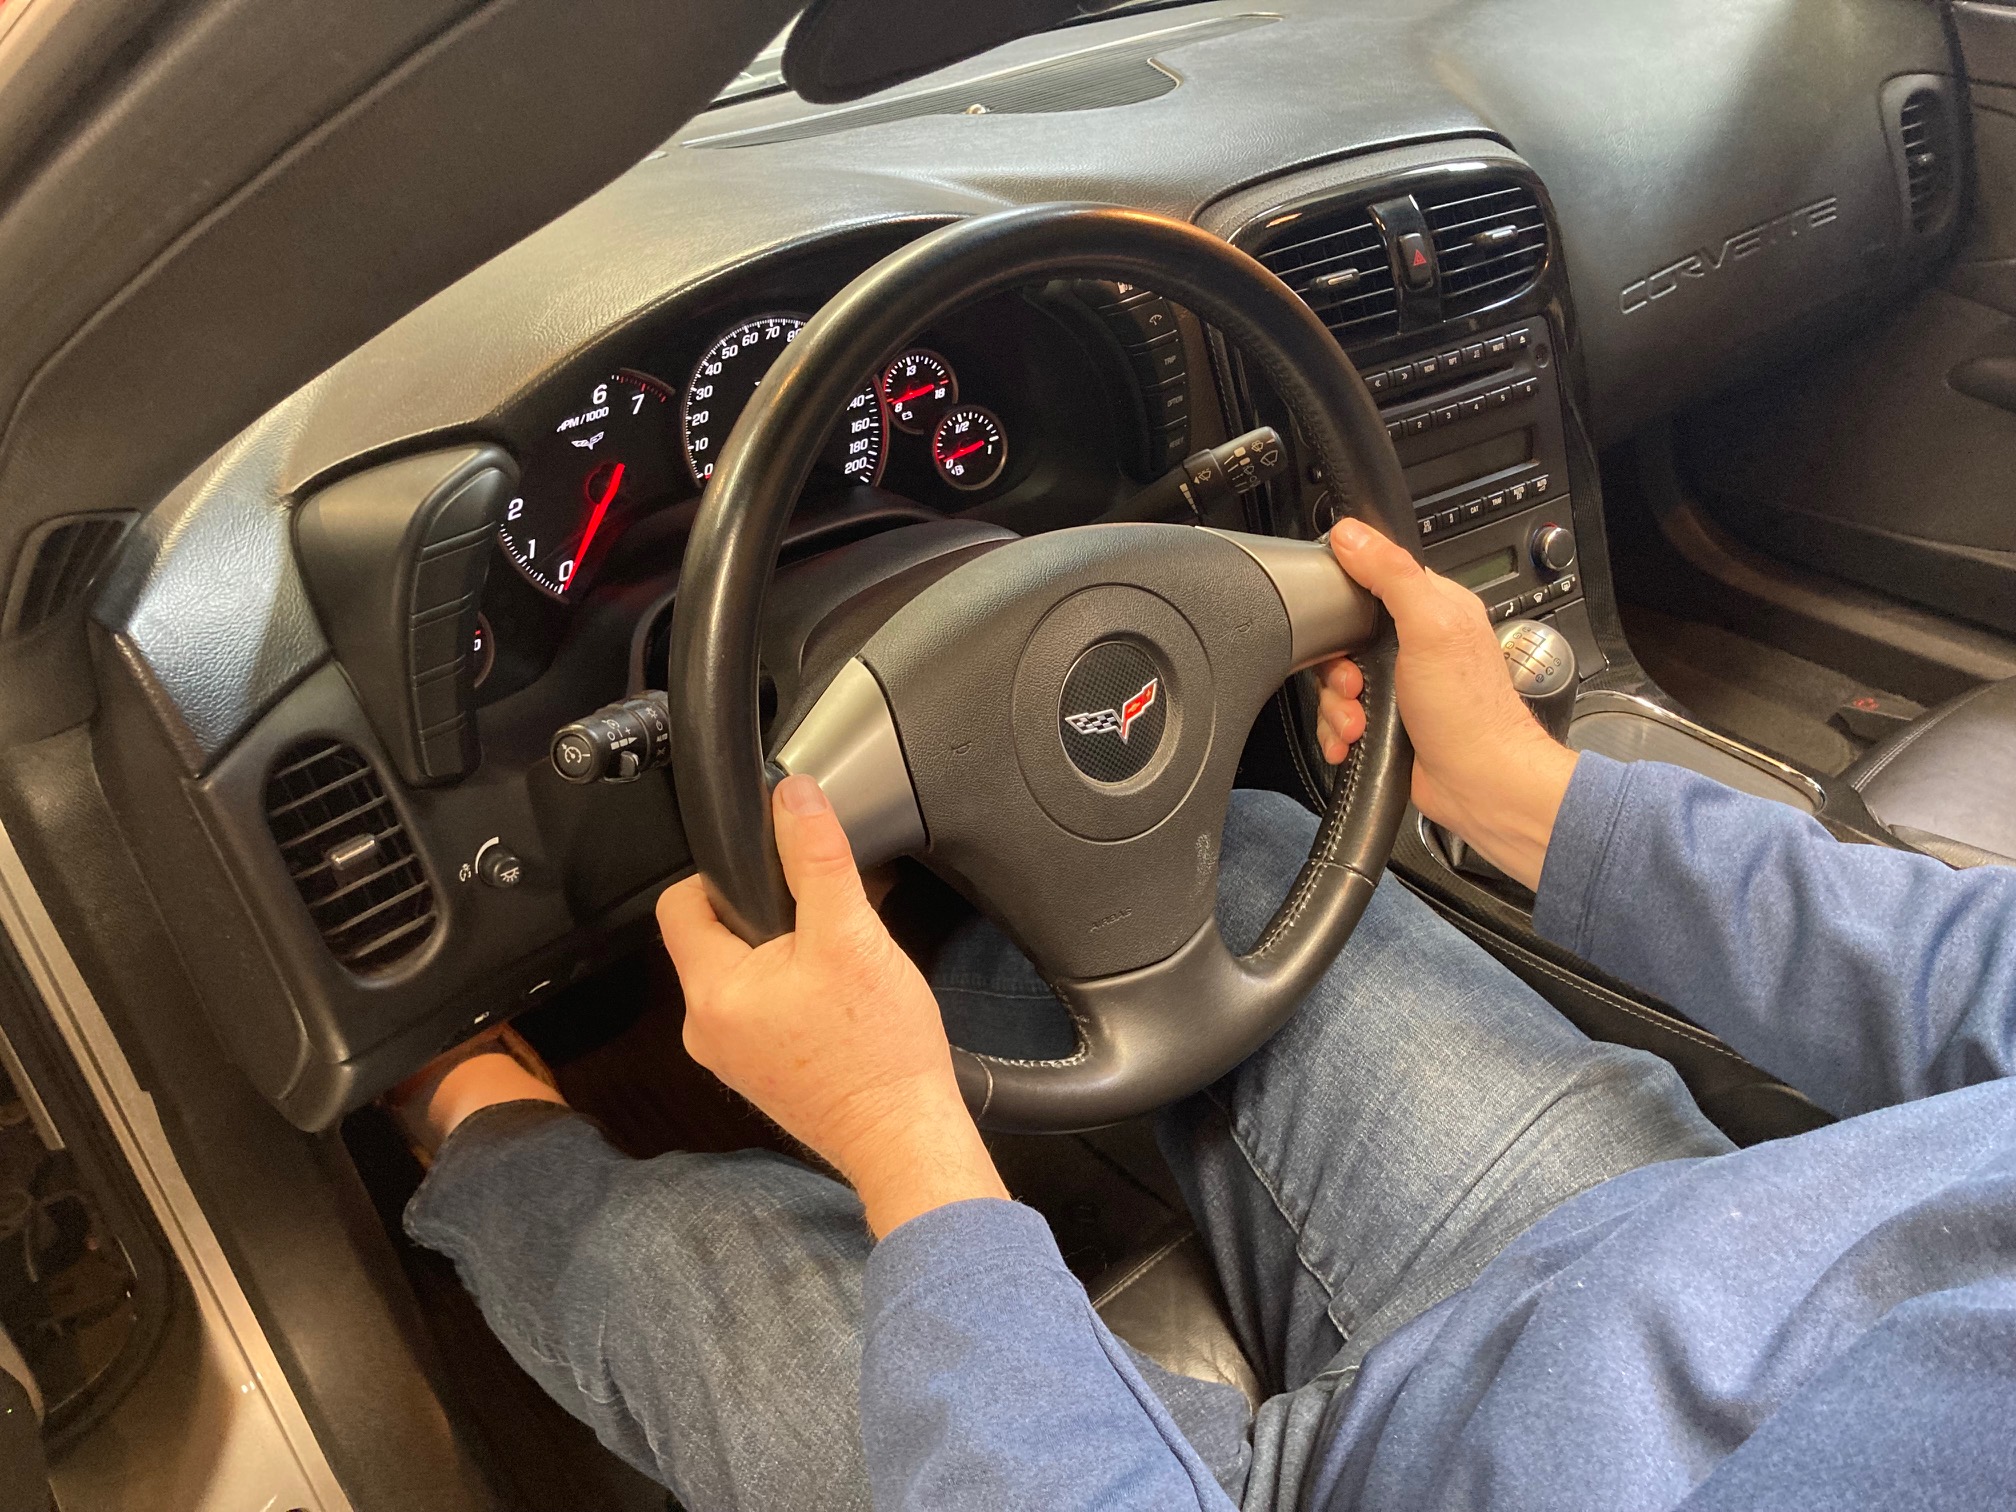
Don’t drive with only the fingertips. In the picture below notice that the fingers are wrapped, all five fingers tips are touching the wheel and the palms are making good contact the wheel. Also, I like to position the hands just below 9 and 3 o’clock to get a little more rotation before having to reposition. A lower position for the hands also promotes relaxed, in-the-socket shoulders. Sinking down the neck, shoulders and elbows is key to sensitivity and control.
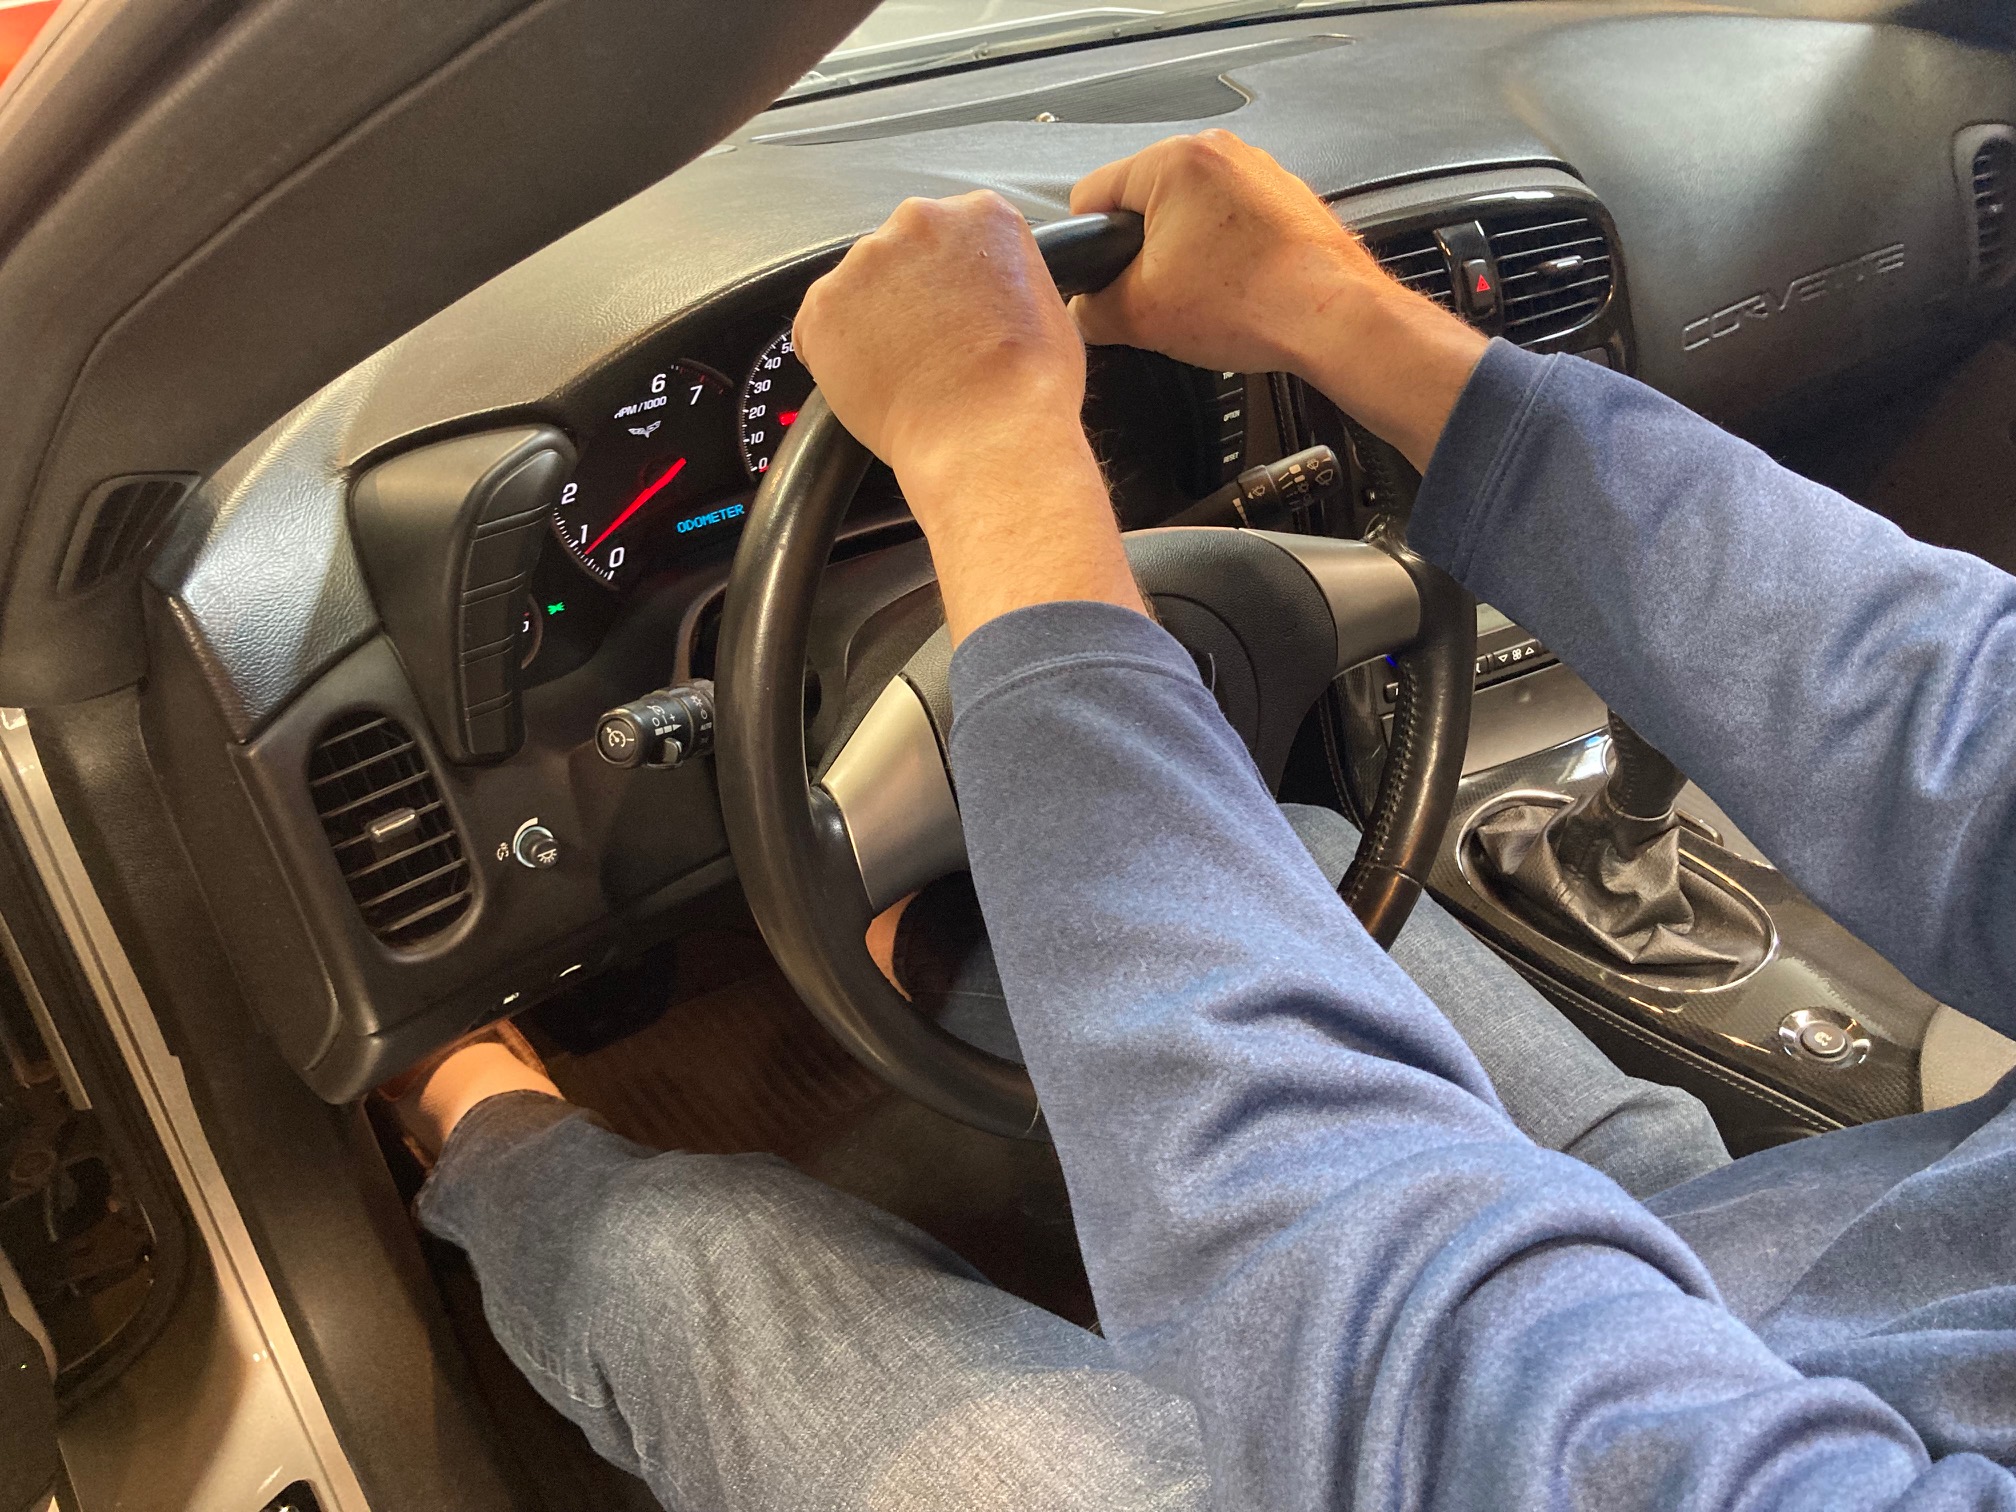
A common habit, one I sometimes still fight, is for the hands to creep up to the top of the wheel, as shown below. Don’t do it! This lifts the shoulders out of the sockets and significantly reduces control and sensitivity. Also, from here you can’t make a big turn without repositioning the hands in the middle of the turn.
Third point: Reposition the hands as little as possible.
In some cars, like the Cadillac CTS-V I started with, many repositions are required. By necessity, I got very practiced at shuffle-steering and it became a habit I had to break later. “Real” race cars generally have a steering ratio such that repositioning is never required, at least on a race track. Sports cars today are generally somewhere in between when it comes to maneuvering around an autocross course.
There are multiple steering philosophies and techniques. Read about them. Try them out. I’ll show you what I do, below.
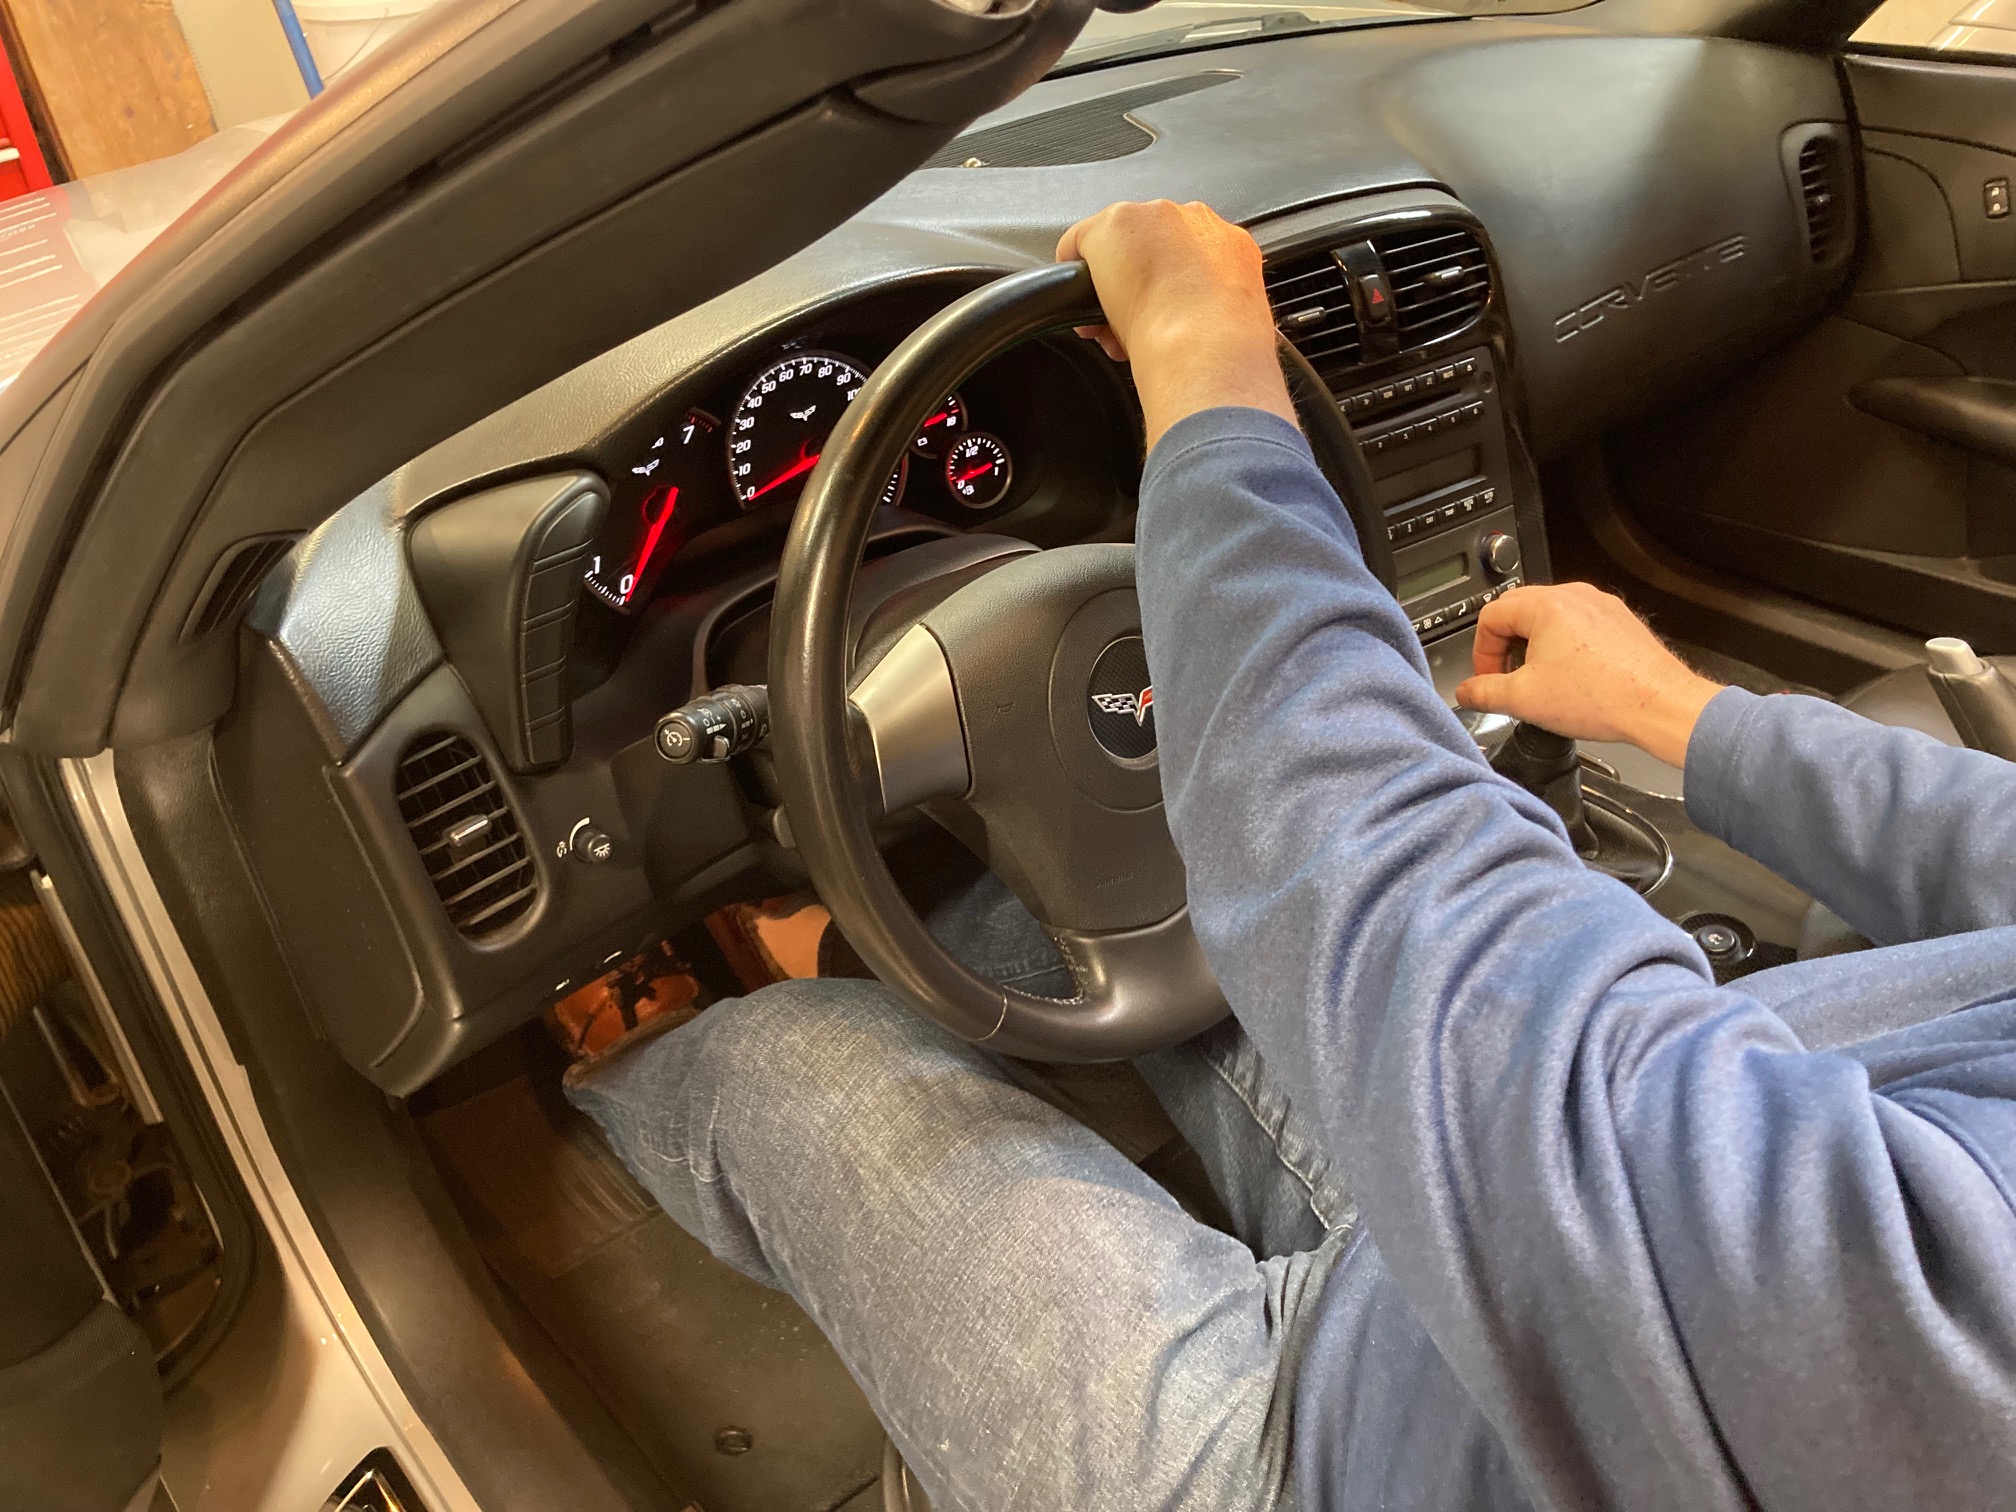
Case 1: For a significant left turn, use both hands to turn the wheel, the right pushing up from the below 3 position and the left hand pulling down and then moving across your lap, having not totally let go but allowing the wheel to slide through the Tiger’s Mouth. Note that the logo in the center of the wheel has turned more than 180 degrees from center. Both hands are still in contact with the wheel and are providing information.
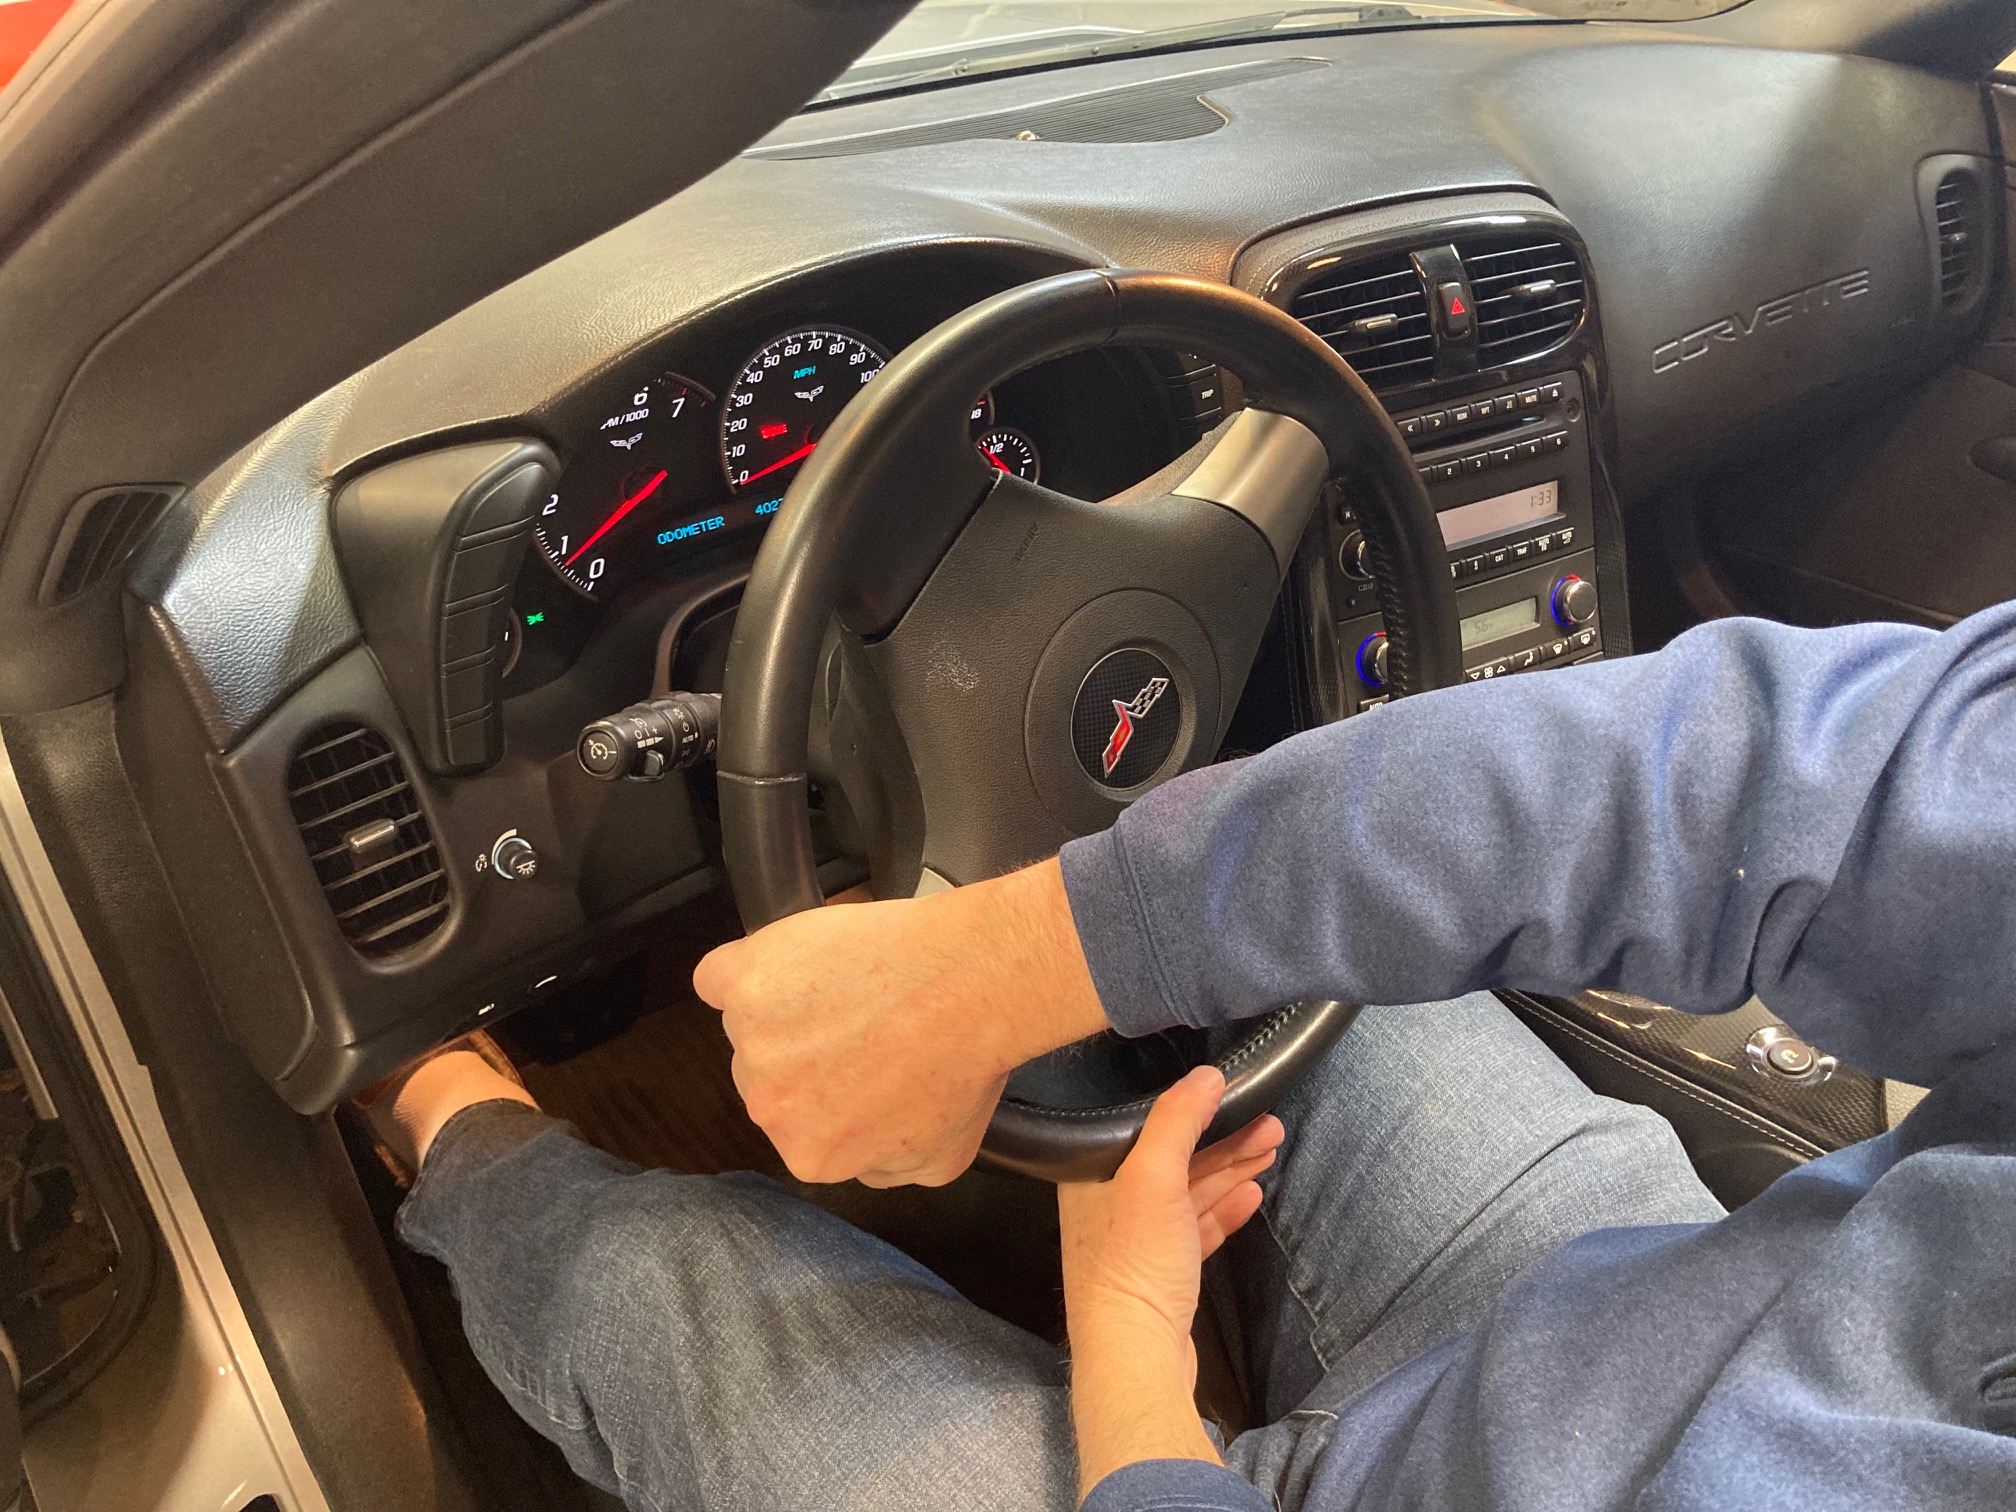
Case 2: If the turn is so tight that repositioning can’t be avoided, say in a tight left turn, I will preposition both hands as I approach the turn-in point as shown in the figure below. The left hand moves around and over the top, the right hand moves around and down. Then I’ll rotate the wheel initially with the left hand until it’s down below in the lap, while the right hand takes over and pushes the wheel over the top. The end position is the same as in the figure above, except that the wheel will have been turned 360 degrees or even a little more without shuffling the hands during the turning process. Unwind by doing these actions in reverse. A turn to the right is just the opposite, of course.
I think this one-time, preparatory reposition of both hands is better than shuffle steering. When shuffling, each shuffle only produces about 160 degrees of wheel turn, so it takes three shuffles to get a full rotation.
Learn to shift some weight to the front tires before turning
Shifting some weight to the front allows the car to turn much harder and faster because the front tires give more traction. This means you don’t have to turn as early. By shifting weight forward you also increase the transient response capability of the car.
There’s exactly one thing that shifts weight to the front: decellerating the car. This can be done by lifting or applying the brake or both. Simple, right? It’s a matter of practicing this technique in order to get the timing correct. The timing is different from car to car and setup to setup.
Two exceptions:
First, turning while accelerating. Now you have to be a little careful. Why? Because now weight has shifted backward from the front to the rear tires, so the fronts will be down on grip.
Second, short-gap slaloms. If the cone to cone distance is not large there isn’t enough time to even lift for each cone and then accelerate in the gap between the cones, so it’s better to go though at the maximum constant speed. For long-gap slaloms and almost all autocross offsets it pays to lift for each cone and add gas within each gap. If the offset is big enough you will even have time to accelerate hard and brake hard within each gap.
How short is short? How long is long? It depends upon how responsive your car is, meaning both how fast it can change direction and how fast you can change from a lift or brake to significant acceleration. This is why transient response and instant engine torque are so highly prized in autocross. This is also why there’s so much argument as to proper slalom technique. Everyone is right and everyone is wrong, depending upon the car and the gap distance between cones.
All other times you turn the steering wheel you should have already shifted some additional weight to the front. There’s no crying in baseball there’s no coasting into a turn in autocross.
Learn to add throttle in coordination with opening the steering wheel
The slowest point in a corner is called the apex. From that point you can begin opening the steering wheel.
For every little bit that the steering wheel opens the lateral forces on the tires decrease. That means that they have molecules sitting around not working as hard as they can. So, put them to work! How? Start adding throttle. How much? As much and as fast as the tires will take. (Too much too fast and generally the car will begin to oversteer if it’s rear wheel drive and do the opposite if front wheel drive.)
Do not wait until the car is going in a straight line to add power!
Learn to trail-brake
Trail-braking into a corner is simply the opposite of adding throttle on the exit. Most autocross corners should be driven like the figure below.
Unlike on a race track, the braking point will usually be very close to, or even the same as, the turn-in point because of the lower top speeds in autocross. Initially brake hard. Then, as soon as you start turning, begin trailing off the brake pedal. As lateral force increases from the tires you must reduce braking or the tires will be overburdened. Theoretically you finish braking right at the apex when the tires are at maximum lateral force and then switch to gradually adding power as you unwind the steering wheel, as discussed earlier. It’s more important to begin adding throttle right from the apex than to perfectly release the brake right at the apex.
Learning to trail-brake on a race track is difficult and can be dangerous. Autocross is the best place to learn it. Start now! When perfected you will be significantly faster. If you then go to a track it will be automatic.

Learn Basic Line Theory
Certain basics of line theory should be quickly learned.
Set up left to turn right. Set up right to turn left.
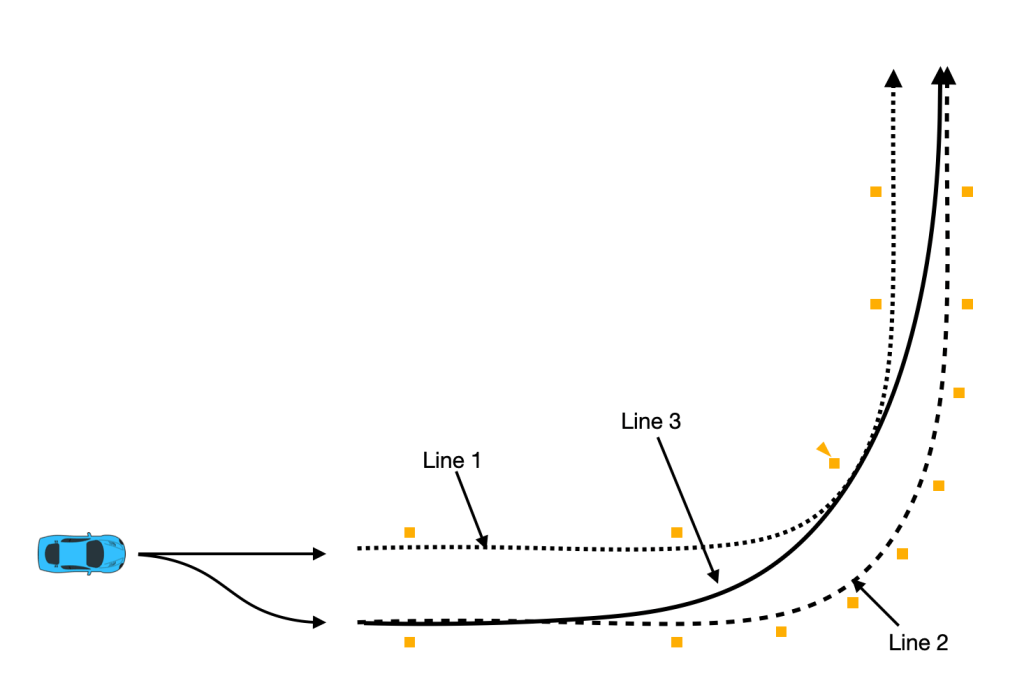
This rule is not quite as simple as it may seem. Let’s take a 90 degree left turn as shown in the figure below. Very simply, don’t take Line 1 because the minimum radius is the tightest, meaning that the minimum speed will be the slowest. This assures that the time through the corner will be longer.
Don’t take Line 2 because the minimum radius, while bigger than Line 1, is still as not as large as it could be and the path is longer.
Do take Line 3 because the minimum radius is much larger than either Line 1 or Line 2. Therefore, a) the minimum speed in the corner is much higher, and b) that means you don’t have to brake so much coming in, and c) that also means you exit the corner faster and carry that higher speed as you accelerate out of the corner. These effects far outweigh the extra distance travelled compared to line 1, including the extra distance it took to get set up to the right based upon the initial location of the car as drawn, even if there is not a long straight after this corner.
Turn Pinched Entries Into Chicanes
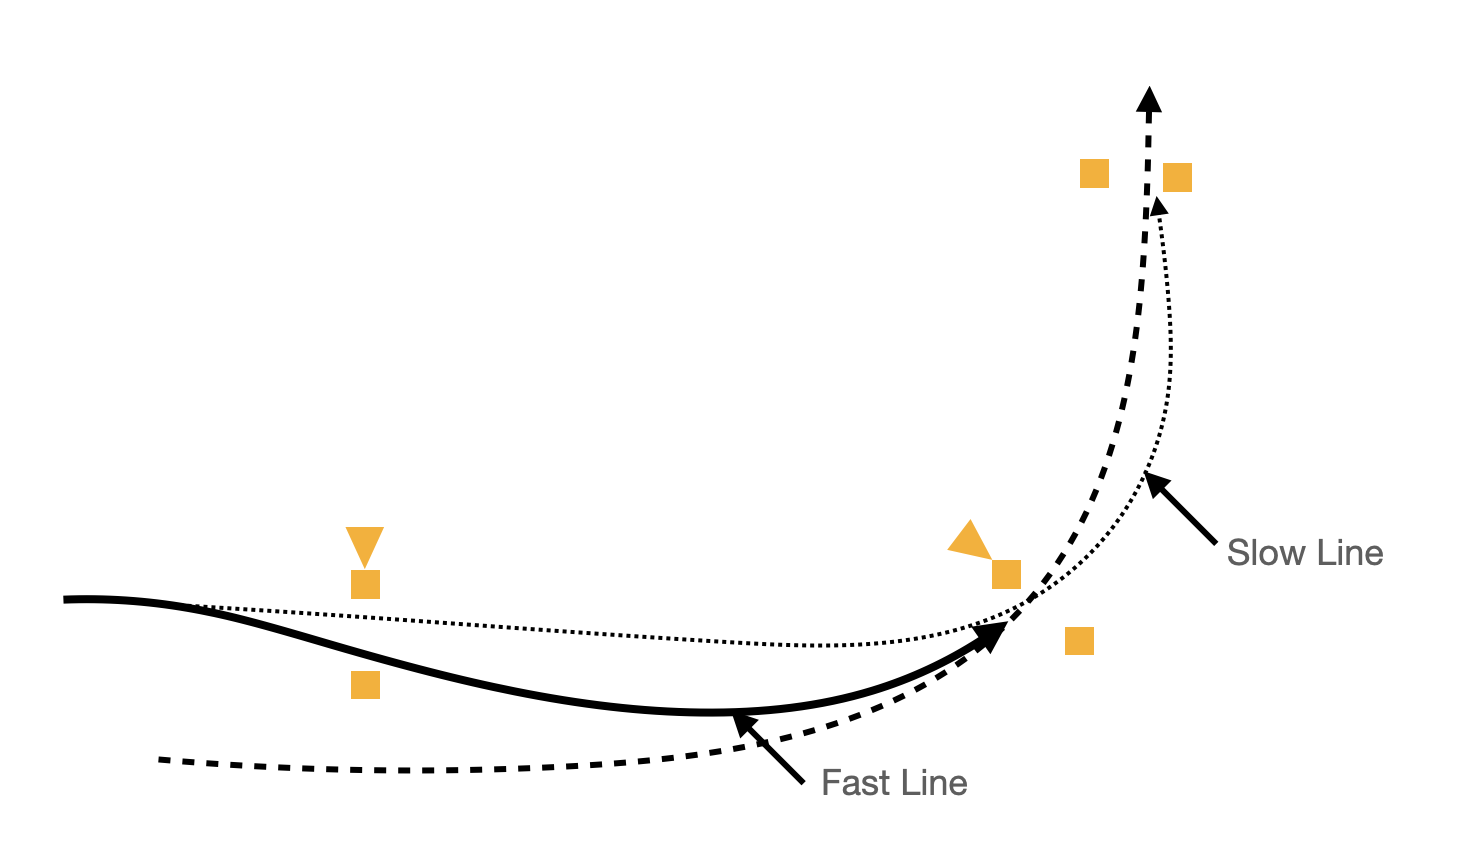
The entry to a corner is pinched when it doesn’t naturally or easily lead to the biggest possible radius through the corner. In the figure below, the best line is the dashed one, but the entry gate makes that impossible. This situation occurs often in autocross.
So, keep your speed up and turn out to get on that best line, the solid one in the figure. This maneuver is a chicane, i.e. two corners in opposite directions close together. The bold path below is the faster one even though the entry path is significantly longer.
A rookie mistake is to head almost straight for the turning cone, slam on the brakes and start a sharp turn as you go by. That’s the dotted path. Don’t do this if you don’t have to. (Sometimes you may encounter courses that give you no choice.) While the car will get to the turn cone faster you will have to slow the car considerably while approaching that point and continue slowing after that to get turned toward the exit gate. Effectively, you will have moved your actual apex (slowest point) to somewhere around the “Slow Line” arrow tip and the car will be very slow because of the tighter radius required.
To add insult to injury, the slow line means you will be starting to accelerate from a slower speed and from a later point, reducing the length of the acceleration zone. All in all the slow line will totally ruin your run time. I see lots of new autocrossers, especially those in powerful cars, do this over and over, for years. It’s very dynamic and fun, and it seems like you’re really killing it out there, and you may tell yourself that you’re making up time by using all that power, but the clock says otherwise.
Don’t Go Wide On Big Corner Entry
By big I mean a corner that turns 120 degrees or more. In the figure below it doesn’t pay to take the 90 degree wide entry for the 150 degree turn, for example. Generally, for corners more than about 120 degrees going wide on entry does not increase the minimum speed in the corner, so you don’t get the same payback as with a smaller corner.
The correct radius to take the 120 degree or 150 degree turn, assuming complete freedom as shown in the figure, is a very complex subject, is dependent upon many factors and is way beyond the bounds of this post.

How To Drive Offsets
A series of offsets looks like this:
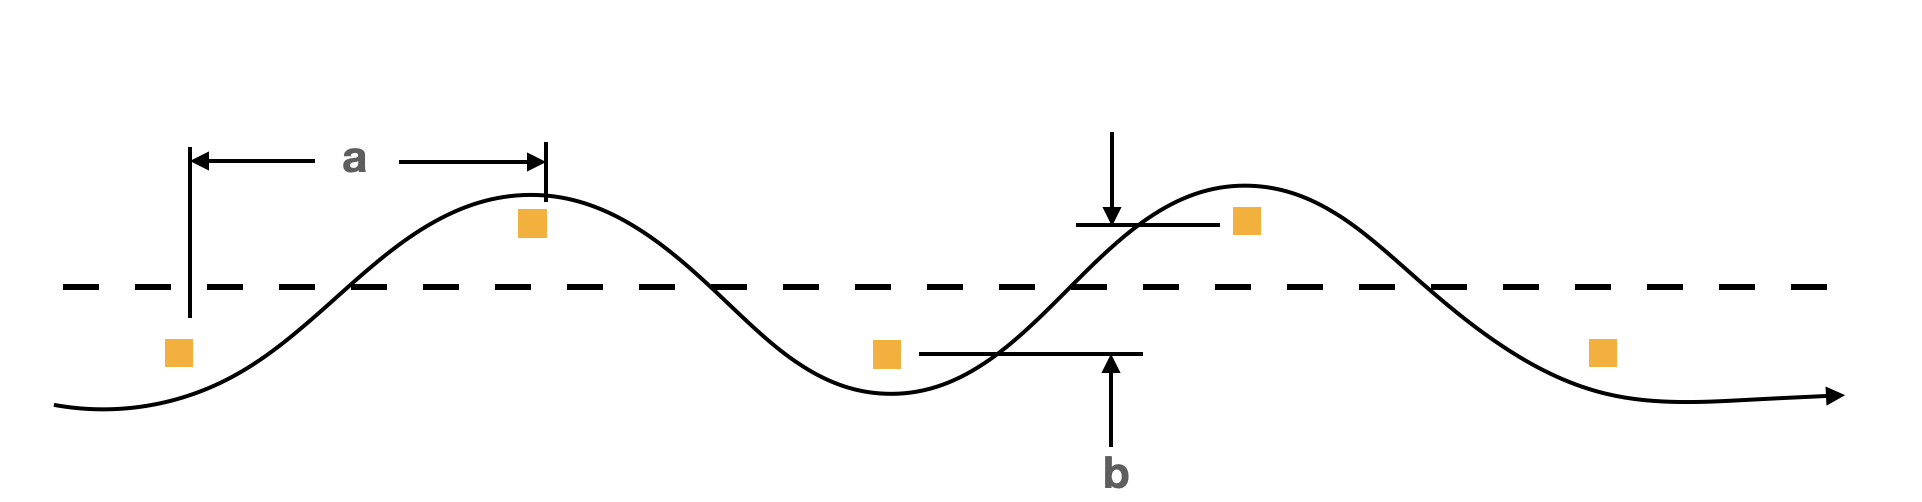
On a small lot it’s unlikely that you’ll see such a long series of offsets, but you’ll probably have one or more shorter features that are actually offsets. Make your transition (change from turning one way to turning the other way) about half way in between the cones. In addition, most offsets have enough total distance between the cones that you should be at least lifting on entry to the turn around the cone and then accelerating through the gap between cones, even though the car is always turning and never going straight.
If the car travels in a straight line in the center of the gap between cones then either 1) you are probably driving too slowly and too tight around the cones, or 2) it’s not an offset because the distance is so far between cones that they are actually separate corners.
How To Drive Slaloms
Let’s start with the simplest slalom: three cones in a row. Geometrically a slalom is an offset, like in the figure above, but with the b dimension equal to zero, or almost equal to zero.

There is much argument about how to drive slaloms, but for the basic 3-cone as shown above most would agree to enter early, meaning cross the center line before the midpoint between cones, and leave late, meaning cross the centerline after the midpoint between cones.
This produces a middle arc with the largest radius which in turn allows the fastest speed to be maintained. It almost always pays to do what’s necessary to set the car up to achieve the early cross. It does not pay to slow in the middle to achieve a tighter turn around the middle cone in order to add gas early on the exit.
At the transition point, the point where you must turn the wheel to change direction, turn the wheel as fast as possible. Take advantage of every bit of transient response the car can deliver. Anything less requires the car to be traveling slower to miss the 3rd cone.
For a slalom with more cones the exact same theory applies as shown in the figure below.
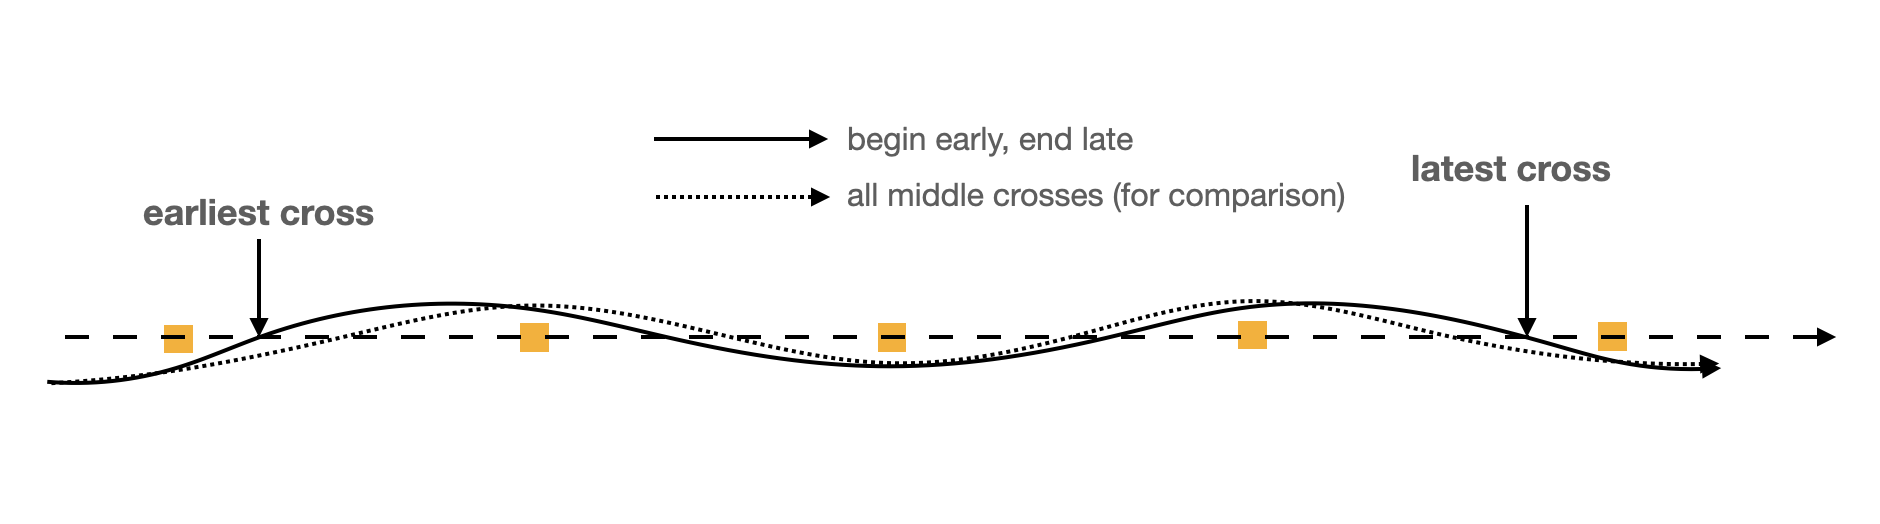
In slaloms with more than three cones start early and end late, proportioning the difference equally so that the arc radii are all as large as possible. Start accelerating as soon as possible in the last gap, but, just as in the 3-cone slalom, don’t slow around the next to last cone to produce a tighter arc in order to move the acceleration point earlier. Similarly, except for the first one, don’t backside all the cones in order to produce an earlier acceleration point in the last gap. It does not pay off unless the car has tremendous acceleration capacity combined with poor cornering power, like maybe 650hp with skinny tires on the front and drag radials out back. Maybe.
OK, that’s about it. I think most people can make a good start on all of the above points in about 20 events. Now you have lots of things to work on at a Test & Tune event this Spring.

Agree with the advantage of hand sensitivity. This can be enhanced by clapping your hands while waiting on the start line, increasing blood flow to your fingers.
LikeLike
Never thought of hand-clapping… good idea! I have a little routine I do before each run as well for priming the important neural pathways and increasing sensitivity. Maybe I’ll post about it.
LikeLike