No one was going to kiss me at the end.
On Sunday I went off at TGPR for the second time in nine years of driving that track during 14 track days in three different cars. Both times were in the Corvette and for exactly the same reason, but not at the same corner. Neither off occasioned any damage, but I’m getting tired of it. I don’t want it to ever happen again. I’m going to analyze what happened so maybe I can learn my lesson. Maybe others can learn something too.
I plan to present data analysis of the cornering technique options at this track, which will have relevance to autocross, but that will follow later. Need to get this done first.
While I consider TGPR to be a very safe track, I know of at least two cars that have gone off and been totaled. These were both PDX-group cars like me, not Time-Trial racers. In neither case was there a serious injury. In both cases, I’m told, the cars went off at very high speed, travelled a long distance from the pavement on wet grass and eventually hit something. In one case it was a drainage culvert, in the other it was a tire wall of some sort, intended to stop a car before it reaches the treed edge of the property. (It worked.)
My incidents were not so bad. In both of my offs I effectively “drove” off the corner, going straight and under control (more or less) into the grass at the edge of the pavement after not being able to make the corner due to insufficient or late braking on corner entry. The first time I was probably going 15 mph when I went off. Not so this time.
Here’s the 1.4 mile track map with the way I number the corners. I went off in corner 1.
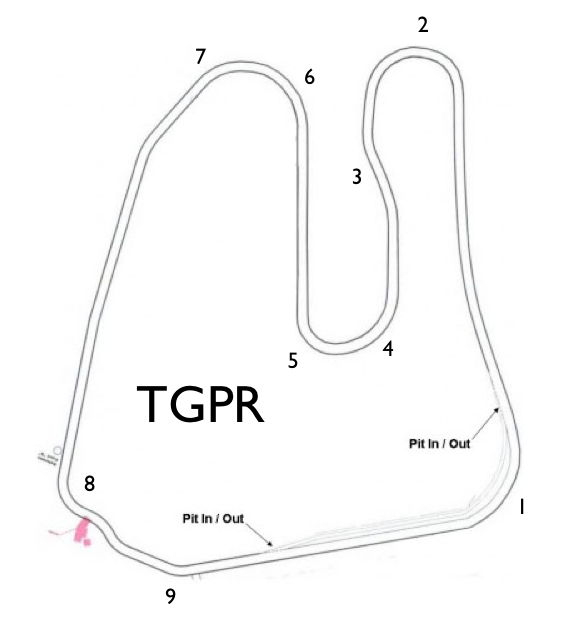
TGPR Track Map
I’d been intentionally driving the corners in slightly different ways during the previous five sessions. I’d study the data in between sessions and compare the different techniques. Each session would consist of two warm-up laps, then two or three fast laps, a lap or two at reduced pace to allow the engine oil temps and tire temps to come down, then two or three more hard laps and then a cool-down before pitting. All this was traffic permitting, of course. I’d then come in, usually before the checkered came out, and study the data.
Using this method I was incrementally reducing lap times while some of the Time-Trialers were saying the track was going away. I don’t know about that, but air temps were increasing as the afternoon went on, so engine power was decreasing in any case.
So, let me stop right here and recognize that there may be many out there who don’t think what I was doing should be happening in a PDX group. Those folks will probably stop reading, thinking, “Well, he finally just pushed it too hard, found either the car’s or his own personal (talent) limit, and went off. Serves him right. Don’t invite him back.”
While I’m not really prepared to argue this point, I will say that I have no data readouts in the car to be a distraction or goad and, in fact, I’d be in favor of ruling out any sort of in-car timer that is visible to the driver, especially the ubiquitous lap-time predictors. On the other hand, ruling out the use of data entirely would be SCCA PDX suicide. New sports cars come with GPS lap data standard, for Heaven’s sake.
I always use point-bys, I always lift when being passed, I never pass without a point-by and generally try to be as polite and safe as possible on track, especially in the vicinity of others. This day we had at most six cars on track, which gave us lots of room. If the full complement of 12 were on the track simultaneously I probably couldn’t have ever put a full fast lap together given the speed disparity from fastest to slowest. (This is an issue almost unique to the PDX/TT format where all the PDX cars run together no matter the skill or speed.)
On the particular lap when I went off my goal was to drive one fast lap using all the “standard” cornering methods as a comparison to all the “non-standard” techniques I’d been using to get faster. Well, I never got that comparison lap.
So, what happened? Afterwards when asked, I said a couple of things: “I think I braked too late and not hard enough.” and “My brake pads had been tapering more and more as the day went on and when I tried to take that corner on a fast lap I didn’t have the braking power I expected on entry.” Let’s see if the data bears out these statements.
Here is a (very poor) overlay of the off along with the trace from an earlier lap:
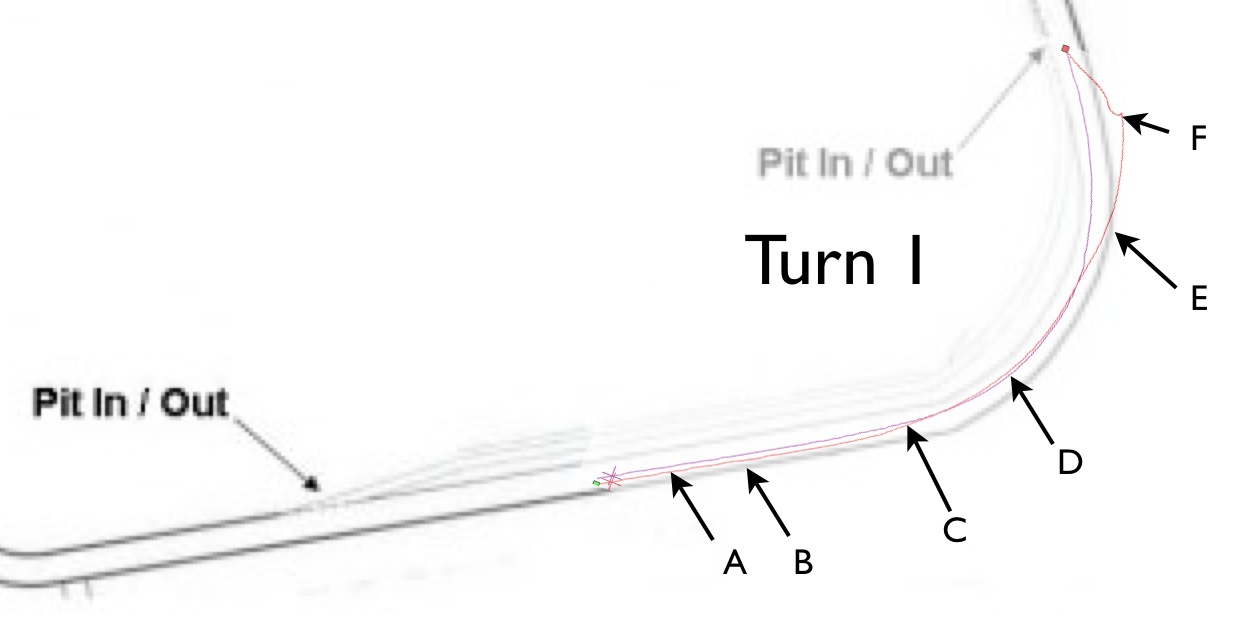
Corner 1 Off vs. Non-Off
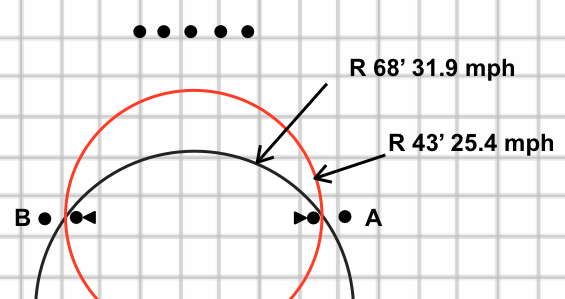
It doesn’t show up very well, but the off is in red and the non-off in purple. I think you can tell which is which in any case! The inner radius of the corner is marked by a series of cones. If you know what you’re doing you always take the corner right on the cones as there’s just a little bit of banking down there to help out. Outside of the inner one-car-width, the track is flat.
At the entry, the little green dot, I’m generally at 103 to 104 mph if I’d done the previous corner at max and used all the revs in the Pit straight. At F, above, the car velocity became zero. You can see this in the next graph, which has three parameters shown: speed at the top, lateral acceleration in the middle and longitudinal acceleration on the bottom.
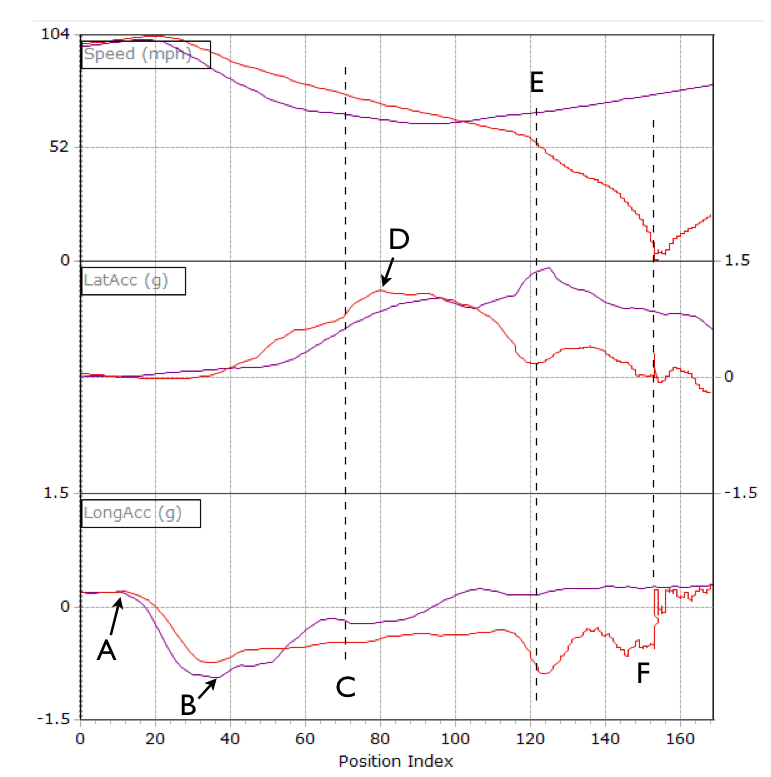
TGPR Off Graph
After the car stopped, I could see the black flag waving and that no other cars were approaching. I re-entered the track and proceeding around to Pit-In. I’m very sorry that I caused the others to lose some track time.
The first thing I notice in the graph data is that at A I starting rolling off the throttle at essentially the same spot on track on both runs. So, this proves that I didn’t actually brake late.
However, the roll-off seems a bit lazy and looking at the slopes down to B, we can see that the purple (non-off) lap is much steeper. For whatever reason I did not or was not able to slow the car nearly as fast as previously. The purple lap reaches -.93G at B, while the red lap reaches only -.73G. This may have been a careless error or maybe the tapered pads.
By the time I reached C in the top two figures the car was a full 10 mph faster than normal and I knew I couldn’t make the corner. In response, I threw the car hard left into the corner, initiating a slide and depressed the clutch. Who knows? Maybe a miracle will occur!
Upon reflection, I don’t think I’d have done that (turn even harder into the corner) when I was a novice. Most novices will sort of freeze up and just run straight off, arms locked, while pushing the brake pedal down. This is something we may need to train folks not to do, though I’m not quite sure how to teach it. Others, I’m fairly certain, will disagree.
The lateral-Gs peak at D and then descend as the car transitions into the slide. From D to almost E the longitudinal G value is almost a constant negative as the tires are scrubbing off speed and making a lot of noise for what seemed like a long time. The car has yawed a full 90 degrees left. Corner workers are looking up to see what mistake the fool has made.
Not wanting to spin and either stop in the center of the track, where I could be hit by a following car, or to go off backwards, I counter-steer into the slide. The car very slowly (it seemed to take forever) turns back to the right and straightens just before reaching the edge of the track. Lateral Gs drop and Longitudinal Gs increase at E as the tires bite the pavement just before hitting the grass. The car leaves the track surface at around 45 mph.[updated]
Once on the grass the car rotated to the left as it slid. I was just a passenger at this point, as the saying goes. You can see that the car arcs left even on the grass, but I really don’t know why. Wasn’t anything I consciously remember causing. The ground is soft and the tires are biting into the soft surface. The car is fully sliding broadside as it hits a bump at F which brings it to an abrupt halt. I was lucky that no tires de-beaded.
My conclusions:
- I definitely drove that corner too hard for the state of my brakes, spurred on by the desire to get some data.
- I drove that corner too hard, too late in the day, in the last session, when I was a little bit tired, mentally if not physically.
- I did not give due consideration to the loss of track camber if you enter too fast and can’t remain on the cones on the inner radius.
It all comes down to not leaving sufficient margin for the conditions, especially at the end of a long day. No one was gonna kiss me when I finished. No one was gonna pop any champagne. No matter what, I was going home poorer than when I arrived. I was lucky it wasn’t worse.