Deceptive Cones & Late-Apex Revisited

Many course designers will include a sucker cone. Reader DeWitt had some really good comments on an earlier post and submitted a photo of the finish of an autocross he did (last year with ETRSCCA?) that’s a perfect example.

The figure below shows the section leading to the finish. The orange dots represent the approximate position of the cones and the white line is DeWitt’s path from his data. (Remember that everything in the following figures is approximate… don’t get hung up on preciseness.) I added the black lines to show how I think of the “shape” of the course boundaries. I try not to reduce autocross courses to road-courses, but we will cover that in a minute. The inside corner cone conveniently circled in orange near the bottom is the “sucker” cone.

basic course.001

Dewitt, in my estimation, did well to ignore the “sucker” cone. Folks that took the bait drove a line more like the red one in the figure below. By doing that, some got into a problem at the end of the straight line of cones where they had to slow severely to negotiate what turned out to be a severely decreasing radius. Reader Dewitt thinks the red path was slower than the one he took and he is probably right, especially if they took too fast and direct a route along-side the straight line of four cones on the inside of the corner.

tight path.001Now, if you look at the way I drew the red line, ask yourself if the minimum radius is really that much tighter than the white line? It is tighter, but not by that much. Notice also that on the approach the red line is shorter. My guess is that the red line, properly executed, would not have been slower than the white line.

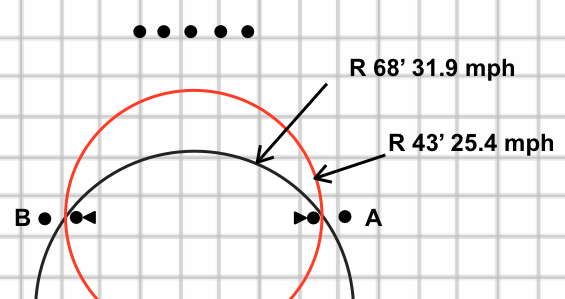
What do I think I would have done, if I had been as smart as I am sitting at this desk, all cloaked in warm hindsight? Something like the figure below, I think, which has two major differences from the white path actually taken by DeWitt.

best path.001

I would have departed from the white line at A, continuing to accelerate longer, taking a more direct and faster route to B. (This is almost, but not quite the same as the red path in the earlier figure. It also depends on there not being other limiting cones, not shown.) Before B I would have braked very hard to get down to the speed necessary to rejoin the white path from B onward. So, I think I get to B in less time and then go around at the same radius and speed thereafter.

This is actually a really good example of open vs. closed course design. Many clubs would have mandated the white path with more cones, forcing everyone to take the same path. By leaving it open, this club encouraged the competitors to think about what they wanted to do and what they thought would be the faster line.

The other difference is that I would have been tight on the cone at C, which means my arc past C is bigger and therefore faster, on my way to an accelerating finish at the same spot as the white path, but at a different angle. This assumes my car accelerates strongly. If my car is very low-power, I might take a tighter arc from C, ending right of center at the finish, cutting the distance to the finish as much as possible.

One other point: reader DeWitt characterizes the white path as a “late-apex” path. I disagreed. This is a good opportunity to explore this question.

To figure this out, I have drawn a more-or-less constant width track through the cones. I then draw in what I think would be a road-race late-apex path through the course, as shown in green.

late apex?.001

If I were doing a track day, faced with the track boundaries shown in black, and wanted to late-apex this corner, I would actually double-apex it, first making an apex at A and then another at B. Beyond A the car is still going very fast, at some point trail-braking into C. To form a very late-apex, one drives a path that goes down to C, which allows an early acceleration point and increases the length of the “straight” beyond B. Now, no one should do this because there is no significant straight beyond B, just another connected curve, so it would waste time to take the path at C. If there were a long straight beyond B, this is exactly the path to take as it will decrease lap time overall.

So, I leave it to you guys to decide whether the white path is a late-apex path or not, or whether both are late-apex, with the green path just very late, having made the apex (the closest spot to the inside of the track) beyond the last cone in the wall of four cones. I call the white path the “momentum maintenance” path. It makes an apex before the last cone of four in the wall. I think it is basically correct except for the revisions I mentioned.

Get Your Transients In Order

Most people rank three qualities in order of importance for an autocross car: 1) peak lateral grip, 2) transient response, and 3) power-to-weight ratio. Let’s talk now about transient response.

What we mean by transient response is how fast a car can change direction, that is, how quickly can turning be initiated or reversed. All forms of automobile racing value transient response, but probably none as highly as autocross. Does any other form of motor-racing regularly negotiate slaloms? The closest are probably the chicanes incorporated into road-race circuits for the purpose of slowing the cars. Here’s some data from my car in a long slalom at TAC/TVR #6 this past Sunday.

slalomsnip

The top lin dog data is speed. Notice that it is constant at about 45 mph until I accelerate at the end. (You may also notice that I start accelerating even before the peak lat-g is reached. I “steal” a little cornering to do this, but it may also mean I was under-driving this slalom.) The lower data line is lateral G’s. They alternate plus and minus at about .58 G’s with a little over 1s peak to peak. The slope of the line between the peaks is a measure of how fast the car is transitioning from left to right… how fast it takes to get from max lateral G right to max lateral G left. The steeper the slope, the faster the transition.

What we’d really like would be perfectly vertical lines separating broad plateaus of max lateral G, as shown below.

instant transient.001

How do we get closer to perfectly vertical lines? Also, if we could get to max lateral G faster, we’d get to both a higher maximum value and higher average velocity. As it was, the car did not have time to get to even 0.6 Gs lateral in the slalom before having to reverse, but the car regularly reached 1.1Gs on that lowish-grip surface on that day on longer corners. [Update: I now know that the data device I was using does not capture the lateral-G peaks in a slalom. The car was getting to more than 0.6G, but not all the way to 1.0G. EF 2020]

The first thing to remember is that if you want the car to transition quickly you must ask it. How do you do ask it? You turn the steering wheel fast! Fast hands shorten the transition from a larger radius to a smaller radius, or from turning left to turning right, by quickly establishing useful slip angles at both front tires, thus creating maximum lateral Gs as soon as possible. In theory, a slalom can be taken the fastest with alternating steady-state maximum lateral G turns with instantaneous reversals. The faster you turn the wheel, the more you mimic an instantaneous reversal.

However, the more over-steery the car, and the faster the steering ratio, the more you may have to limit your hand speed. It may also be valid to do like many top drivers: turn the wheel too fast and too far initially, intentionally causing excess rotation, then turn back to catch the oversteer, applying throttle to shift the weight to the rear and increase rear grip.

Besides fast hands, high roll stiffness is necessary to achieve a quick change of direction, which is one of the major advantages of stiff springs in autocross cars where the class rules allow it. How long it takes for the sprung mass to roll to its new attitude directly affects how fast a car can change direction. In classes where you cannot change the springs to increase roll stiffness some cars can use an extra-stiff front anti-sway bar allied with shocks valved to produce high levels of compression damping with a knee at low (1 to 2 in/s) shaft speeds and digress (blow off) at higher velocity. (The digression is necessary to keep the car from becoming unstable over sharp bumps at high speed.) The figure below is a dyno plot of my present shocks, showing average Force vs. Velocity. Notice the knee at 1 in/s in the compression data, which are the top half of the chart. (The bottom half is rebound. I have linear, not digressive behavior in rebound.)

shockdyno1

The compression damping resists and slows the compression of the outside shock, thus limiting roll and speeding up weight transfer. This produces higher transient roll stiffness than otherwise. It has no effect on the maximum roll angle reached after the car takes a set because shocks only creating damping force when the shaft is moving. In a  slalom the car may not have time to even reach the full roll angle, especially if the bump damping is high.

Rebound damping also helps turn-in by slowing the extension of the inside shock, thus again resisting roll and speeding weight transfer across the axle. However, the autocross car is limited in the usable level of rebound damping because, in excess, it hurts grip by binding up wheel motion. The effect is that the tire does not stay fully in contact with the pavement. Even on a substantially flat and smooth surface too much rebound can “pull” weight off the contact patch and reduce grip. For one thing, you are rockin’ & rollin’ out there, creating your own pitch and roll dynamics. Every pound of force a shock produces in rebound is obtained from the contact patch of that tire.

Let me repeat that, and put it in italics, because I’m not completely sure you really got it the first time and I haven’t seen it put quite this way before: All rebound forces developed by a shock absorber are achieved by reducing the load at the contact patch of that tire, which in turn reduces the grip available from that tire.

To an extent this is what we want when turning, because that pound of force also acts on the mass of the car to limit it’s upward motion at the shock for good transient response. When rebound damping is used to excessively control body motions we may regret it. For instance, when we try to turn after a ripple in the pavement we may find a momentary decrease in grip has exchanged our normally sharp turn-in for a half second of understeer.

Toe-out in the front can also speed turn-in by quickly creating slip-angle at the inside tire. This pulls the front into the corner even before any weight has shifted to the outside tire.

Long Corners

Long corners, as in an arc of more than 90 degrees, are more common in autocross than road-racing, but this is one case where the conventional wisdom is the same: approach on a tangent line, brake in a straight line to take the section at the maximum speed for the minimum radius and follow the minimum radius around the corner. Take a look at the figure below.

longcorner

The typical construction in autocross is a gate that limits entry to some extent, a series of pointed cones set into an arc, more or less circular, followed by a shortish exit that leads to another turn.

The classic way to take such a corner is shown by the solid line with straight-line braking starting at A in plenty of time to match the radius. If you misjudge the braking and go past the minimum radius you will definitely lose time. Better to let off the brake a little early than push out beyond the minimum radius. This is the way I was taught in Evo school.

What you definitely don’t want to do is shown by the dashed line. This is intended to illustrate a late-apex approach, except that instead of braking early in a straight line I’ve shown an attempt at combination turning and trail braking in the curve starting at C. Even so, the extra distance traveled and the slow speed necessary to negotiate the small radius before the exit will kill your time. There isn’t enough acceleration zone before the next feature to overcome the time lost in the late-apex corner.

Any other path that takes a larger radius than the minimum will also be slow, all else equal. See this blog post to understand why.

The dotted line is what I’ve gotten into the habit of doing and what I see some others  do. I really don’t know if it is any better than the classic technique or not. It shows an attempt at delaying braking by initially going wide, then braking and turning into a slide that scrubs speed down to meet the minimum radius. Does it save any time on entry? The more I think about it the less I like it. Even if it does work in theory, time-wasting mistakes are very easy to make. I’d love to hear any good ideas on whether there is any chance this technique saves time. It’s a very complex and difficult situation to paper analyze.

Watch This!

The most interesting autocross video I’ve ever seen is a split screen of Matthew Braun and Geoff Walker, both driving Geoff’s S2000CR in STR on day 2 of the 2014 Wilmington Championship Tour. You can find it here on youtube.

I’ve been lucky enough to meet both of these guys and I can tell you they are both great drivers and great persons. Many of you know, or know of, Matthew. He’s been a fixture on the national circuit for a long time with (I think) two jackets and many Nationals trophies. Geoff, from nearby Nashville, is a very solid up-and-comer that I’ve been chasing for years. He and Matthew drove Geoff’s car in STR last year at Nationals. Both trophied, with Matthew in 2nd and Geoff only 0.6s (over two days) back in 8th. On to the video.

I’ve seen some side-by-side comparisons, but I’ve never seen anything done quite as well as this. Matthew is on the top half of the screen, Geoff on bottom half. The action is shown at about half-speed, so you have time to take in what’s happening. (Still, I’ve watched it countless times.) At three points along the way the video stops, the car behind is allowed to catch up and the delta time and total elapsed time is displayed. Really cool.

But the driving, Holy Toledo Pro-Solo! There may have never been as good a comparison of two very different styles. Geoff is smooth as butter. The car is always in perfect position. And, believe me, he is fast! Matthew is a wild man by comparison, but utterly perfect. The first ten seconds is enough to tell the story. Go ahead and watch it. I’ll wait right here.

Each of the offset cones in the first 10 seconds of the run is the same story, and really is the story. Matthew is traveling faster, turning the wheel much faster, farther and earlier (has to be earlier because his velocity is greater) and the back end slides out approaching each cone. Then he counter-steers, catches the tail while hitting the throttle and zooms on to the next cone. Meanwhile Geoff is smooth and controlled with, near as I can tell, very little sliding going on. (I’ve seen Geoff slide that S2000CR, so I know he is sometimes more ragged, but not here. Maybe he was, for whatever reason, just being slightly safe on that run. I don’t know. I’ve been wanting to ask him but he hasn’t been racing much this year.) After 11.7 seconds on-course, Matthew is 0.265s ahead. Matthew’s total lead over Geoff on day 1 was less than 0.265 seconds.

The two drive almost exactly the same line, in the same car, on the same tires, yet by the end Matthew is over 0.8 seconds in front. The only “mistake” I see anywhere is that Geoff gets a little late in the slalom around 13 seconds into the run. Just a little bit. But, you can see it costs him some time as the slalom ends and Matthew gets on the throttle earlier.

Go watch it again!

180-Degree Turn-Arounds Revisited

In a recent post here we talked about saving time in 180 degree turn-arounds by taking the tightest possible circular path. I feel like I owe it to the reader to expand on that discussion as soon as possible because, really, it left out an important consideration.

Earlier this year I competed at the SCCA Georgia Match Tour in Moultrie. The results are here. That course had three 180-degree turn-arounds, all different, and only one of which was the situation discussed in the earlier post, i.e. with the entrance, exit and path tightly constrained. I want to talk about the first of those three turn-arounds because it was the opposite: both the entrance and the exit were wide open and the path from entry to exit was also unconstrained. That is, the driver was free to go wide on the entrance and go wide on the exit and as deep or shallow as desired. You’ll have to take my word for it that this was the case, because the ability to go wide depends not only on how the turn-around is constructed but also on the course design leading into and leading away from the turn-around. In any case, this is the kind of feature one finds on big, National-type courses.

The first turn-around at Moultrie was more like the following figure. You could take any path you wanted from the entrance to the exit, constrained only by a far-away boundary at the rear.

wide180

The red circle is the tight path discussed in the previous post. I didn’t mention it then, but that path takes 3.63 seconds from B to A if the car corners at 1G lateral. What if you enter wide and take the black circle path? That path has a radius of 68 feet. Neglecting for the moment what happens before B and after A, that path takes 2.0 seconds from B to A. Yeah, wow.

The black path is not only shorter from B to A, it’s much faster and that’s why I took it absolutely as wide as I could at Moultrie, as did most other folks.

Of course, that’s not the whole story. Going wide on the entrance costs time. I will stipulate (and you will have to give me the benefit of the doubt) that going wide on the exit did not cost any time, thanks to the higher velocity at the exit, which put the engine at a higher torque point, allowing faster acceleration beyond the exit, with plenty of time to maneuver for the next feature. In any case, let’s say going wide cost .63 seconds. It wasn’t nearly that much, but let’s assume it was. (For one thing, it means I didn’t have to brake as much because the path was going to be a faster one.) Even if it did cost .63 seconds, the wide (black) path still saves one full second over the red “tight” path.

Now we know why we go wide and shallow through almost every “corner” if we can.